
A very interesting feature of Arduino is the great avalaibility of library that make the developer work very simple and fast.
Make a Web Server, a Web Client or post a Tweet haven’t difficulty.
Try to do the same application with the Microchip’s Stack TCP/IP…. It’s not impossible but for beginner developpers is of course hard.
With the Ethernet shield or WiFi shield you can connect your application to the internet world, get information, send email, post data…
Post data? But where?
Some site host your data with graphics like the famous Pachube, I also use this service for my projects.
But in some case could be useful have the data in a spreadsheet to do operations and evaluate numbers.
In this post I want explain the best way found by RobertMParker to send data on Google Spreadsheet. Many thanks to Andrea Fainozzi that has corrected the code.
The best way to access to Google Spreadsheet is not access to Google Spreadsheet…
I didn’t find a way to access directly on the sheet, but we can pass data to our sheet using a Form.
All the results of a Form are imported in the corresponding sheet…. so … the data are on Google Spreadsheet.
The method step by step to send data from Arduino to Google Spreadsheet

For Example:
The result must be:
The application could be very different. If you have the data on Google you can draw grafics, download data on you PC, share this data with your friends…
Make a Web Server, a Web Client or post a Tweet haven’t difficulty.
Try to do the same application with the Microchip’s Stack TCP/IP…. It’s not impossible but for beginner developpers is of course hard.
With the Ethernet shield or WiFi shield you can connect your application to the internet world, get information, send email, post data…
Post data? But where?
Some site host your data with graphics like the famous Pachube, I also use this service for my projects.
But in some case could be useful have the data in a spreadsheet to do operations and evaluate numbers.
In this post I want explain the best way found by RobertMParker to send data on Google Spreadsheet. Many thanks to Andrea Fainozzi that has corrected the code.
The best way to access to Google Spreadsheet is not access to Google Spreadsheet…
I didn’t find a way to access directly on the sheet, but we can pass data to our sheet using a Form.
All the results of a Form are imported in the corresponding sheet…. so … the data are on Google Spreadsheet.
The method step by step to send data from Arduino to Google Spreadsheet
- We must create a Form from Google Documents page (you must be logged):
- Select “Create new” -> “Form” from Google Docs Menu:
- Create the form with TEXT type box. You can insert how many box you need. Give a name to the Form and to Question (the Questions names will be the columns names):
- Click “Done”. You created the Form. In the URL you can see the formkey. In my case is formkey=dDBMdUx3TmQ5Y2xvX2Z0V183UVp2U0E6MQ . Take note of this key. We will use it on the Arduino sketch.
- Normaly the TEXT box (Data 1 and Data 2 in this example) are named entry.0.single and entry.1.single …. etc. But the name can change if you modify the basic structure. So the best way is explore the HTML code to check this.
Checkout First 5 steps in following flash :
- I use Google Chrome to do this, but similar procedure is with Firefox or IE. The code show the BOX name. Take note of this name.

- In my case the name are entry.0.single for Data 1 and entry.2.single for Data 2. To send data to the Form we must use this syntax:
https://spreadsheets.google.com/formResponse?formkey=YOUR FORM KEY &ifq& YOUR ENTRY =THE VALUE TO STORE &submit=Submit
For Example:
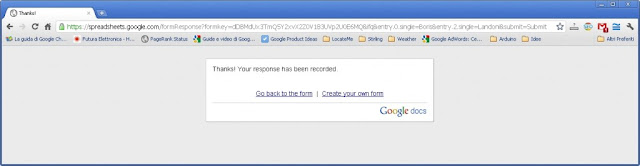
https://spreadsheets.google.com/formResponse?formkey=dDBMdUx3TmQ5Y2xvX2Z0V183UVp2U0E6MQ &ifq&entry.0.single=Boris&entry.2.single=Landoni&submit=Submit
The result must be:

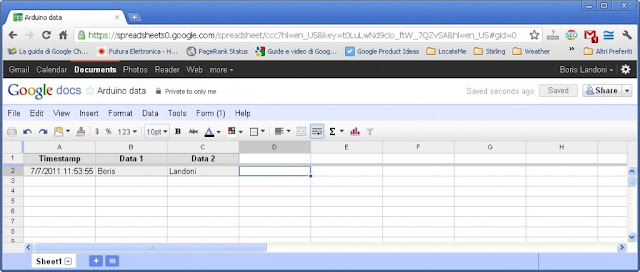
- The data are copied in the Google Spreadsheet. This is my sheet link https://spreadsheets.google.com/spreadsheet/ccc key=0As0sZjJOmuxUdDBMdUx3TmQ5Y2xvX2Z0V183UVp2U0E&hl=en_US.

- Now we must upload data with Arduino. We use the POST method to send data to the Form. And the code become very simple.
/* Arduino to Google DocsThis code publishes on the Google Spreadsheet the value of analog input A0 and A1.
created 2011
This example code is in the public domain.
http://s2ptech.blogspot.com
https://spreadsheets.google.com/formResponse?formkey=dDBMdUx3TmQ5Y2xvX2Z0V183UVp2U0E6MQ &ifq&entry.0.single=Boris&entry.2.single=Landoni&submit=Submit
Original from http://goodsite.cocolog-nifty.com/uessay/2010/07/arduinogoogle-d.html
Modified by John Missikos 11/6/11
Modified by Andrea Fainozzi 30/6/11
Modified by Boris Landoni 8/7/11
*/
#include <Ethernet.h>
#include <SPI.h>
char formkey[] = "dDBMdUx3TmQ5Y2xvX2Z0V183UVp2U0E6MQ"; //Replace with your Key
byte mac[] = { 0x90,0xA2,0xDA,0x00,0x55,0x8D}; //Replace with your Ethernet shield MAC
byte ip[] = { 192,168,0,109}; //The Arduino device IP address
byte subnet[] = { 255,255,255,0};
byte gateway[] = { 192,168,0,254};
byte server[] = { 209,85,229,101 }; // Google IP
Client client(server, 80);
void setup()
{
Serial.begin(9600);
Ethernet.begin(mac, ip , gateway , subnet);
delay(1000);
Serial.println("connecting...");
}
void loop(){
String data;
data+="";
data+="entry.0.single=";
data+=analogRead(A0);
data+="&entry.2.single=";
data+=analogRead(A1);
data+="&submit=Submit";
if (client.connect()) {
Serial.println("connected");
client.print("POST /formResponse?formkey=");
client.print(formkey);
client.println("&ifq HTTP/1.1");
client.println("Host: spreadsheets.google.com");
client.println("Content-Type: application/x-www-form-urlencoded");
client.println("Connection: close");
client.print("Content-Length: ");
client.println(data.length());
client.println();
client.print(data);
client.println();
Serial.print("POST /formResponse?formkey=");
Serial.print(formkey);
Serial.println("&ifq HTTP/1.1");
Serial.println("Host: spreadsheets.google.com");
Serial.println("Content-Type: application/x-www-form-urlencoded");
Serial.println("Connection: close");
Serial.print("Content-Length: ");
Serial.println(data.length());
Serial.println();
Serial.print(data);
Serial.println();
}
delay(1000);
if (!client.connected()) {
Serial.println();
Serial.println("disconnecting.");
client.stop();
}
delay(10000);
}
The application could be very different. If you have the data on Google you can draw grafics, download data on you PC, share this data with your friends…


