
The database that we create using Notepad will consist of comma delimited values (CDV). In other words, we will use commas to separate the data fields in the file. The downside to using a CDV Notepad database is that, although you can use Internet Explorer to browse, search, and sort the database, you can only edit the database in Notepad. Of course, this is perfect if you want to put a read-only database on your website.
A Brief Introduction to Databases
There are basically two different kinds of databases; flat and relational. Flat databases consist of a table. The rows of the table are called "records". Each record contains several "fields", or to put it another way, the columns of the table are called "fields".
Each record in a database should be unique. It doesn't make any sense to have two records that are exactly the same. To make sure each record is unique, usually one field of each record is a unique ID number. That field is called the "key".
A relational database consists of several tables. One field in a record "points to" a record in another table. For example, a field named "address" in one table would point to a record in another table that actually contains the name, street, city, zip, and country fields of the address. This is called a "relation".
The value in the "address" field might, for example, be "AKNEY INDUSTRIES". Maybe AKNEY INDUSTRIES supplies you with thousands of different parts. Rather than repeating the same name, street, city, zip, and country fields in the record for each part supplied by AKNEY INDUSTRIES, the relational database has a relation to another table containing the address.
This eliminates all the repeated data sometimes found in a flat database. For example, in a flat database, if AKNEY INDUSTRIES changed their address, you would have go through the parts database and change the address in every record of every part that comes from AKNEY INDUSTRIES. Not too cool.
The database we will create for this example will be a flat database. So the purpose of this brief introduction to databases is to advise you that if you need a relational database, this will not be the optimal implementaion.
Creating the CDV Database
To create the database, we first need to determine what fields we need in each record. Below is a list of the field names and their descriptions.
| Item | A unique ID number |
| Desc | A Description of the item |
| Cost | What you paid for the item |
| ShipP | The shipping charge you paid to receive the item |
| Sale | The sales price you received for the item |
| ShipR | The amount you received to ship the item |
| ShipC | The amount you actually paid to ship the item |
The database will consist of comma delimited values (CDV). In other words, we will use commas to separate the data fields in the file. Open Notepad (in the Accessories menu) and type in the data for your CDV database exactly as shown below.
Item,Desc,Cost,ShipP,Sale,ShipR,ShipC
10001,Action Figure,8.50,4.50,9.25,4.50,4.50
10002,Beanie Baby,12.25,2.95,15.25,3.50,3.50
10003,Baseball Card,2.95,3.75,8.50,4.00,3.50
10004,Fiesta Pot,12.50,2.95,16.00,2.95,2.50
10005,Crystal Glass,4.98,6.50,25.00,6.50,6.50
10006,Video Game,16.00,4.55,17.50,3.00,3.00
10007,License Plate,5.85,2.50,12.50,2.75,2.50
10008,Elvis Photo,25.50,3.12,34.50,3.50,3.50
10009,Pepper Shaker,3.95,2.50,8.00,2.50,2.50
10010,Tin Sign,28.95,4.60,65.00,5.00,4.50
10011,Cartoon Poster,16.25,5.40,17.25,5.40,5.40
10012,Craft Book,6.50,5.49,8.50,6.50,6.50
10013,Folk Art,34.39,3.78,45.00,3.78,3.78
10014,Military Ribbon,82.00,15.00,100.00,15.00,15.00
10015,Hip Hop Music,24.95,8.75,28.50,9.00,9.00
10016,Garden Magazine,1.00,0.64,1.50,0.64,0.64
Of course, you could simply cut and paste the above test into Notepad. Then save the file with the name ebaydb.txt.
Next, we create a webpage with text boxes to display the data from one record of the database. Open a new Notepad file and enter the following html code.
<html>
<head>
</head>
<body>
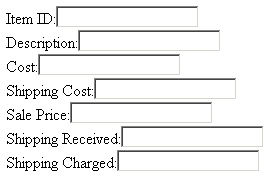
Item ID:<input id="Item" type="text"><br>
Description:<input id="Desc" type="text"><br>
Cost:<input id="Cost" type="text"><br>
Shipping Cost:<input id="ShipP" type="text"><br>
Sale Price:<input id="Sale" type="text"><br>
Shipping Received:<input id="ShipR" type="text"><br>
Shipping Charged:<input id="ShipC" type="text"><br>
</body>
</html>
Again, you could simply cut and paste the above test into Notepad. Then save the file with the name ebaydb.htm in the same folder where you saved the CDV database file.
When you open the webpage in Internet Explorer, if you see seven text boxes with labels, you have coded it correctly. You will not see entries in the text boxes because you have not yet made the webpage "data aware".
Making Webpage Elements Data Aware
To make the webpage data aware, you must place a Data Source Object (DSO) on the webpage. Internet Explorer comes with a number of DSOs, including the Tabular Data Control (TDC). To add the TDC to the webpage, type the following code just below the body tag and above the first input text box.
<object classid="clsid:333C7BC4-460F-11D0-BC04-0080C7055A83" ID="ebaydb">
<param name="DataURL" value="ebaydb.txt">
<param name="UseHeader" value="True">
</object>
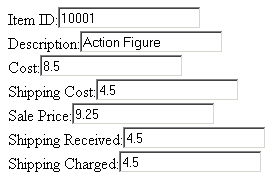
The above code will connect the "data provider" to the web page. Next, we need to add attributes to the webpage text boxes to identify them as "data consumers". Add "datasrc" and "datafld" attributes to the code for the webpage text boxes as shown below.
Item ID:<input id="Item" type="text" datasrc="#ebaydb" datafld="Item"><br>
Description:<input id="Desc" type="text" datasrc="#ebaydb" datafld="Desc"><br>
Cost:<input id="Cost" type="text" datasrc="#ebaydb" datafld="Cost"><br>
Shipping Cost:<input id="ShipP" type="text" datasrc="#ebaydb" datafld="ShipP"><br>
Sale Price:<input id="Sale" type="text" datasrc="#ebaydb" datafld="Sale"><br>
Shipping Received:<input id="ShipR" type="text" datasrc="#ebaydb" datafld="ShipR"><br>
Shipping Charged:<input id="ShipC" type="text" datasrc="#ebaydb" datafld="ShipC"><br>
Now when you open the webpage in Internet Explorer, the text boxes will be filled with entries from the first record in the database. If the text boxes are not filled, check your code for typos.
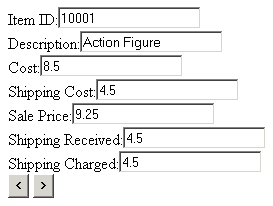
Next we will add some buttons that will let us browse through all the records of the database. In the webpage, just below the bottom text box, add the code for the buttons as shown below.
<input type="button" value=" < " onclick="Prev()">
<input type="button" value=" > " onclick="Next()">
Note that the onclick events of these buttons call the "Prev" and "Next" functions. Put the Java Script code for these two functions, as shown below, in the head section of the webpage.
<script language="JavaScript">
function Prev()
{
  ebaydb.recordset.MovePrevious();
  if(ebaydb.recordset.BOF)
  {
  ebaydb.recordset.MoveFirst();
  alert("At First Record!");
  }
}

function Next()
{
  ebaydb.recordset.MoveNext();
  if(ebaydb.recordset.EOF)
  {
    ebaydb.recordset.MoveLast();
    alert("At Last Record!");
  }
}
</script>
Now when you open the webpage in Internet Explorer, you should be able to use the "Prev" and "Next" buttons to step through all the records in the database.
The Repetition Agent
So far we have been binding the database fields to textboxes, which are single value consumers. We can also bind the database fields to an html table element, which is a tabular data consumer. This can be accomplished because Tabular Data Control (TDC) contains a funtion called the "Repetition Agent" that maintains synchronization between the Data Source Object (DSO) and the data consumers.
To demonstrate the operation of the repetition agent, open a new file in Notepad and type in the code shown below. Save the new webapge with the name ebaydb_table.htm in the same folder where you saved the CDV database file.
<html>
<head>
</head>
<body>
<object classid="clsid:333C7BC4-460F-11D0-BC04-0080C7055A83" ID="ebaydb">
<param name="DataURL" value="ebaydb.txt">
<param name="UseHeader" value="True">
</object>

<table datasrc="#ebaydb">
<tr>
<td><span datafld="Item"></span></td>
</tr>
</table>

</body>
</html>
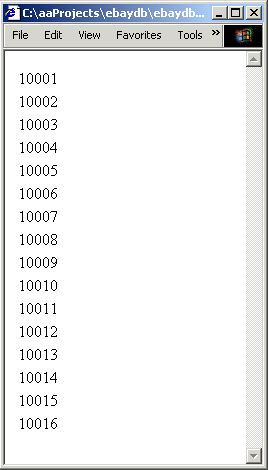
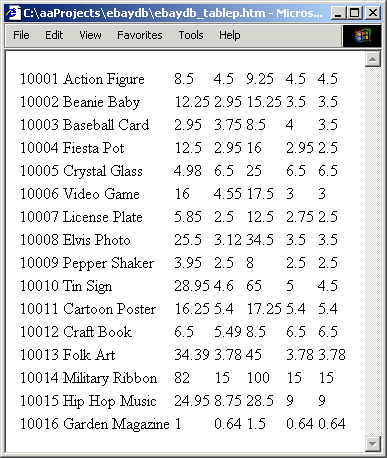
Open ebaydb_table.htm in Internet Explorer and it will display a single column listing the Item numbers from all the records in the database. The repetition agent uses the table row element as a template and repeats that template for every row supplied by the data source object. You can view this better by completeing the table row with the rest of the fields from the database, as shown below.
<table datasrc="#ebaydb">
<tr>
<td><span datafld="Item"></span></td>
<td><span datafld="Desc"></span></td>
<td><span datafld="Cost"></span></td>
<td><span datafld="ShipP"></span></td>
<td><span datafld="Sale"></span></td>
<td><span datafld="ShipR"></span></td>
<td><span datafld="ShipC"></span></td>
</tr>
</table>
The webpage now displays the entire database as a table. This database has only 16 records. What happens when we use the repetition agent to display a database containing thousands of records? Obviously we need some way to limit the number of records displayed. One way to do that would be to use the "dataPageSize" attribute of the table tag as shown below.<table id="tblElements" datasrc="#ebaydb" dataPageSize=4>After setting the "dataPageSize" to 4, we can use code to add some buttons that will let us browse through all the database, except this time it will display 4 records at a time. The complete code for ebaydb_table.htm is shown below.<html>
<head>
<script language="JavaScript">
function Prev()
{
tblElements.previousPage();
}
function Next()
{
tblElements.nextPage();
}
</script>
</head>
<body>
<object classid="clsid:333C7BC4-460F-11D0-BC04-0080C7055A83" id="ebaydb">
<param name="DataURL" value="ebaydb.txt">
<param name="UseHeader" value="True">
</object>
<table id="tblElements" datasrc="#ebaydb" dataPageSize=4>
<tr>
<td><span datafld="Item"></span></td>
<td><span datafld="Desc"></span></td>
<td><span datafld="Cost"></span></td>
<td><span datafld="ShipP"></span></td>
<td><span datafld="Sale"></span></td>
<td><span datafld="ShipR"></span></td>
<td><span datafld="ShipC"></span></td>
</tr>
</table>
<input type="button" value=" < " onclick="Prev()">
<input type="button" value=" > " onclick="Next()">
</body>
</html>


Hey keep posting such good and meaningful articles.
ReplyDeleteNice article, I like the author of this, not all articles are tjis good and accurate
ReplyDeleteHello everyone I want to introduce you guys to a group a private investigators who can help you with information you need in any situation in life and they are ready to follow you step by step until your case is cleared just contact +17078685071 and you will happily ever after
ReplyDeletePremiumhackservices@gmail.com
Great and I have a dandy proposal: How Much House Renovation Cost Philippines house renovation application
ReplyDelete