If you look at the bottom of the posts in many blogs you will see they finish with a signature.I think the signature looks great and adds a bit of style to the posts.These signatures are very easy to create and add to your blog and in this post i will show you how.You can actually use a small pad to write you signature or pick from one of hundreds of pre-made signatures.I suggest using the pre-made signature, using the pad to create your actual signature is almost imposable.

Create the signature
Im going to create another signature and walk you trough the steps as i do.
Step 1. Go to My Live Signature and click 'Start Now' you don't need to register.
Step 2. You have 2 free options here, choose to use the wizard as i did or be brave and try to write one.
Write in your name as i did below :

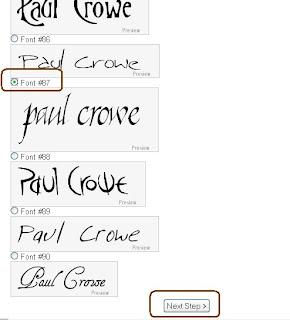
Choose the font you want to use from the hundreds they have and click next as below :

Follow the steps to design the signature :
-You now choose the size i choose size 3.
-Select the color, i choose a transparent background.
-Choose the angle slant, I choose 2.
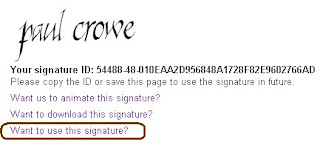
Now your signature is ready, click on 'Want to use this signature?' as below :

Now choose 'Generate html code' you will be provided with the code :
This is the code for my new signature :
<a href="http://www.mylivesignature.com" target="_blank"><img src="http://signatures.mylivesignature.com/54488/48/010EAA2D956848A1728F82E9602766AD.png" style="border: 0 !important; background: transparent;"/></a>
And this is the new signature :
If you know how to upload the image to Blogger or Photobucket or any image hosting you may want to do that, if not don't worry we will use it as it is.
We only want the image and we don't want the image to be a link back to My live signature so you can remove the code in blue and keep the code in red :
(If your not sure how just change www.mylivesignature.com to the address of your blog)
<a href="http://www.mylivesignature.com" target="_blank"><img src="http://signatures.mylivesignature.com/54488/48/010EAA2D956848A1728F82E9602766AD.png" style="border: 0 !important; background: transparent;"/></a>Add the signature to your blog
There are two ways to add the signature to your blog the first way is the easiest but it wont be in you previous posts.
The second way adds it directly to your template.
First way to add the signature to your blog.
.
1. Click 'Settings' in your dashboard and then choose 'Formatting' in the top menu as below:

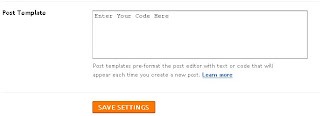
2.Scroll down to 'Post Template' and paste in the code and save:

Now everytime you you go to write a post the signature will be already in the post.
Second way to add the signature to your blog.
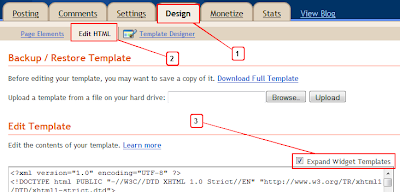
In your dashboard Click 'Design' > 'Edit Html' and cick the 'Expand Widgets Box' :

Find the following code in your blogs html :
(Click 'CTRL and F' for a search bar to find the code)
<data:post.body/>
Paste the code for your signature Directly Below or After <data:post.body/>
Note : If <data:post.body/> is in your template twice place it after the second one.
If you have any trouble or need more help leave a comment below.Now save your template and your signature has been added.


Great job ! You have described each and every step to this process. A first time user can easily follow this article to create signature. Thank you for sharing.
ReplyDeleteelectronic signature
Basharat
ReplyDelete