Showing posts with label window tips. Show all posts

Use Windows 8 as a Wi-Fi Hotspot

Creating Wi-Fi HotSpot in Windows 8 – Share Laptop Internet Connection

In windows seven there was an option to create the Wi-Fi hotspot but it’s not the case with the Windows 8. In Windows 8 you will need cmd to create a hotspot.

Requirement:

    A Working Internet Connection (Either Dial Up Connection or Else Lan Internet Connection)
    A Built In or External Wifi adapter which supports the sharing ability for internet connection
    A laptop.

Step:


  • Open up CMD in the administrator mode.
  • Write the following command and look for the thing mentioned in the screen shot that whether it’s written yes or no. It it’s yes then you can go on “It means that you can enable the hotspot and can share your internet connection.”

         Command to Check Sharing Compatibility of wifi network for windows 8:

          netsh wlan show drivers


Creating The Wi-Fi Hotspot:

Don’t close the cmd as you are going to use cmd again. Following is the command line to create the hotspot, set the password and name it as you want too.

    netsh wlan set hostednetwork mode=allow ssid=nameOfwifiHotspot key=yourpassword

The above is the command to create the hotspot. Replace “nameOfwifiHotspot” with the desired network name and replace “yourpassword” with the desired password which will be used by the others to connect to the hotspot.

  • Press the enter and hotspot will be created.
  • Starting the Wi-Fi Created Hotspot in Windows 8:

Now you need to start the hotspot, again you are going to need the cmd and the cmd must run in the administrator mode. Write the following command in the cmd to start the above created hotspot.

    netsh wlan start hostednetwork


Press enter and the hotspot will be created and will be discoverable by the other devices as well.
Sharing the working internet connection with the windows 8 Wi-Fi hotspot:

All Right, everything has been done and now you only need to give your laptop’s internet connection’s access to the created hotspot, so that any user connected to the hotspot will have the internet access also. For this reason you will need to open the windows networking and sharing center.


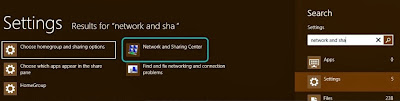
Windows 8 searching the network and sharing center

Open up the network and sharing center, and then go to “Change adapter settings” on the top left pane. Click that to open. Here you will see your created hotspot connection plus the connection which you want to be shared with the hotspot for the internet sharing. The created hotspot connection has the star with the name. You need to open the properties of the connection which you want to be shared with the hotspot.


Right click and open the properties of the connection which has the internet access and is the original internet connection of the laptop, whether it’s a dialup, local area network or anything like that. Go to the sharing tab in the properties and then tick the “Allow other network users to connect through this pc internet connection” and in the drop down below, select the hotspot connection which is “Local Area connection *21” in my case and then hit ok. Re-dial the connection or else reconnect the internet connection if needed.


That was it and you are done, the password to connect with the hotspot is the same which you used while setting up hotspot in the cmd. If you can’t still share the internet then reason are that firewall or an antivirus is causing the problem, try disabling the firewall if you trust the person with whom you are sharing the hotspot or else try adding an exception int he firewall or antivirus.
Read More

Test Your Antivirus


Test your Antivirus. Is it working properly or not.You can also make your own antivirus.
You have installed an Antivirus on your computer. Now what do you think, your computer is safe from viruses.You may or may not be wrong.
One thing you can do. You can test your antivirus.
You have to follow only few steps.

test your antivirus

Steps to create your own virus :
  • Paste the below text in a text file.

X5O!P%@AP[4\ PZX54(P^) 7CC)7}$EICAR- STANDARD- ANTIVIRUS- TEST-FILE! $H+H*

  • Save the file as myvirus.exe in desktop.
  • Within few seconds, your Antivirus will identify this file and take actions(delete/quarantine) on it.
  • If it is done, then you can conclude that your antivirus is Alive.
  • If your antivirus software does not find this file then it is time to change/update your antivirus.

The file created above is called as EICAR Standard Anti-Virus Test File which was developed by European Institute for Computer Antivirus Research.

Read More

How to Abort The Shutdown Operation in Windows

Step1. Press the right button of the mouse on the clean area of the desktop and then choose “shortcut” under “New”
Step 2: Write “shutdown -a” under “type the location of the item” and click next.

Step3: Now give the shortcut name of your choice and click on finish.

Step 4: With this the abort operation icon is ready. Now whenever, you click on the shutdown or restart button, then immediately press this icon and the operation is aborted.

Shutdown Operation in Windows image1

Shutdown Operation in Windows image2
Read More

Windows Phone Tips And Tricks For 2012

Windows Phone 7.5 is out and users who owned Window Phone will feel glad to hear that this article is for those who love to explore Windows Phone Tips + Tricks over Internet.
We all know that 2012 is On and users are exploring something new this year for their Window Phone.But i will not discuss customization section like wallpaper and Theme for Window phone .Today i made mind to write an article on Windows Phone Tips + Tricks of 2012.So i gather some of Best Tips And Tricks For Window Phone .


Try out these Tips and Tricks to make your Windows Phone the most productive and most connected

1.Apps + Games Windows Phone Tips And Tricks

See Your Apps.

By using this application you can view your app purchase history and reinstall apps from the web—use your Windows Live ID to sign in to the My Phone section of windowsphone.com.

Mighty Multitasking

Mighty Multitasking this help you to Keep your place in a game while checking email? All you have to do is
Just press and hold the Back button to see your recent apps, and tap one to go to it.


Play with a pal

Some games have online multiplayer options. And users who love to play games with their friends can Tap a game, then check the main menu to see if you can invite a friend.if you get option then enjoy.

2.Internet Explorer Windows Phone Tips And Tricks

Browse Faster

If you love to browse faster then simply add a site to your favorites list in Internet Explorer Mobile to get back to it in a flash.Tap on More and then Add favorite

Share a page

By using this trick you can share your webpage with your friends just by using internet Explorer.All you have to do is tap on more and then choose the sharing mode.

Pin sites to Start

Pin site is another cool thing which you can use to get instant excess to your favorite website.Just Tap on

More and then Pin to Start.

3.Calendar Windows Phone Tips And Tricks

To-do Tweak

Add anything to  To-do list of your calendar and give it a due date.And it will shown to you on agenda and days.And if you want to make more secure then add a reminder.

Flick through reminders

Sometimes we got more then two or three reminder a time at that time this came to action all you have to do is.flick left or right to read, snooze, or dismiss them one-by-one.

Running late?

If you feel that you are getting late an you don’t have much time to tell you friends that you are late then simply tap Late to send a quick email.

Quick-add appointments.

To add a quick appointment to your calendar, flick to Day view, tap a time slot, type a subject, and tap Save. You can add details later

4.People + Contacts Windows Phone Tips And Tricks

Pin Groups to Start

Pin a contact Group to Start, then watch its Live Tile light up with info from other Group members.You can do this by Tap on Group name, then tap More and then Pin.

Reply on the fly

By using this you can simply tap one to call back or write a reply.All you have to do is visit contact card then history .

Jump to a contact.

On your contact list, tap a letter to see the whole alphabet—then tap any letter to leap to that section of your list.

Filter Contacts

By using this you can filter your contact and you will get those users in search which you want.

Filter social feeds.

Buried in social updates? Filter them on the fly: on the What’s new panel in your People Hub, tap All
accounts, and then tap the account you want to see.

5.Email Windows Phone Tips And Tricks

Clear inbox clutter

By using this feature you can bulk delete—messages in the same thread.All you have to do is group your

Email by Conversation.

Streamline inboxes

This one is really cool you can merge your different emails accounts  to get message under same hood but
your account will be separate.

Bulk trash

Bulk trash is cool feature which every users love to have in their gadget.By using this you can Bulk trash your multiple mail.

6.Keyboard Windows Phone Tips And Tricks

.org, .net, .edu
Tap and hold the .com key and you will get other common extensions to add to an email address.

Pop-up punctuation

Tap and hold the period key to see a pop-up menu with other common punctuation marks.

Spelling help

This is cool feature which is needed by ever users in its keyboard section.All you have to do is tap on misspelled word to see suggestions from the built-in dictionary.

7.Messaging Windows Phone Tips And Tricks

Tap, shoot, text

Whenever you got something interesting   then simply start a new text message, then tap Attach  Camera to snap and attach the evidence.

Thread it

Use Threads to switch between text and Facebook or Messenger chat.

Text with your voice

By using this you can simple dictate you whole message with keeping your eyes and hands away from you

Window Mobile.

8.Music and Videos Windows Phone Tips And Tricks

Automatic grooves

Under this smart Dj automatically create playlist of your taste.All you have to do is just tap on tap and hold an artist, song, or album, and then tap Play Smart DJ mix.

Flick through songs

Using this you can move between your songs and album just by swype left to right.

Subscribe to podcasts.

You can subscribe to podcasts right from your phone. Go to the Marketplace Hub and tap Podcasts to get started.

Rock out, randomly

This feature is for your music player to listen Mp3 and videos randomly from your collection.

9.Office Mobile Windows Phone Tips And Tricks

Get it done

Use OneNote Mobile to make shopping or to-do lists, then check off your chores one by one. You can
even sync and share them.

One tap to a new note

In OneNote Mobile, tap More Pin new to Start. A New note tile will appear on Start—tap it whenever you want to create a new note.

Dictate notes

No time to type? Record an audio note instead.

Pin a doc location to Start

Pin SkyDrive, SharePoint, or another doc location to Start for fast access. In the Office Hub, tap and hold a location, then tap Pin to Start.

Get the overview

Use Outline view in Excel to see and jump to key content in a workbook—sheets, charts, tables, and comments. Open a workbook, then tap Outline.

10.Phone Windows Phone Tips And Tricks

Find your phone

If you lost your phone you can get your phone just by visiting My Phone section of windowsphone.com from any internet connected mobile to ring, lock, erase, or show your phone on a map.

Lock your SIM

You can lock your Sim just by putting pin to protect it from unrecognized users.

Speed dial

If you want to call someone back just tap on call next to an entry in call history.

Speech over the lock

If you phone is locked still you can call or text someone all you have to do is. Go to Settings > Speech, and then tap the Use Speech when the phone is locked.

11.Pictures And Camera Windows Phone Tips And Tricks

Custom focus

By using this you can type any where in camera view finder to focus.
Shhhhh

Use this to took snapshot silently just by muting the shutter.Now you can took snapshot even in library.

Pics in the cloud

You can automatically upload a low-res version of every picture you take to SkyDrive.

Snap and view pics over the lock

Press and hold the camera button to launch your camera when your phone is locked. When you’re done, you can flick to view the pictures you just took without unlocking your phone.

Fix your pics

Using this feature you can auto fix your picture to make it more cool.

Tag some faves

Choose some favorites in your picture albums, then set them to rotate through the Pictures Hub background and the animated Pictures Tile on Start.

Photo flick

In Pictures, pinch a photo until it’s as small as it can get, then flick left or right to browse your album in filmstrip view.

12.Search + Maps Camera Windows Phone Tips And Tricks

Tap to map

By using this you can type street address to see that in your Maps.

Mall maps

Mall orienteering made easy! Zoom in on the mall in Maps (or go to its Place card) to see if it’s got an indoor map.

Tap a pin

Tap a pin in Maps to see things like what’s nearby and customer reviews for a restaurant or store.
So what are you waiting for guys just enjoy and don’t forget to share with NerdsMagazine

Read More

Save your Data from Keyloggers

Welcome to My Bank’s Internet banking.
Enter your userid and password.
Userid: xxxxxxxxx
Password: xxxxxxx
Action = submit.jsp

and you have logged into banking application.
Now Just Go inside following location:
Location:
C:\WINDOWS\system32\config.dll

You will get:
File contents:
08-Aug-08: 08:00: Window title: Welcome to My Bank's internet banking
Userid: xxxxxxxx Password: xxxxxxx

What's wrong:
When you browsed to banking page and typed in your userid and password to signin into the bank, A hidden malicious program was working to log your keystrokes, and browser interceptions, named keylogger, keystroke recorder running in the background logging all the keystrokes into a config.dll file located in C:\WINDOWS\system32 folder. This file contains all the keystrokes typed in. It contains the window title and all those things typed into that window along with few other details. This file will go to attacker's ftp site or in attacker email id.
These keyloggers are easily and freely available on internet . And many of these are undetectable for a normal computer user. So your chance of being infected by such a malicious code even if you have an updated antivirus/anti-Spyware program is about 70%. See the brighter side, you still are 30% safe.

So what can we do-
<1> Use a strong antivirus programm, with anti spyware .
<2> Daily or weakly boot scan can reduce the threats of malicious software.
<3> The past foolproof way to bypass keylogger was virtual keyboards.

Why i said that virtual keyboards was foolproof in past. They can save your keystrokes but this was when stealers were simple keyloggers. Whatever keys were typed in, they were captured by the malicious code and logged into some file in simple or encrypted form. This attack can be mitigated by virtual keyboards. It works simply by clicking the keyboard layout by a mouse. So the basic keyloggers cannot capture the mouse clicks and hence the passwords cannot be logged.
malware coders have thought a new one mouse clicks cannot be logged. However their x-y positions can be logged which can then be used to get the keys clicked using their x-y position on the web page. people started randomizing their virtual keyboards alphabets rows.
 So malware coders thought - Why not take a snap-shot of the keys pressed. Screen snap-shot of say 1 by 1 cm can be taken when a mouse click occurs. The letter present in snapshot is the password of the victim.
After this discussion i think that if we use three tricks given above the chance of your password stealing will remain only 10%.


Disclaimer: I don’t take Responsibility for what you do with this script, served for Educational purpose only. 
Read More

How to Remove Fake Windows Security Center


How Do I Remove Fake Windows Security Center ?

How to remove Fake Windows Security Center : There are two methods. The manual way and the automatic way. First – if you want to try and remove it manually (and I only recommend this to IT Professionals!) you must disable all related system processes, adjust all related system DLL files and registry files in the LOCAL_HKEY_USER folder, block all related websites, and delete all program files with the Fake Windows Security Center name. Below are the Fake Windows Security Center Removal Instructions.

Fake Windows Security Center Manual Removal Instructions:

Stop Fake Windows Security Center Processes:
[random].exe
Remove Fake Windows Security Center Registry Keys:
HKEY_CURRENT_USERSoftwareClasses.exeDefaultIcon “(Default)” = ‘%1′ = ‘”%UserProfile%Local SettingsApplication Data[random 3 letters].exe” /START “%1″ %*’
HKEY_CURRENT_USERSoftwareClasses.exeshellopencommand “IsolatedCommand” = ‘”%1″ %*’
HKEY_CURRENT_USERSoftwareClasses.exeshellrunascommand “(Default)” = ‘”%1″ %*’
HKEY_CURRENT_USERSoftwareClasses.exeshellrunascommand “IsolatedCommand” = ‘”%1″ %*’
HKEY_CURRENT_USERSoftwareClassesexefile “(Default)” = ‘Application’
HKEY_CURRENT_USERSoftwareClassesexefile “Content Type” = ‘application/x-msdownload’
HKEY_CURRENT_USERSoftwareClassesexefileDefaultIcon “(Default)” = ‘%1′
HKEY_CURRENT_USERSoftwareClassesexefileshellopencommand “(Default)” = ‘”%UserProfile%Local SettingsApplication Data.exe” /START “%1″ %*’
HKEY_CURRENT_USERSoftwareClassesexefileshellopencommand “IsolatedCommand” = ‘”%1″ %*’
HKEY_CURRENT_USERSoftwareClassesexefileshellrunascommand “(Default)” = ‘”%1″ %*’
HKEY_CURRENT_USERSoftwareClassesexefileshellrunascommand “IsolatedCommand” – ‘”%1″ %*’
HKEY_CLASSES_ROOT.exeDefaultIcon “(Default)” = ‘%1′
HKEY_CLASSES_ROOT.exeshellopencommand “(Default)” = ‘”%UserProfile%Local SettingsApplication Data.exe” /START “%1″ %*’
HKEY_CLASSES_ROOT.exeshellopencommand “IsolatedCommand” = ‘”%1″ %*’
HKEY_CLASSES_ROOT.exeshellrunascommand “(Default)” = ‘”%1″ %*’
HKEY_CLASSES_ROOT.exeshellrunascommand “IsolatedCommand” = ‘”%1″ %*’
HKEY_CLASSES_ROOTexefile “Content Type” = ‘application/x-msdownload’
HKEY_CLASSES_ROOTexefileshellopencommand “IsolatedCommand” = ‘”%1″ %*’
HKEY_CLASSES_ROOTexefileshellrunascommand “IsolatedCommand” = ‘”%1″ %*’
HKEY_CLASSES_ROOTexefileshellopencommand “(Default)” = ‘”%UserProfile%Local SettingsApplication Data.exe” /START “%1″ %*’
HKEY_LOCAL_MACHINESOFTWAREClientsStartMenuInternetFIREFOX.EXEshellopencommand “(Default)” = ‘”%UserProfile%Local SettingsApplication Data.exe” /START “C:Program FilesMozilla Firefoxfirefox.exe”‘
HKEY_LOCAL_MACHINESOFTWAREClientsStartMenuInternetFIREFOX.EXEshellsafemodecommand “(Default)” = ‘”%UserProfile%Local SettingsApplication Data.exe” /START “C:Program FilesMozilla Firefoxfirefox.exe” -safe-mode’
HKEY_LOCAL_MACHINESOFTWAREClientsStartMenuInternetIEXPLORE.EXEshellopencommand “(Default)” = ‘”%UserProfile%Local SettingsApplication Data.exe” /START “C:Program FilesInternet Exploreriexplore.exe”‘
Remove Fake Windows Security Center Files and Folders:
%AllUsersProfile%t3e0ilfioi3684m2nt3ps2b6lru
%AppData%Local[random].exe
%AppData%Localt3e0ilfioi3684m2nt3ps2b6lru
%AppData%RoamingMicrosoftWindowsTemplatest3e0ilfioi3684m2nt3ps2b6lru
%Temp%t3e0ilfioi3684m2nt3ps2b6lru
Note: In any Fake Windows Security Center files I mention above, “%UserProfile%” is a variable referring to your current user’s profile folder. If you’re using Windows NT/2000/XP, by default this is “C:\Documents and Settings\[CURRENT USER]” (e.g., “C:\Documents and Settings\JoeSmith”). If you have any questions about manual Fake Windows Security Center removal, go ahead and leave a comment.
How to delete Fake Windows Security Center files in Windows XP and Vista:
  1. Click your Windows Start menu, and then click “Search.”
  2. A speech bubble will pop up asking you, “What do you want to search for?” Click “All files and folders.”
  3. Type a Fake Windows Security Center file in the search box, and select “Local Hard Drives.”
  4. Click “Search.” Once the file is found, delete it.
How to stop Fake Windows Security Center processes:
  1. Click the Start menu, select Run.
  2. Type taskmgr.exe into the the Run command box, and click “OK.” You can also launch the Task Manager by pressing keys CTRL + Shift + ESC.
  3. Click Processes tab, and find Fake Windows Security Center processes.
  4. Once you’ve found the Fake Windows Security Center processes, right-click them and select “End Process” to kill Fake Windows Security Center .
How to remove Fake Windows Security Center registry keys:
Warning! Your registry is a vital key to your Windows system. If you plan on making any edits to your registry, you absolutely must backup your registry first in case anything goes wrong. Be forewarnd that a mistake when editing your registry can result in a computer that no longer boots up. These instructions are designed for IT Professionals and PC Experts.
  1. Select your Windows menu “Start,” and click “Run.” An “Open” field will appear. Type “regedit” and click “OK” to open up your Registry Editor.
  2. Registry Editor will open as a window with two panes. The left side Registry Editor’s window lets you select various registry keys, and the right side displays the registry values of the registry key you select.
  3. To find a registry key, such as any Fake Windows Security Center registry keys, select “Edit,” then select “Find,” and in the search bar type any of Fake Windows Security Center ’s registry keys.
  4. As soon as Fake Windows Security Center registry key appears, you can delete the Fake Windows Security Center registry key by right-clicking it and selecting “Modify,” then clicking “Delete.”
How to delete Fake Windows Security Center DLL files:
  1. First locate Fake Windows Security Center DLL files you want to delete. Open your WindowsStart menu, then click “Run.” Type “cmd” in Run, and click “OK.”
  2. To change your current directory, type “cd” in the command box, press your “Space” key, and enter the full directory where the Fake Windows Security Center DLL file is located. If you’re not sure if the Fake Windows Security Center DLL file is located in a particular directory, enter “dir” in the command box to display a directory’s contents. To go one directory back, enter “cd ..” in the command box and press “Enter.”
  3. When you’ve located the Fake Windows Security Center DLL file you want to remove, type “regsvr32 /u SampleDLLName.dll” (e.g., “regsvr32 /u jl27script.dll”) and press your “Enter” key.
If you wish to restore any Fake Windows Security Center DLL file you deleted, type “regsvr32 DLLJustDeleted.dll” (e.g., “regsvr32 jl27script.dll”) into your command box, and hit the “Enter” key.
Did Fake Windows Security Center change your homepage?
  1. Click Windows Start menu > Control Panel > Internet Options.
  2. Under Home Page, select the General > Use Default.
  3. Type in the URL you want as your home page (e.g., “http://www.google.com”).
  4. Select Apply > OK.
Read More

Complete list of run commands in windows XP

                                         Run Commands In Windows XP

You can access all these programs by going through START-->RUN or Simply Click Windows Key+R

SQL Client Configuration - cliconfg
System Configuration Editor - sysedit
System Configuration Utility - msconfig
System File Checker Utility (Scan Immediately)- sfc /scannow
System File Checker Utility (Scan Once At Next Boot)- sfc /scanonce
System File Checker Utility (Scan On Every Boot) - sfc /scanboot
System File Checker Utility (Return to Default Setting)- sfc /revert
System File Checker Utility (Purge File Cache)- sfc /purgecache
System File Checker Utility (Set Cache Size to size x)-sfc/cachesize=x
System Information - msinfo32.
Task Manager – taskmgr
System Properties - sysdm.cpl
Task Manager – taskmgr
TCP Tester - tcptest
Telnet Client - telnet
Tweak UI (if installed) - tweakui
User Account Management- nusrmgr.cpl
Utility Manager - utilman
Windows Address Book - wab
Windows Address Book Import Utility - wabmig
Windows Backup Utility (if installed)- ntbackup
Windows Explorer - explorer
Windows Firewall- firewall.cpl
Windows Magnifier- magnify
Windows Management Infrastructure - wmimgmt.msc
Windows Media Player - wmplayer
Windows Messenger - msmsgs
Windows Picture Import Wizard (need camera connected)- wiaacmgr
Windows System Security Tool – syskey
Windows Update Launches - wupdmgr
Windows Version (to show which version of windows)- winver
Windows XP Tour Wizard - tourstart
Wordpad - write
Password Properties - password.cpl
Performance Monitor - perfmon.msc
Phone and Modem Options - telephon.cpl
Phone Dialer - dialer
Pinball Game - pinball
Power Configuration - powercfg.cpl
Printers and Faxes - control printers
Printers Folder – printers
Private Character Editor - eudcedit
Quicktime (If Installed)- QuickTime.cpl
Real Player (if installed)- realplay
Regional Settings - intl.cpl
Registry Editor - regedit
Registry Editor - regedit32
Remote Access Phonebook - rasphone
Remote Desktop - mstsc
Removable Storage - ntmsmgr.msc
Removable Storage Operator Requests - ntmsoprq.msc
Resultant Set of Policy (XP Prof) - rsop.msc
Scanners and Cameras - sticpl.cpl
Scheduled Tasks - control schedtasks
Security Center - wscui.cpl
Services - services.msc
Shared Folders - fsmgmt.msc
Shuts Down Windows - shutdown
Sounds and Audio - mmsys.cpl
Spider Solitare Card Game - spider
Malicious Software Removal Tool - mrt
Microsoft Access (if installed) - access.cpl
Microsoft Chat - winchat
Microsoft Excel (if installed) - excel
Microsoft Frontpage (if installed)- frontpg
Microsoft Movie Maker - moviemk
Microsoft Paint - mspaint
Microsoft Powerpoint (if installed)- powerpnt
Microsoft Word (if installed)- winword
Microsoft Syncronization Tool - mobsync
Minesweeper Game - winmine
Mouse Properties - control mouse
Mouse Properties - main.cpl
Nero (if installed)- nero
Netmeeting - conf
Network Connections - control netconnections
Network Connections - ncpa.cpl
Network Setup Wizard - netsetup.cpl
Notepad - notepad
Nview Desktop Manager (If Installed)- nvtuicpl.cpl
Object Packager - packager
ODBC Data Source Administrator- odbccp32.cpl
On Screen Keyboard - osk
Opens AC3 Filter (If Installed) - ac3filter.cpl
Outlook Express - msimn
Paint – pbrush
Keyboard Properties - control keyboard
IP Configuration (Display Connection Configuration) - ipconfi/all
IP Configuration (Display DNS Cache Contents)- ipconfig /displaydns
IP Configuration (Delete DNS Cache Contents)- ipconfig /flushdns
IP Configuration (Release All Connections)- ipconfig /release
IP Configuration (Renew All Connections)- ipconfig /renew
IP Configuration(RefreshesDHCP&Re-RegistersDNS)-ipconfig/registerdns
IP Configuration (Display DHCP Class ID)- ipconfig/showclassid
IP Configuration (Modifies DHCP Class ID)- ipconfig /setclassid
Java Control Panel (If Installed)- jpicpl32.cpl
Java Control Panel (If Installed)- javaws
Local Security Settings - secpol.msc
Local Users and Groups - lusrmgr.msc
Logs You Out Of Windows - logoff.....
Accessibility Controls - access.cpl
Accessibility Wizard - accwiz
Add Hardware - Wizardhdwwiz.cpl
Add/Remove Programs - appwiz.cpl
Administrative Tools control - admintools
Adobe Acrobat (if installed) - acrobat
Adobe Designer (if installed)- acrodist
Adobe Distiller (if installed)- acrodist
Adobe ImageReady (if installed)- imageready
Adobe Photoshop (if installed)- photoshop
Automatic Updates - wuaucpl.cpl
Bluetooth Transfer Wizard – fsquirt
Calculator - calc
Certificate Manager - certmgr.msc
Character Map - charmap
Check Disk Utility - chkdsk
Clipboard Viewer - clipbrd
Command Prompt - cmd
Component Services - dcomcnfg
Computer Management - compmgmt.msc
Control Panel - control
Date and Time Properties - timedate.cpl
DDE Shares - ddeshare
Device Manager - devmgmt.msc
Direct X Control Panel (If Installed)- directx.cpl
Direct X Troubleshooter- dxdiag
Disk Cleanup Utility- cleanmgr
Disk Defragment- dfrg.msc
Disk Management- diskmgmt.msc
Disk Partition Manager- diskpart
Display Properties- control desktop
Display Properties- desk.cpl
Display Properties (w/Appearance Tab Preselected)- control color
Dr. Watson System Troubleshooting Utility- drwtsn32
Driver Verifier Utility- verifier
Event Viewer- eventvwr.msc
Files and Settings Transfer Tool- migwiz
File Signature Verification Tool- sigverif
Findfast- findfast.cpl
Firefox (if installed)- firefox
Folders Properties- control folders
Fonts- control fonts
Fonts Folder- fonts
Free Cell Card Game- freecell
Game Controllers- joy.cpl
Group Policy Editor (XP Prof)- gpedit.msc
Hearts Card Game- mshearts
Help and Support- helpctr
HyperTerminal- hypertrm
Iexpress Wizard- iexpress
Indexing Service- ciadv.msc
Internet Connection Wizard- icwconn1
Internet Explorer- iexplore
Internet Setup Wizard- inetwiz
Internet Properties- inetcpl.cpl

Read More

How to Change Windows 7 Password without Knowing Current Password

 There are various methods to bypass windows 7 password protection.In case you forgot windows passsword,you can reset it using windows 7 Dvd or OfflineNT Password and Registry Editor.However if you have access to any windows account then you can change the password without knowing current password.

How to Change Window 7 Password without Knowing Current Password:
 

Method 1:
•    Go to Control Panel and click on the Administrative Tools.
•    Under this section double click on Computer Management.
•     Select  System Tools from right window pane.


•    Under this, just double click on Local Users and Groups and then on Users
•    Now you will see all the login accounts of your computer. Right click on any the account whose password you want to change and then click on Set Password.


•    A warning message will popup on your screen just click on Proceed button.


•    Now enter your New Password  and click on OK button.


That’s it! your windows 7 password is changed without knowing current password. The only limitation of this method is that your current  account should  have Administrative privileges.

Method 2:
If you love to be work on Command Line then this method is for you.
•    Open command prompt by typing with administrative privileges .( Type CMD in start, right click on it and select Run as Administrative )


•    In the CMD window  type the following command and  hit Enter
net user Account Name Your New Password
In this command replace Account Name by the account name (Account Name is case sensitive) whose password you want to change and replace Your New Password by the password that you want to set.


•    Now if everything goes alright  you will see “The command completed successfully” on your screen, now type exit command and hit Enter
This will reset your current windows password.

Read More

How To Open Docx Files Without Microsoft Word

This tutorial is for all those people who dont have Microsoft office 2007 and they want to open docx files.Microsoft introduced the docx format with the release of its 2007 office suit.All the files created in Microsoft office 2007 are by default in the format of docx,pptx,xlsx which are not compatible with the 2003 office suite of Microsoft.If you dont want to buy Microsoft office 2007 or you dont want to upgrade your office suite from 2003 to 2007 or 2010 version then in this tutorial you will learn that how we can use alternative freeware utilities to resolve this situation.

We are providing you with Four Solutions to solve this problem

1.Use Microsoft Office compatibility pack

Well this option is for only those user who have Microsoft office 2003 installed on their systems.Microsoft office compatibility pack will convert the docx format into a compatible format that can be easily opened with the Microsoft 2003 office suite.It is available for download directly from Microsoft official website.

2.Download Open Office
 

Open office is the default office suite for Linux users .It is available for downloading for windows,Linux as well as Mac users.It is available for free and as the name suggests it is also open source.It is also compatible with some other formats.

3.Dev Vicky world 2010 office suite

If you want to go for a very light weight application then go for this software.It is a freeware utility that can be used to open docx files.

4.Use Google Docs to open Docx Files

Google Docs is an online suite to view files on the Internet.You can upload your document into it and view it.Another method that you can use is that you send a gmail email to your own email id with the Docx file attached to it.When you will open this email gmail will give you an option to view this mail.
If you know any other method.Please leave a comment and we will add it into this Post
Read More

How to Protect Yahoo Account from Hackers

 2 Step verification or Second Sign-In verification is an addtional layer of security that protects your account even if your password gets hacked.This feature  is already available for facebook and Gmail accounts .Yahoo has also launched Second Sign-In verification for accounts of selected countries (U.S, Canadian, Indian, Philippines).It is expected to be rolled out for all users by March 2012.
If you enable Second Sign-in verification you have to enter a verification code (sent on your mobile) or Security answer after entering your password.This addtional step is required only if your login from a new computer or mobile.

How to Protect Yahoo Account from Hackers:
•    Login in to your Yahoo Account.
•    Now open your Account Information.
•    In the Sign-In and Security section look for the Second Sign-In Verification and click on it.


•    Check the box to turn on the Second Sign-In Verification feature


•    Now a pop-up window will open, in this give your mobile number on which you want to receive verification codes and click on Receive SMS.


•    You will receive Confirmation Code on your mobile, enter this code and click on Verify button.


After completion of verification process whenever you will login from a new computer ( like cybercafe) you will receive a confirmation code on your mobile and without it your account cannot be accessed.

Read More

How to Reset Windows 7 or Vista Password

If somehow you have forgotten your windows password and are looking for way around to login back into your computer then you won’t have to worry.There are many methods are available for resetting password of your windows 7 or vista.But many of them are lengthy or sophisticated.This is one of the simplest method and you only need a windows installation CD/USB to reset the password.It relies on an unpatched bug in windows operating system.

Step-By-Step Guide to Reset Windows Password:
  •     Insert windows 7 disk into your CD Rom and Restart your computer.
  •     Press any key to Boot from the CD and then click on Repair your Computer.


  Now from the various options select Command Prompt.


    Now Command Prompt will be open and create a backup of Sticky keys by typing the following command in the command prompt

copy c:\windows\system32\sethc.exe c:\

    Now replace sticky keys with the Command Prompt by typing the following command

copy c:\windows\system32\cmd.exe c:\windows\system32\sethc.exe
    Now Restart your computer.

    When you get the windows login screen then hit Shift button for 5 times continuously and Administrative Mode of Command Prompt will be open.


    Now to reset the password just type the following command


net user geek MyNewPassword

Remember: geek is the username of the computer and MyNewPassword is the password. Replace both as you wish.

    Login in your computer system with your new Username and Password.

Now every time when you press Shift key for 5 times then command prompt will be open instead of Sticky keys. To get back these Sticky keys repeat first three steps and then in the command prompt window type the following command.

copy c:\sethc.exe  c:\windows\system32\sethc.exe.


Read More

Encrypt/Lock Computer Drives Or Pendrive In Windows 7


Microsoft Bitlocker drive encryption is used to encrypt/lock any Local drive or removable drives like pendrives.Bitlocker encrypts the drives using 128 bit key.Once the drives are encrypted/locked it can only opened using the password.Microsoft introduced bitlocker encryption in windows vista.The bitlocker feature is currently available in Ultimate and Enterprise editions of windows 7 ,Vista as well as the Windows Server 2008 and Windows Server 2008 R2 .Bitlocker requires that your hard disk should have atleast two NTFS drives :One of the operating system and the other with a minimum size of 100 MB.
Let’s Begin the step by step tutorial along with screenshots on how to Lock/encrypt Computer drives or pendrive in windows 7.

1.Plugin your Pendrive into your Usb port.
(Skip the above step if you want to lock/encrypt a local drive)

2.Click on Start button and type Bitlocker and click on BitLocker Drive Encryption


3.Now you can see all local drives and your pendrive(If you have plugged in any)


4.Now click on Turn on BitLocker in front of the drive you want to lock/Encrypt.

5.Now it will ask you to choose your password


6.Once you have entered your password click Next you will be now asked to save the password or take a print out.


Note:If you save your password in your computer then make sure that it at some safe place.

 
7.Now bitlocker will start encrypting your drive.The encryption time varies according to the size of the drive.


8.If you have encrypted/locked  a local drive then you will see a lock in front of the drive.


9.If you have encrypted/locked a pendrive then you will see a bitlocker setup file when you put this pendrive in computer.Install this in another computer.
(If bitlocker is already installed in another system then this step is not required.)

10.Now it will prompt you to enter your password.

Read More

How To Encrypt Files And Folders In Windows 7

Encryption is a method to protect your files from unauthorized access.Windows 7 has inbuilt Encryption capabilities so that you don’t have spend extra money on these type of softwares.File encryption is becoming more and more important these days.If you fear that somebody may transfer your important data from your computer then go for windows encryption.The person is still able to transfer your data but they will never be able to read/open that data because it is encrypted and it cannot be opened without private encryption key.Encryption is the safest Protection for files and folders that windows 7 provides to its users.
Now,lets start the step by step tutorial with screen shots on how to encrypt files and folders in windows 7.


1.Right click on the folder you want to encrypt and then click on properties.


2.In the properties dialog click on Advanced under the general tab.


3.After clicking on advanced you will see a prompt,check the box in the prompt which says Encrypt Contents To Secure Data


4.If your trying to encrypt a folder you will see another prompt asking you whether you would like to encrypt subfolder also.Click on OK.


5.Now your files will be encrypted.


Note:If you are performing the encryption for the first time then you should backup your encryprtion key certiface because without this encryption key certificate you wont be able to open your files or folders on other computers.

6.Your Encrypted files and folders names will turn into green colour which indicates that the these files have been encrypted.

 
Read More

-: Network Hacking :-

Network Hacking is generally means gathering information about domain by using tools like Telnet, NslookUp, Ping, Tracert, Netstat, etc.
It also includes OS Fingerprinting, Port Scaning and Port Surfing using various tools.

Ping :- Ping is part of ICMP (Internet Control Message Protocol) which is used to troubleshoot TCP/IP networks. So, Ping is basically a command that allows you to check whether the host is alive or not.
To ping a particular host the syntax is (at command prompt)--

c:/>ping hostname.com

example:- c:/>ping www.google.com


Various attributes used with 'Ping' command and their usage can be viewed by just typing c:/>ping at the command prompt.


Netstat :- It displays protocol statistics and current TCP/IP network connections. i.e. local address, remote address, port number, etc.
It's syntax is (at command prompt)--

c:/>netstat -n


Telnet :- Telnet is a program which runs on TCP/IP. Using it we can connect to the remote computer on particular port. When connected it grabs the daemon running on that port.
The basic syntax of Telnet is (at command prompt)--

c:/>telnet hostname.com


By default telnet connects to port 23 of remote computer.
So, the complete syntax is-

c:/>telnet www.hostname.com port


example:- c:/>telnet www.yahoo.com 21 or c:/>telnet 192.168.0.5 21


Tracert :- It is used to trace out the route taken by the certain information i.e. data packets from source to destination.
It's syntax is (at command prompt)--

c:/>tracert www.hostname.com

example:- c:/>tracert www.insecure.in


Here "*    *    *    Request timed out." indicates that firewall installed on that system block the request and hence we can't obtain it's IP address.

various attributes used with tracert command and their usage can be viewed by just typing c:/>tracert at the command prompt.

The information obtained by using tracert command can be further used to find out exact operating system running on target system.
Read More

Titan II is HTC’s First LTE Windows Phone


 HTC has announced HTC Titan II, the company’s first LTE Windows Phone.

Like its predecessor, the Titan II is huge, with a 4.7-inch super LCD screen. The rest of the specifications are quite impressive, too: a 16-megapixel back camera (and a 1.3-megapixel camera on the front for video calls) and a 1.5 GHz Snapdragon CPU.

Interestingly enough, while the back camera comes with a huge range of goodies, such as a wide-angle lens, autofocus, image stabilization and dual LED flash, it only takes 720p – not 1080p – video.

Of course, LTE support, which will enable super fast data transfer on AT&T’s network, makes the Titan II a good choice for heavy multimedia and internet users.

The device will be available “in the coming months” to AT&T customers. The price hasn’t yet been announced.

Read More

How to make a tablet pc from an old laptop

In this project i used an old Fujitsu Siemens life book S series laptop. It has got a 1 Ghz processor and 256 Mb ram, (not sure about the graphic card but i know its between 8-32 Mb). In this instructable i will show how to do tablet pc the easy way(and the cheapest) , and how to do it hard way (including "touch" screen etc). I personaly did it the hard way about half way and run out of materials and  i decided to finish it the easy way.

In this project you will need:
1.Old laptop
2. Soldering iron
3.some wires
4. Basic tools to open up the laptop

And if you are doing the hard way you will also need:
5.Lots of straight plastic
6.Something to melt down the plastic
7. And for the touch screen i would have used device called Minio Xi (look from google)(and buy from Ebay)  . It is mostly used to make projektor sceen "touch" screen. This device uses infrared to map out where the pen is moving on the screen. I will talk about it later in the quide.


The skils you will need to make this are:
1. Soldering
2. Plastic soldering
3. Basic knowledge how things work
4. Lots of patience

And of course for the hard way you will also need:

5.Problem solving skills
6.Serious knowledge how things work
7.Way to know how to make "special" tools
8. Huge amount of patience


And sorry for my English its not my main language but i will try to make it readable : S2P

Step 1Tearing up the laptop


This is just basic demolition of the laptop.
Decide wich parts you will use in your project and wich you will modify.

Step 2Building the Tablet pc (easy way) Part 1

Warning!
remember that you are working in sensitive electronic equipment involved. Make sure to ground yourself before you start working. Remember also that the LCD monitor uses very high voltage when turned on. This does not kill you, but hurts a lot.


The basic idea of the easy way is to flip the screen upside down on the laptop chasis.
This can be a easy job to do but there is always something that wont fit, work. so you have to make it work or fit or both.
For examble in my case i had to find out how to make the power button to work and fit in so i can power up the pc.
As you can see in the seacond picture i had to solder two wires to the pins in order to get the ON/OFF switch to the other side of the laptop.
After i did that i had to modify the heatsink to fit under the screen as you can see in the picture number 5. Without the heatsink the laptop overheats and shuts down
after that i put all in their own place and installed speacers and other things i needed and did a test run as you can see in the last two pictures

Step 3Easy way part 2 (plastic soldering)
 
when you're at the point when you put all the parts on their places. place the screens original frame on the LCD screen, and try whether it fits right. If you are pleased you can start  plastic soldering.

Heat up the soldering iron about 240 degrees celsius and start welding the plastic together.


Step 4Easy way part 3
    
and now its ready.  use USB mouse to operate it and on screen keyboard to write

Step 5Now for the hard way  
after you have extracted the whole computer, fit the necessary components on your computer screen to see how much space you need and how much extra there is and how to make more space.
I had to tear up the battery plastic chasis in order to fit it in the space i had. Use flat screwdriver to do that.
when  done everything needed proceed to the next part.

Step 6Hard way part 2 (Making the tablet pc body)
   
This is the part where i had to stop building this one. Mainly reason is that i run out of materials and the seacond reason that i'm too lazy :D But i wil show you how to take it to the end but you will have to use your own brain and imagination to do that.

First of all i started to make the frame to the tablet. i cut the plastic the way i needed it and folded the plastic the way i had to in orded to make the frame to the tablet. the frame is about the size of the screen.
this is where i drop out. You can use plexi glass to make the top and bottom sides to the frame.

And for the touch screen part. I would have used Mimio Xi to do that. It uses one USB  port to power and to work. it uses infrared to map out where the pen is moving. the pen sends infrared to the mimio xi and the mimio calculates where the pen is moving. the pen is like computer mouse but instead moving it on the table you can move it on the screen. The mimio xi Is very expensive to buy but you can find it from the Ebay cheap. and you don't have to buy the whole thing you will only need the same parts shown on the last picture. there is the pen and the receiver. But make sure first that it works on the laptop before building it, because it needs drivers and the software to work. I have one mimio xi my self and its on my video projector screen so i can operate computer from the wall if i have to, and let me tell you. IT IS useless but so cool to use
So this is it this is all the information you need. Have fun Building your own laptop tablet. and Make a post if you did the hard way to the finish. Please RATE AND COMMENT and if there is something bothering PM me and i'l do something about it. Happy building!


Read More