
Make a GSM sim using PIC Microcontroller (working and tested)
then follow the instructions carefully given below to make your own GSM sim card.
Step 1:
Download SIM-EMU Configurator here >> SIM_EMU_6.01_CFG_v2.1.zip
Download two hex files "16f877a.hex" and "24c64.hex" file from my download page.
Step 2:
Install and run SIM-EMU Configurator, then go to configure menu. (see figure below)

then click on "Read from disk" and load "16f877a.hex" and then it will ask to load EEPROM file and you can load "24c64.hex" that you already downloaded. after loading two hex files you want to edit IMSI and KI field with you scanned using sim scanner.(if u want you can edit PIN and PUK, defalt values are 1111 and 11111111) see figure2.

Then Save your edited files(click on "Write to disk"). save flash file as "16f877a_my.hex" and EEPROM file as "24c64_my.hex". then you want to write these two files to PIC and EEPROM.
Step 3 :
Use PIC parallel port programmer ( Working and tested ) or other MC programmer and writes "16f877a_my.hex" file to PIC16F877A and writes "24c64_my.hex" file to 24c64 EEPROM(its a very famous and cheap memory chip) one after one.
Step 4 :
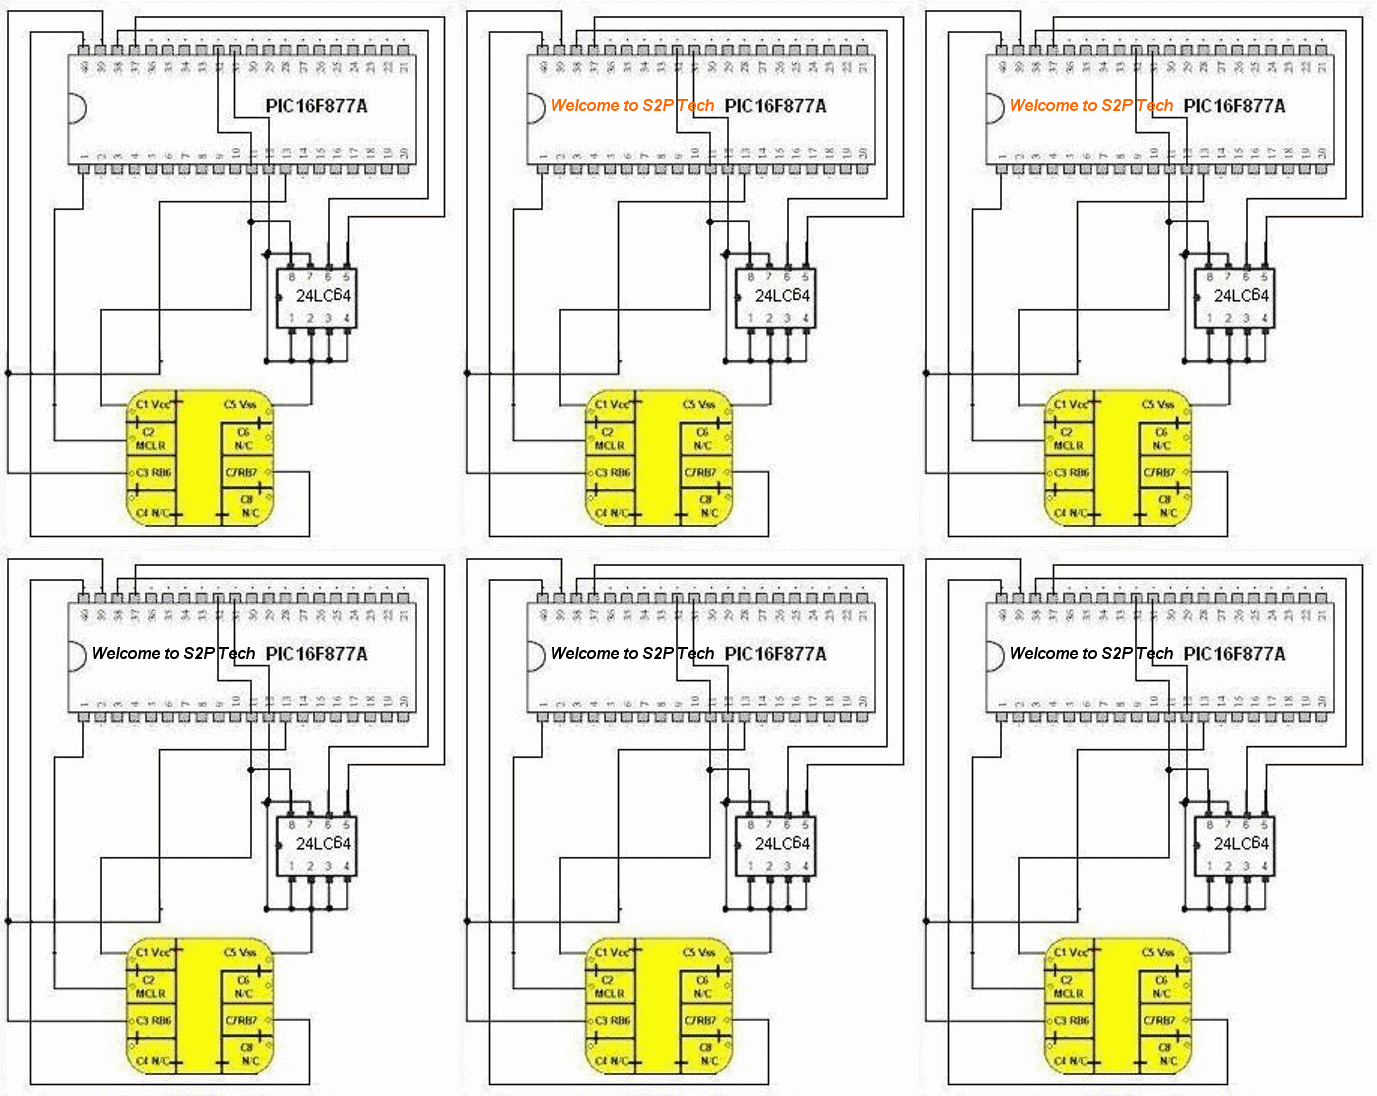
Now connect PIC16F877A, 24c64 and sim card adapter. see figure3.
you have done it..! just connect this gadget with your mobile phone and enjoy. If you have any problem regarding this please comment below, I'll try to solve it. and if you are interested in this work please don't forget to share on facebook. ( just click and share the fb like button top of the page :-) )
( Caution: sim clone is illegal, just for educational purposes only..! )First you want to get IMSI and KI number from your original SIM using SIM Card Reader/Writer <Smart Card Reader> (you can buy or make it, Search in Google then you can find cheap one). If you wish to make your own one, see this step by step tutorial for "Make Simple GSM SIM card Reader / Writer" in my site.
then follow the instructions carefully given below to make your own GSM sim card.
Step 1:
Download SIM-EMU Configurator here >> SIM_EMU_6.01_CFG_v2.1.zip
Download two hex files "16f877a.hex" and "24c64.hex" file from my download page.
Step 2:
Install and run SIM-EMU Configurator, then go to configure menu. (see figure below)
figure 1
then click on "Read from disk" and load "16f877a.hex" and then it will ask to load EEPROM file and you can load "24c64.hex" that you already downloaded. after loading two hex files you want to edit IMSI and KI field with you scanned using sim scanner.(if u want you can edit PIN and PUK, defalt values are 1111 and 11111111) see figure2.
figure 2
Then Save your edited files(click on "Write to disk"). save flash file as "16f877a_my.hex" and EEPROM file as "24c64_my.hex". then you want to write these two files to PIC and EEPROM.
Step 3 :
Use PIC parallel port programmer ( Working and tested ) or other MC programmer and writes "16f877a_my.hex" file to PIC16F877A and writes "24c64_my.hex" file to 24c64 EEPROM(its a very famous and cheap memory chip) one after one.
Step 4 :
Now connect PIC16F877A, 24c64 and sim card adapter. see figure3.
figure 3
you have done it..! just connect this gadget with your mobile phone and enjoy. If you have any problem regarding this please comment below, I'll try to solve it. and if you are interested in this work please don't forget to share on facebook. ( just click and share the fb like button top of the page :-) )
NOTE: You can write up to 10 different KIs and IMSIs to this gadget. In above Step 2 you can select "Positions" (0 to 9) and enter different KIs and IMSIs. then you can see a new menu in your phone "SIM-EMU Configurator". you can switch between SIMs by entering this menu..


