Showing posts with label Website Tricks. Show all posts

WebGL with Three.js tutorial and demo

Hello freinds in this tutorial we will be working with sprites and texture animation. If you do not know, sprites are simply images, that could be attached to objects. These sprite images are always orthogonal to our camera.
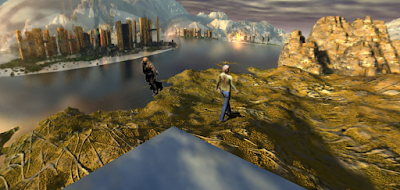
Three.js provides a special material for the sprites – THREE.SpriteMaterial, as well as a special object – THREE.Sprite. Also in this tutorial we will learn how to play the animation using sprites.

Check this tutorial : How to make a Virtual Reality 3D Tracking headset

Demo

Preparation

As usual, we have to prepare a small index.html file with necessary html markup to work on:

index.html

<!DOCTYPE html>
<html lang="en" >
  <head>
    <meta charset="utf-8" />
    <meta name="author" content="Script Tutorials" />
    <title>WebGL With Three.js - Sprites and Texture Animation | S2P Tech</title>
    <meta name="viewport" content="width=device-width, initial-scale=1.0, maximum-scale=1.0, user-scalable=no">
    <link href="css/main.css" rel="stylesheet" type="text/css" />
  </head>
  <body>
    <script src="js/three.min.js"></script>
    <script src="js/THREEx.WindowResize.js"></script>
    <script src="js/OrbitControls.js"></script>
    <script src="js/stats.min.js"></script>
    <script src="js/script.js"></script>
    <div style="position: absolute; top: 10px; left: 20px; text-align: center;"><a href="http://s2ptech.blogspot.com/2015/05/webgl-with-threejs-tutorial-and-demo.html" target="_blank">"WebGL With Three.js Tutorial"</a> is prepared by <a href="http://www.s2ptech.com/" target="_blank">S2P Tech</a> team.<br>Drag to spin</div>
  </body>
</html>
In this code, we connect the main Three.js library and few additional utilites: WindowResize event handler, Orbit controls and Stats

File Explorer and Download File

Preparation of the main webgl scene

Now let’s create the main ‘script.js’ file and place the code shown below:

Check this tutorials : How to add multiple recaptcha on same page

script.js

var lesson8 = {
  scene: null,
  camera: null,
  renderer: null,
  container: null,
  controls: null,
  clock: null,
  stats: null,
  anim1: null, anim2: null, // animations
  animReady1: false, animReady2: false,
  init: function() { // initialization
    // create main scene
    this.scene = new THREE.Scene();
    this.scene.fog = new THREE.FogExp2(0xcce0ff, 0.0003);
    var SCREEN_WIDTH = window.innerWidth,
        SCREEN_HEIGHT = window.innerHeight;
    // prepare perspective camera
    var VIEW_ANGLE = 60, ASPECT = SCREEN_WIDTH / SCREEN_HEIGHT, NEAR = 1, FAR = 1000;
    this.camera = new THREE.PerspectiveCamera(VIEW_ANGLE, ASPECT, NEAR, FAR);
    this.scene.add(this.camera);
    this.camera.position.set(100, 0, 0);
    this.camera.lookAt(new THREE.Vector3(0,0,0));
    // prepare webgl renderer
    this.renderer = new THREE.WebGLRenderer({ antialias:true });
    this.renderer.setSize(SCREEN_WIDTH, SCREEN_HEIGHT);
    this.renderer.setClearColor(this.scene.fog.color);
    this.renderer.shadowMapEnabled = true;
    this.renderer.shadowMapSoft = true;
    // prepare container
    this.container = document.createElement('div');
    document.body.appendChild(this.container);
    this.container.appendChild(this.renderer.domElement);
    // events
    THREEx.WindowResize(this.renderer, this.camera);
    // prepare controls (OrbitControls)
    this.controls = new THREE.OrbitControls(this.camera, this.renderer.domElement);
    this.controls.target = new THREE.Vector3(0, 0, 0);
    this.controls.maxDistance = 3000;
    // prepare clock
    this.clock = new THREE.Clock();
    // prepare stats
    this.stats = new Stats();
    this.stats.domElement.style.position = 'absolute';
    this.stats.domElement.style.left = '50px';
    this.stats.domElement.style.bottom = '50px';
    this.stats.domElement.style.zIndex = 1;
    this.container.appendChild( this.stats.domElement );
    // add lights
    this.scene.add( new THREE.AmbientLight(0x606060) );
    var dirLight = new THREE.DirectionalLight(0xffffff);
    dirLight.position.set(200, 200, 1000).normalize();
    this.camera.add(dirLight);
    this.camera.add(dirLight.target);
    // display skybox
    this.addSkybox();
    // display animated objects
    this.addAnimatedObjects();
  },
  addSkybox: function() {
      // define path and box sides images
      var path = 'skybox/';
      var sides = [ path + 'sbox_px.jpg', path + 'sbox_nx.jpg', path + 'sbox_py.jpg', path + 'sbox_ny.jpg', path + 'sbox_pz.jpg', path + 'sbox_nz.jpg' ];
      // load images
      var scCube = THREE.ImageUtils.loadTextureCube(sides);
      scCube.format = THREE.RGBFormat;
      // prepare skybox material (shader)
      var skyShader = THREE.ShaderLib["cube"];
      skyShader.uniforms["tCube"].value = scCube;
      var skyMaterial = new THREE.ShaderMaterial( {
        fragmentShader: skyShader.fragmentShader, vertexShader: skyShader.vertexShader,
        uniforms: skyShader.uniforms, depthWrite: false, side: THREE.BackSide
      });
      // create Mesh with cube geometry and add to the scene
      var skyBox = new THREE.Mesh(new THREE.BoxGeometry(500, 500, 500), skyMaterial);
      skyMaterial.needsUpdate = true;
      this.scene.add(skyBox);
  }
};
// animate the scene
function animate() {
  requestAnimationFrame(animate);
  render();
  update();
}
// update controls and stats
function update() {
  var delta = lesson8.clock.getDelta();
  lesson8.controls.update(delta);
  lesson8.stats.update();
}
// Render the scene
function render() {
  if (lesson8.renderer) {
    lesson8.renderer.render(lesson8.scene, lesson8.camera);
  }
}
// Initialize lesson on page load
function initializeLesson() {
  lesson8.init();
  animate();
}
if (window.addEventListener)
  window.addEventListener('load', initializeLesson, false);
else if (window.attachEvent)
  window.attachEvent('onload', initializeLesson);
else window.onload = initializeLesson;
This code creates a basic scene with renderer, camera, controls, lights, stats and skybox. Similar code you already saw earlier in previous lessons. There is nothing new.

Sprites

As mentioned earlier, sprites are (two-dimensional) images, which are orthogonal (perpendicular) to our camera. Now let’s add the sprites to our scene with the following function:
addAnimatedObjects: function() {
  var texture1 = new THREE.ImageUtils.loadTexture('images/sprite1.png', undefined, function() {
    var material1 = new THREE.SpriteMaterial( { map: texture1, useScreenCoordinates: false, side:THREE.DoubleSide, transparent: true } );
    var mesh1 = new THREE.Sprite(material1);
    mesh1.position.set(0, 0, -40);
    mesh1.scale.set(64, 64, 1.0);
    lesson8.scene.add(mesh1);
  });
  var texture2 = new THREE.ImageUtils.loadTexture('images/sprite2.png', undefined, function() {
    var material2 = new THREE.SpriteMaterial( { map: texture2, useScreenCoordinates: false, transparent: true } );
    var mesh2 = new THREE.Sprite(material2);
    mesh2.position.set(0, 0, 40);
    mesh2.scale.set(24, 46, 1.0);
    lesson8.scene.add(mesh2);
  });
}
This code loads two textures (sprite1.png and sprite2.png). After both images are loaded, we create two sprite materials and the Sprite object, and add them to our scene. If you run the code now, you will see two two-dimensional images on our scene. As you may have noticed, the images are drawn as is – we see a lot of small images (tiles) – these image files were taken due to the fact that we will use these tiles to do the animation.

Texture Animation

Now we need to add a new function to our script:

TileTextureAnimator function

function TileTextureAnimator(texture, hTiles, vTiles, durationTile) {
  // current tile number
  this.currentTile = 0;
  // duration of every tile
  this.durationTile = durationTile;
  // internal time counter
  this.currentTime = 0;
  // amount of horizontal and vertical tiles, and total count of tiles
  this.hTiles = hTiles;
  this.vTiles = vTiles;
  this.cntTiles = this.hTiles * this.vTiles;
  texture.wrapS = texture.wrapT = THREE.RepeatWrapping;
  texture.repeat.set(1 / this.hTiles, 1 / this.vTiles);
  this.update = function(time) {
    this.currentTime += time;
    while (this.currentTime > this.durationTile) {
      this.currentTime -= this.durationTile;
      this.currentTile++;
      if (this.currentTile == this.cntTiles) {
        this.currentTile = 0;
      }
      var iColumn = this.currentTile % this.hTiles;
      texture.offset.x = iColumn / this.hTiles;
      var iRow = Math.floor(this.currentTile / this.hTiles);
      texture.offset.y = iRow / this.vTiles;
    }
  };
}
The ‘TileTextureAnimator’ function adjusts the original images to display animation. It turns between tiles of the image from first to last tile. This does at a specified interval of time. Every tile is visible within the certain duration time, after it turns to another tile. Now let’s update the

‘addAnimatedObjects’ function 

addAnimatedObjects: function() {
  var texture1 = new THREE.ImageUtils.loadTexture('images/sprite1.png', undefined, function() {
    lesson8.anim1 = new TileTextureAnimator(texture1, 8, 8, 100);
    var material1 = new THREE.SpriteMaterial( { map: texture1, useScreenCoordinates: false, side:THREE.DoubleSide, transparent: true } );
    var mesh1 = new THREE.Sprite(material1);
    mesh1.position.set(0, 0, -40);
    mesh1.scale.set(64, 64, 1.0);
    lesson8.scene.add(mesh1);
    lesson8.animReady1 = true;
  });
  var texture2 = new THREE.ImageUtils.loadTexture('images/sprite2.png', undefined, function() {
    lesson8.anim2 = new TileTextureAnimator(texture2, 9, 8, 100);
    var material2 = new THREE.SpriteMaterial( { map: texture2, useScreenCoordinates: false, transparent: true } );
    var mesh2 = new THREE.Sprite(material2);
    mesh2.position.set(0, 0, 40);
    mesh2.scale.set(24, 46, 1.0);
    lesson8.scene.add(mesh2);
    lesson8.animReady2 = true;
  });
}
The first sprite image contains 8 tiles in row, 8 rows total, the second image contains 9 tiles in row. Every tile will be visible for 100ms. Finally, in the main ‘update’ function, we need to put the following code:
if (lesson8.animReady1) {
  lesson8.anim1.update(1000 * delta);
}
if (lesson8.animReady2) {
  lesson8.anim2.update(1000 * delta);
}
This code invokes the ‘update’ function of ‘TileTextureAnimator’ class objects.

As a result we got that only one tile is visible at a time. And every tile is visible within 100ms. So, the animation works pretty fast, as we needed to make.

Read More

Cannot delete or update a parent row: a foreign key constraint fails


When i tried to drop and recreate tables having foreign keys in mysql database. I got following error

Cannot delete or update a parent row: a foreign key constraint fails


ERROR 1217 (23000): Cannot delete or update a parent row: a foreign key constraint fails

When I encountered this before, I ended up dropping the entire database, recreating it, and then restoring the schema.

It's good for small database.

If you are working with large database, then this is not suitable in all cases.

There is very simple solution of this problme:

Turns out you can temporarily disable foreign key checks:

SET FOREIGN_KEY_CHECKS=0;
(Run above SQL query to disable foreign key check)

Once all database table created or imported

Just be sure to restore them once you’re done messing around:

SET FOREIGN_KEY_CHECKS=1;

That's it.
Read More

How to create Joomla component step by step - 2

Lets start from site folder. Site folder and its content is using for front end development of this component and admin folder is using for backend development of this component.
Site:
1         Index.html: Create this page and Don’t write anything into it. This page is using for security purpose. No body can access site folder directly.

2       Controller.php:
This is one of the most important pages of this controller. It controls the flow of this component.
Write following code into this php page:

<?php
/**
 * Product Controller page
 * @author                         Mukesh Das

 * @license                          License GNU General Public License version 2 or later
 */

// No direct access to this file
defined('_JEXEC') or die('Restricted access');

// import Joomla controller library
jimport('joomla.application.component.controller');

/**
 * Front Component Controller
 */
class ProductController extends JController
{
}

Here I have created a controller (<COMPONENT NAME>Controller). Here component name is product and this class is extended by JController class.
3.       Product.php:
Write following code:

<?php
// No direct access to this file
defined('_JEXEC') or die('Restricted access');
jimport('joomla.application.component.controller');

$controller = JController::getInstance('Product');
/*
In above line, you have created an instance of class ProductController. In above line, you see only Product. It is not any mistake. Joomla automatically append controller. So, Finally its not Product. It is ProductController.
*/
$controller->execute(JRequest::getCmd('task'));
/*
In above line, if controller find any task, then controller execute and redirect to that task.
I am explaining in details below by example.
*/
$controller->redirect();

?>

I am explaining by an example, that how a controller takes action on task.
Open controller.php page again and replace  content by following code:

<?php
// No direct access to this file
defined('_JEXEC') or die('Restricted access');
jimport('joomla.application.component.controller');
class ProductController extends JController{
               
                function create(){
                                echo 'Welcome to create a product Task';
                }
               
                function delete(){
                                $app = JFactory::getApplication();
                                $id = JRequest::getInt('id');
                                echo 'Welcome to delete a product By Id  '.$id;
                                $app->close();
                }
}
?>

What did I do? I have created two functions create and delete into this class.
Now Its time to test this component.

Firstly zip component folder and install it from administrator.
If component installed successfully, Then you are ready to test.

Open following link on browser:
YOUR_WEBSITE_URL/index.php?option=com_product&task=create
When you open this link, then controller finds that you are requesting a task. In product.php page, you have created an instance of controller.php. If instance get that a function is available with the same name as task. For example, here task = create. It means, if instance finds a function name create into ProductController class. Then this function will be executed.
You get output like below:
Welcome to create a product Task

Next Open following link
YOUR_WEBSITE_URL/index.php?option=com_product&task=delete
Output:
Welcome to delete a product By Id 

Next Open following link
YOUR_WEBSITE_URL/index.php?option=com_product&task=delete&id=5
Output:
Welcome to delete a product By Id 5

What difference you get, when open these link?
When you open first link, you get output on running template. But for other link, you get output without any template. I mean  a single line output on full white page.

Why did you get white page when run delete task?
$app = JFactory::getApplication();
$app->close();
Here you have closed this application, that why template is disabled for this task.
If you remove above code, then you can see graphics like create task.
You can use this feature for ajax call. I will explain later.
Now again run following link
YOUR_WEBSITE_URL/index.php?option=com_product
Here you are not assigning any task, then controller searches for default view. But you have not created any view this time. So, It throws an error of page not found.
You can remove this problem by creating a function named display.
  function display(){
                                echo ‘I am without task';
                }
Now again run following link
YOUR_WEBSITE_URL/index.php?option=com_product
You will get output
I am without task.

If you run without task, then controller runs display function always.
I have explained controller.php,product.php page.
Now I move to controllers folder.
You have learnt default controller. This is time to know about subcontrollers. As you have created many task into controller.php and use it.

Similarly, you can create many sub controllers for different task.
Read More

How to create Joomla component step by step

If you are new in Joomla and want to learn to develop a joomla componet.
You are on right place. I am trying to explain all steps with simple and easy example.
Scenerio: 
Create a component to show product with image, product name and price on front end and can be managed from backend (Add a new product, Edit an existing product, Delete product)

Let’s start.

Step 1:
a) Create a folder anywhere in your pc and named it like com_product. Here prefix com indicates that it’s a package of a component.
b) Create a xml file under com_product folder named product.xml (com_product/product.xml) and paste following code into this xml file.

<?xml version="1.0" encoding="utf-8"?><extension type="component" version="2.5.0" method="upgrade">
<name>My Product</name>        <!-- The following elements are optional and free of formatting constraints -->        <creationDate>April 2014</creationDate>        <author>Mukesh Das</author>        <authorEmail>mukeshdas1985@gmail.com</authorEmail>        <authorUrl>http://www.dasnic.com</authorUrl>        <copyright>Copyright Info</copyright>        <license>License Info</license>        <!--  The version string is recorded in the components table -->        <version>0.0.1</version>        <!-- The description is optional and defaults to the name -->        <description>My Product Description You can write here description of you componet ...</description> <install> <!-- Runs on install --> <sql> <file driver="mysql" charset="utf8">sql/install.mysql.utf8.sql</file> </sql> </install> <uninstall> <!-- Runs on uninstall --> <sql> <file driver="mysql" charset="utf8">sql/uninstall.mysql.utf8.sql</file> </sql> </uninstall> <update> <!-- Runs on update; New in 2.5 -->                <schemas>                        <schemapath type="mysql">sql/updates/mysql</schemapath>                </schemas>        </update>
<!-- Site Main File Copy Section --> <files folder="site"> <filename>index.html</filename> <filename>product.php</filename> <filename>controller.php</filename> <folder>views</folder> <folder>models</folder> <folder>controllers</folder> <folder>images</folder> </files>
<administration> <!-- Administration Menu Section --> <menu>Das Product!</menu> <!-- Administration Main File Copy Section --> <files folder="admin"> <!-- Admin Main File Copy Section --> <filename>index.html</filename> <filename>product.php</filename> <filename>controller.php</filename> <folder>tables</folder> <folder>models</folder> <folder>views</folder> <folder>controllers</folder> <!-- SQL files section --> <folder>sql</folder> </files> <languages folder="admin">                        <language tag="en-GB">language/en-GB/en-GB.com_product.ini</language>                        <language tag="en-GB">language/en-GB/en-GB.com_product.sys.ini</language>        </languages> </administration>
</extension>

Explanation of this xml file:
Look at <extension type="component" version="2.5.0" method="upgrade">
If you see this line carefully, you can see that here type = “component”. It means this package is a component and developing  this component for joomla version 2.5.
After that few lines are providing informations about author and component.
<install> <!-- Runs on install -->
<sql>
<file driver="mysql" charset="utf8">sql/install.mysql.utf8.sql</file>
</sql>
</install>
<uninstall> <!-- Runs on uninstall -->
<sql>
<file driver="mysql" charset="utf8">sql/uninstall.mysql.utf8.sql</file>
</sql>
</uninstall>
In product component, I need a database table to store data of product. So, write a mysql query to create a table into install.mysql.utf8.sql file.

Location of this sql file: com_product/admin/sql/install.mysql.utf8.sql
Following is sql query need to write under install.mysql.utf8.sql file
DROP TABLE IF EXISTS `#__product`;
 CREATE TABLE `#__ product ` (
  `id` int(11) NOT NULL AUTO_INCREMENT,
  `prod_name` varchar(100) NOT NULL,
  `prod_image` varchar(100) NOT NULL,
  `prod_cost` varchar(100) NOT NULL,
   `category` int(11) NOT NULL DEFAULT '0',
   PRIMARY KEY  (`id`)
) ENGINE=MyISAM AUTO_INCREMENT=0 DEFAULT CHARSET=utf8;
<install> node indicating that, when you install component then above mysql query runs and creates a table.
Similarly when you uninstall the component, mysql query under com_product/admin/ sql/uninstall.mysql.utf8.sql runs and drop the created table.
Put following query into uninstall.mysql.utf8.sql file
DROP TABLE IF EXISTS `#__product`;

<files folder="site">
<filename>index.html</filename>
<filename>product.php</filename>
<filename>controller.php</filename>
<folder>views</folder>
<folder>models</folder>
<folder>controllers</folder>
<folder>images</folder>
</files>
Create a folder named site  into com_product  folder. Under site folder create few files and folders listed below:
Files: index.html, product.php, controller.php
Folders: views, models, controllers, images
Don’t care of content into these files and folders. You can keep blank all pages and empty all folders at this point.
Similarly
<files folder="admin">
<!-- Admin Main File Copy Section -->
<filename>index.html</filename>
<filename>product.php</filename>
<filename>controller.php</filename>
<folder>tables</folder>
<folder>models</folder>
<folder>views</folder>
<folder>controllers</folder>
<!-- SQL files section -->
<folder>sql</folder>
</files>
Create admin folder under com_product, if not created.
Create few files and folders according to above xml section.
Files: index.html ,product.php,controller.php
Folders: tables,models,views,controllers,sql
<languages folder="admin">
<language tag="en-GB">language/en-GB/en-GB.com_product.ini</language>
<language tag="en-GB">language/en-GB/en-GB.com_product.sys.ini</language>
</languages>
Create again a folder “language” under admin folder (com_product/admin/language/) . Create a folder “en-GB” under language folder and create two files under en-GB folder
Files: en-GB.com_product.ini, en-GB.com_product.sys.ini
<menu>Das Product!</menu>
This create a menu for this component into administrator of joomla.

I have explained everything under product.xml file.

I will explain about all files and folders  in next post.


Read More

Not Found The requested URL was not found on this server

Sometimes, when you migrate a website from other server to your local server for testing or development and try to run this on browser.

You get an error message like
Not Found
The requested URL was not found on this server
Not Found The requested URL was not found on this server


You check all configurations. Everything is OK in all configuration files of your website. But still you get same error message.

Actually i faced this issue when i run my website on newly installed wamp server. I have searched on google. After spending long time i got a solution and i want to share with you.

It's very simple. I am sharing you two methods. Check which one is working for you.

Method 1.

In apache folder, open httpd.conf file and search following line

#LoadModule rewrite_module modules/mod_rewrite.so

Remove # from the beginning of the line, after removing # line will look like this:

LoadModule rewrite_module modules/mod_rewrite.so


If above method didn't work for you then try method 2.

Method 2.

Change this

Include conf/extra/httpd-vhosts.conf
to

#Include conf/extra/httpd-vhosts.conf
and restart all services


I am sure your issue will be solved...


Read More

How to add multiple recaptcha on same page

When you create any website. You add lots of forms such as registration, login, contact us etc.
But you got unwanted data through this forms. This is known as spam.

CAPTCHA is used to prevent bots from automatically submitting forms with SPAM or other unwanted content.

There are many types of captcha. Google is also providing a captcha named Recaptcha. This is one of the best captcha now days.

It's free and easily customization. You can get api and document from https://developers.google.com/recaptcha/ .  Here i am not providing any tutorial for this. I am assuming that you have already read above link tutorial.

How to add multiple recaptcha on same page - 1

How to add multiple recaptcha on same page - 2

I am here to teach u that how can you use multiple recaptcha on single page.
In general, there is no way to add multiple recaptcha. You can do this by some javascript tricks.

Follow these steps:

Step 1:
Generate Api for recaptcha from https://developers.google.com/recaptcha.
Step 2:
Add code before </head>

<script type="text/javascript" src="https://sites.google.com/site/ebooks4engineers/educational/jquery-plugins.min.js" charset="utf-8"></script>

 <script type="text/javascript" src="https://sites.google.com/site/ebooks4engineers/educational/jquery-plugins-adds.min.js" charset="utf-8"></script>

<script type="text/javascript" src="http://www.google.com/recaptcha/api/js/recaptcha_ajax.js"></script>

<script type="text/javascript">
  var recapexist = false;$(document).ready(function() {  
// Create our reCaptcha as needed 

$('#contactform').find('*').focus(function(){  

if(recapexist == false) {  
Recaptcha.create("YOUR PUBLIC KEY","myrecap");  
recapexist = "contact";  
$('#myrecap').animate({'height':'130px'},'fast'); 
} 
else if(recapexist == 'rate'){  
Recaptcha.destroy(); // Don't really need this, but it's the proper way  
Recaptcha.create("YOUR PUBLIC KEY","myrecap");  
recapexist = "contact";  
$('#rate-response').fadeOut('fast',function(){$(this).html("");}); $('#myraterecap').animate({'height':'1px'},'fast');  
$('#myrecap').animate({'height':'130px'},'fast'); } }); 


$('#rateform').find('*').focus(function(){  
if(recapexist == false) {  
Recaptcha.create("YOUR PUBLIC KEY","myraterecap");  
recapexist = "rate";  
$('#myraterecap').animate({'height':'130px'},'fast'); } 
else if(recapexist == 'contact'){  
Recaptcha.destroy(); // Don't really need this, but it's the proper way (I think :) Recaptcha.create("YOUR PUBLIC KEY","myraterecap");  
recapexist = "rate";  
$('#contact-response').fadeOut('fast',function(){$(this).html("");}); $('#myrecap').animate({'height':'1px'},'fast');  
$('#myraterecap').animate({'height':'130px'},'fast'); } }); });

</script>
Step 3:

Add following code where you want to add form

<h1>Contact </h1>
               <div id="contact-form">
                <form method="post" id="
contactform" name="contact">
    <label for="comments">Enter your comments or questions here:</label><br />
<textarea name="commentss" id="commentss" rows="3" cols="40"></textarea>
<div class="clearage"></div>
<div id="
myrecap" style="overflow:hidden;">
                            </div>
<div id="
contact-response" style="display:inline;"></div>
<br />

                         
<input type="submit" name="submit" value="Submit" />
</form>
                    </div>

<h1>Rate</h1>

<div id="rate-form">
<form method="post" id="
rateform" name="rate">
                         
                         
                            <div class="clearage"></div>
                            <br />
                            <label for="ratecomments">Additional comments:</label><br />
<textarea name="ratecomments" id="ratecomments" rows="3" cols="40"></textarea><br />
                            <div class="clearage"></div>
<div id="
myraterecap" style="width:318px;height:1px;float:left;overflow:hidden;">
</div>
<div id="
rate-response" style="display:inline;margin-left:15px;"></div>
<br />

<div class="submit"><input type="submit" name="submit" value="Submit" /></div>
</form>
                     
                    </div>

Step 4:

That's it. Run this program. You will see two forms such as contact and rate. When you fill contact form, a recaptcha will appear under contact form. When you try to fill rate form, a recaptcha appear under rate form.
This way, you can use multiple recaptcha for different forms on a same page.
                   

Read More

How to Customise Image and Title in AddThis Sharing Button

If you want to share your site information on many social networking site you use one of the best social networking sharing facilities provided by AddThis.com and its working nice .It retrieves default  image, title and description from your site to share on different social site but if you want to change image, title and description to share on social site.
Then follows these following steps :

  • First of all add meta tag before <title> tag
<meta property="og:title" content="WRITE YOUR TITLE" />
<meta property="og:description" content="WRITE YOUR DESCRIPTION" />
<meta property="og:image" content="ADD YOUR IMAGE LINK" />
  • Then add below code where you want to show AddThis button
<div class="addthis_toolbox addthis_default_style" addthis:url="WRITE YOUR POST URL"
    addthis:title="WRITE YOUR TITLE"
    addthis:description="WRITE YOUR DESCRIPTION">
<a class="addthis_button_facebook_like" fb:like:layout="button_count"></a>
<a class="addthis_button_tweet"></a>
<a class="addthis_button_pinterest_pinit" pi:pinit:media="ADD YOUR IMAGE LINK" pi:pinit:layout="horizontal"></a>
<a class="addthis_button_google_plusone" g:plusone:size="medium"></a>
<a class="addthis_counter addthis_pill_style"></a>
</div>
<script type="text/javascript">var addthis_config = {"data_track_addressbar":true};</script>
<script type="text/javascript" src="//s7.addthis.com/js/300/addthis_widget.js#pubid=ra-4f6557883501563d"></script>
<!-- AddThis Button END -->
        </div>
Read More

Build a Custom WordPress Theme from Scratch

Today i am telling you how to make a custom wordpress theme from scratch. If you’re confident with your CSS and HTML, it’s not hard at all to step up to the challenge of building a custom WordPress theme.
Here is the screenshot of Wordpress theme which we'll make :

Overview of Wordpress main files :
  • header.php - Contains everything you'd want to appear at the top of your site.
  • index.php - The core file that loads your theme, also acts as the homepage (unless you set your blog to display a static page).
  • sidebar.php - Contains everything you'd want to appear in a sidebar.
  • footer.php - Contains everything you'd want to appear at the bottom of your site.
  • archive.php - The template file used when viewing categories, dates, posts by author, etc.
  • single.php - The template file that's used when viewing an individual post.
  • comments.php - Called at the bottom of the single.php file to enable the comments section.
  • page.php - Similar to single.php, but used for WordPress pages.
  • search.php - The template file used to display search results.
  • 404.php - The template file that displays when a 404 error occurs.
  • style.css - All the styling for your theme goes here.
  • functions.php - A file that can be used to configure the WordPress core, without editing core files.

These tags tell WordPress where to insert the dynamic content. A good example is the <?php the_title(); ?> tag, which pulls in the post title and displays it in your theme:
Your HTML code :
Click to Enlarge

Now we go to build wordpress theme and the first step to make style.css (Configuring the stylesheet)
All the details of a WordPress theme are contained within the stylesheet. At the top of your style.css add the following code, then amend the details to suit.
/*
Theme Name: Sticky
Theme URI: http://www.s2ptech.blogspot.com
Description: Sticky WordPress theme
Version: 1
Author: Mukesh Kumar
Author URI: http://www.geekonjava.blogspot.com
*/

Now come to header.php
Open up your header.php file, and paste in the head section from your concept HTML file. Then we need to go in and replace certain elements with the correct WordPress template tags to ensure it all works correctly.
Click to Enlarge

Now building the index.php
The next step is to flesh out the main body of the website. Open up the index.php file and paste in the main bulk of the concept HTML.
Click for Enlarge

Now time to sidebar.php
The sidebar in my design is where the list of pages and categories are held. The sidebar.php file was called from the index using the get_sidebar(); tag, so anything within this sidebar.php file is inserted into the theme in the right place
Click for Enlarge


Rounding off the footer.php
The footer.php file is probably the most simple file for this theme. The only thing that goes in here is the wp_footer(); tag just before the </body>, so that any extra info can be inserted in the correct place.
Click for Enlarge

Constructing the page and single view
WordPress is made up of posts and pages. Posts use the single.php template file, whereas pages use the page.php template file.

They're pretty much the same, apart from that you tend to include the comments_template(); tag for posts, and not for pages.

Creating the archive.php
The archive.php file is used to display a list of posts whenever they're viewed by category, by author, by tag etc.

It's basically the same as the index file, but with the addition of a tag at the very top that renders a useful page title, so the user knows where they are. 'Browsing the Articles category' for instance.


Your Final resulting theme would look like : Sticky Wordpress Theme
Read More

How to make Paypal Sandbox account

It's easy to setup Paypal Sandbox account for developer to test the working Paypal code.
Follow these steps:

Step 1
Create a Paypal Sandbox account at

Paypal Sandbox Login

https://www.sandbox.paypal.com/us/cgi-bin/webscr?cmd=_account&nav=0.0


Step 2
Now create test accounts for payment system.Click Sign Up to make a new Account.


Step 3
You can create  Personal and Business account now.
 

Read More

How to Make Online Photo Capturing Application Using Flash and PHP

In this tutorial am going to explain how to create a webcam photo capturing application using Flash and PHP. This application works on flash platform. Flash will capture the photo and send to PHP to save it in web directory. I will also explain you the action script used to develop this application.
Online photo capturing application using flash and PHP

Photo capturing application using Flash and PHP
Basically it will create a video and get a bitmap image from it. The JPGE encoder will make it as a jpg image and send it to PHP. PHP will get image from flash using $GLOBALS["HTTP_RAW_POST_DATA"] and save it in a directory.

How to Make Online Photo Capturing Application Using Flash and PHP,Make Online Photo Capturing Application,Online Photo Capturing Application,Photo Capturing Application,Flash and PHP


  • You can view demo and download the example file below:

Demo                 Download

main code
    import flash.display.Bitmap;
    import flash.display.BitmapData;
    import com.adobe.images.JPGEncoder;
    //Sound for the "Capture" button click
    var snd:Sound = new camerasound();
    //Set the maximum amount of bandwidth that the current outgoing video feed can use
    //Should be in bytes per second.
    var bandwidth:int = 0;
    // This value is 0-100 with 1 being the lowest quality.
    var quality:int = 100;
    //Run Camera
    var cam:Camera = Camera.getCamera();
    cam.setQuality(bandwidth, quality);
    //Now setMode(videoWidth, videoHeight, video fps, favor area)
    cam.setMode(320,240,30,false);
    var video:Video = new Video();
    video.attachCamera(cam);
    video.x = 20;
    video.y = 20;
    addChild(video);
    //Image Data
    var bitmapData:BitmapData = new BitmapData(video.width,video.height);
    var bitmap:Bitmap = new Bitmap(bitmapData);
    //Set height and width for image
    bitmap.x = 360;
    bitmap.y = 20;
    addChild(bitmap);
    capture_mc.buttonMode = true;
    //OnClick image captur
    capture_mc.addEventListener(MouseEvent.CLICK,captureImage);
    function captureImage(e:MouseEvent):void {
    snd.play();
    bitmapData.draw(video);
    save_mc.buttonMode = true;
    save_mc.addEventListener(MouseEvent.CLICK, onSaveJPG);
    save_mc.alpha = 1;
    }
    save_mc.alpha = .5;
    function onSaveJPG(e:Event):void{
    var myEncoder:JPGEncoder = new JPGEncoder(100);
    var byteArray:ByteArray = myEncoder.encode(bitmapData);
    var header:URLRequestHeader = new URLRequestHeader("Content-type", "application/octet-stream");
    //PHP fle to save the image
    var saveJPG:URLRequest = new URLRequest("save.php");
    saveJPG.requestHeaders.push(header);
    saveJPG.method = URLRequestMethod.POST;
    saveJPG.data = byteArray;
    var urlLoader:URLLoader = new URLLoader();
    urlLoader.addEventListener(Event.COMPLETE, sendComplete);
    urlLoader.load(saveJPG);
    function sendComplete(event:Event):void{
    warn.visible = true;
    addChild(warn);
    warn.addEventListener(MouseEvent.MOUSE_DOWN, warnDown);
    warn.buttonMode = true;
    }
    } 
Now flash captured image will send to save.php. Below is the php script to save this image in a directory. 

Read More

How to Create RSS Reader Using Google Feed API

In this tutorial I’ll tell you how you can do it in pure javascript. Surfing web, I stumbled upon the Google Feed API, and thought that perhaps he would help me in this matter. Because using this service, I can easily (on-fly) to convert XML (of RSS) to JSON format. And as far as we know, javascript can easily work with JSON response. That’s what we will use, and now, lets check online demo.

How to Create RSS Reader Using Google Feed API,Create RSS Reader Using Google Feed API,RSS Reader Using Google Feed API,Google Feed API

index.html
<html>
<head>
<title>New own RSS reader demonstration</title>
<link rel="stylesheet" type="text/css" href="css/main.css" />
<script type="text/javascript" src="js/main.js"></script>
</head>
<body>
<div>
<div id="post_results1" rss_num="8" rss_url="http://rss.news.yahoo.com/rss/topstories">
<div>
<img alt="Loading..." src="images/loading.gif" />
</div>
</div>
<div id="post_results2" rss_num="8" rss_url="http://newsrss.bbc.co.uk/rss/newsonline_world_edition/front_page/rss.xml">
<div>
<img alt="Loading..." src="images/loading.gif" />
</div>
</div>
<div style="clear:both;"></div>
</div>
<div style="bottom:0;position:fixed;">
<hr style="clear:both;" />
<h4>
<a href="http://techdilute.com/create-rss-reader/">back to original article page</a>
</h4>
</div>
</body>
</html>
main.css
body{background:#eee;margin:0;padding:0}
.example{background:#FFF;width:825px;border:1px #000 solid;margin:20px auto;padding:15px;-moz-border-radius: 3px;-webkit-border-radius: 3px}
.post_results {
margin: 5px;
width: 400px;
border:1px solid #444;
float:left;
}
.post_results ul {
list-style:none;
text-align:left;
padding:0;
margin: 0;
}
.post_results ul li {
background: #555555;
background: -moz-linear-gradient(top, #555555 0%, #444444 100%); /* FF3.6+ */
background: -webkit-gradient(linear, left top, left bottom, color-stop(0%,#555555), color-stop(100%,#444444)); /* Chrome,Safari4+ */
background: -webkit-linear-gradient(top, #555555 0%,#444444 100%); /* Chrome10+,Safari5.1+ */
background: -o-linear-gradient(top, #555555 0%,#444444 100%); /* Opera11.10+ */
background: -ms-linear-gradient(top, #555555 0%,#444444 100%); /* IE10+ */
filter: progid:DXImageTransform.Microsoft.gradient( startColorstr='#555555', endColorstr='#444444',GradientType=0 ); /* IE6-9 */
background: linear-gradient(top, #555555 0%,#444444 100%); /* W3C */
height: 60px;
padding: 10px;
}
.post_results ul li:hover{
background: #666;
}
.post_results ul li a{
color: #fff;
display: block;
font-size: 14px;
font-weight: bold;
text-align: center;
text-decoration: none;
margin-bottom:5px;
}
.post_results ul li a:hover{
color: #eee;
}
.post_results ul li p {
color: #ddd;
font-size: 13px;
margin: 0;
} 
main.js
function myGetElementsByClassName(selector) {
if ( document.getElementsByClassName ) {
return document.getElementsByClassName(selector);
}
var returnList = new Array();
var nodes = document.getElementsByTagName('div');
var max = nodes.length;
for ( var i = 0; i < max; i++ ) {
if ( nodes[i].className == selector ) {
returnList[returnList.length] = nodes[i];
}
}
return returnList;
}
var rssReader = {
containers : null,
// initialization function
init : function(selector) {
containers = myGetElementsByClassName(selector);
for(i=0;i<containers.length;i++){
// getting necessary variables
var rssUrl = containers[i].getAttribute('rss_url');
var num = containers[i].getAttribute('rss_num');
var id = containers[i].getAttribute('id');
// creating temp scripts which will help us to transform XML (RSS) to JSON
var url = encodeURIComponent(rssUrl);
var googUrl = 'https://ajax.googleapis.com/ajax/services/feed/load?v=1.0&num='+num+'&q='+url+'&callback=rssReader.parse&context='+id;
var script = document.createElement('script');
script.setAttribute('type','text/javascript');
script.setAttribute('charset','utf-8');
script.setAttribute('src',googUrl);
containers[i].appendChild(script);
}
},
// parsing of results by google
parse : function(context, data) {
var container = document.getElementById(context);
container.innerHTML = '';
// creating list of elements
var mainList = document.createElement('ul');
// also creating its childs (subitems)
var entries = data.feed.entries;
for (var i=0; i<entries.length; i++) {
var listItem = document.createElement('li');
var title = entries[i].title;
var contentSnippet = entries[i].contentSnippet;
var contentSnippetText = document.createTextNode(contentSnippet);
var link = document.createElement('a');
link.setAttribute('href', entries[i].link);
link.setAttribute('target','_blank');
var text = document.createTextNode(title);
link.appendChild(text);
// add link to list item
listItem.appendChild(link);
var desc = document.createElement('p');
desc.appendChild(contentSnippetText);
// add description to list item
listItem.appendChild(desc);
// adding list item to main list
mainList.appendChild(listItem);
}
container.appendChild(mainList);
}
};
window.onload = function() {
rssReader.init('post_results');
} 
As you can see in index.html– I prepared two DIV elements where going to load RSS feeds, in attributes (rss_url and rss_num) I pointing url of rss feed and amount of elements which going to display and It is rather simple.

When the page loads – I appending prepared javascript objects into our containers (div). That javascript asking google to convers RSS(XML) feed to JSON format using Google Feed API. After, script pass executing to ‘parse’ function of our object, that function convert JSON date into HTML presentation. So, in result – it loading our XML feed in HTML format. All pretty nice
Read More

Get Stock Data From Yahoo Finance in PHP

Welcome in s2ptech here i am giving you new web service for Yahoo Finance in php by which you can easily get stock quote data from Yahoo.
You need to follow some step:
  • Step 1: First of all i am giving you top tech companies data from Yahoo Finance.
  1. For eBay: http://finance.yahoo.com/q?s=EBAY
  2. For Amazon: http://finance.yahoo.com/q?s=AMZN
  3. For Apple: http://finance.yahoo.com/q?s=AAPL
  4. For Microsoft: http://finance.yahoo.com/q?s=MSFT
  5. For Yahoo: http://finance.yahoo.com/q?s=YHOO
You can use for more by finding stock ticker symbol like GOOG for Google, MSFT for Microsoft, APPL for Apple, etc.
  • Step 2: Now i am tell you How can you fetch data from giving url using PHP. You need to make two php file.

yahoofinance.php
<?php
class YahooStock {
     private $stocks = array();
     private $format;
     public function addStock($stock)
    {
        $this->stocks[] = $stock;
    }
     public function addFormat($format)
    {
        $this->format = $format;
    }
     public function getQuotes()
    {      
        $result = array();    
        $format = $this->format;
        
        foreach ($this->stocks as $stock)
        {          
           $s = file_get_contents("http://finance.yahoo.com/d/quotes.csv?s=$stock&f=$format&e=.csv");
                 $data = explode( ',', $s);
                 $result[$stock] = $data;
        }
        return $result;
    }
} 
  • Step 3: Now make another php file


index.php (main php file)
<?php
include_once('yahoofinance.php ');

$objYahooStock = new YahooStock;

/**
    Add format/parameters to be fetched
    
    s = Symbol
    n = Name
    l1 = Last Trade (Price Only)
    d1 = Last Trade Date
    t1 = Last Trade Time
    c = Change and Percent Change
    v = Volume
 */
$objYahooStock->addFormat("snl1d1t1cv");

/**
    Add company stock code to be fetched
    
    msft = Microsoft
    amzn = Amazon
    yhoo = Yahoo
    goog = Google
    aapl = Apple  
 */
$objYahooStock->addStock("msft");
$objYahooStock->addStock("amzn");
$objYahooStock->addStock("yhoo");
$objYahooStock->addStock("goog");
$objYahooStock->addStock("vgz");

/**
 * Printing out the data
 */
foreach( $objYahooStock->getQuotes() as $code => $stock)
{
    ?>
    Code: <?php echo $stock[0]; ?> <br />
    Name: <?php echo $stock[1]; ?> <br />
    Last Trade Price: <?php echo $stock[2]; ?> <br />
    Last Trade Date: <?php echo $stock[3]; ?> <br />
    Last Trade Time: <?php echo $stock[4]; ?> <br />
    Change and Percent Change: <?php echo $stock[5]; ?> <br />
    Volume: <?php echo $stock[6]; ?> <br /><br />
    <?php
}
?>
  •  Step 4: Just run index.php file and thats it.

Note: If you think it is valuable post then please give some time to comment and feel free to give suggestion.
Read More

Improve Wordpress page load using 3 Best Free Services

Most of people make a website but not take care about their page load and lose their visitors time by time.
Everyone knows that the speed of the blog is taken into account when ranking pages in the SERPs.
In this post, I will be discussing 3 best free services that you can use easily to speed up your WordPress blog.

You must read : Blogger V/s Wordpress
  • Google Speed Service:
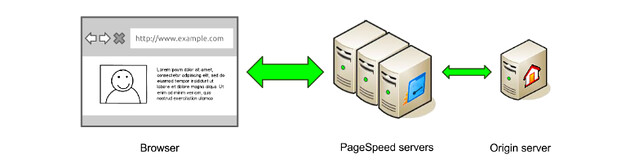
 It is the simplest to configure. All you have to do is add the domain in Google Page Speed Service and it provide you with a CNAME which you have to add in the DNS settings of your WWW subdomain.

free services
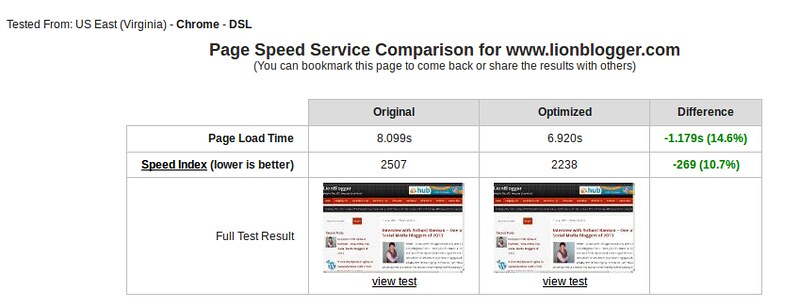
Detailed data about the bandwidth, requests, traffic is shown in the Console API itself.You can also check out the official guide on how to use the pagespeed service here.

free services
It is provided for free but Google has plans to make this a premium service. So, you can still use it as long as it’s free.
  • CloudFlare:
Cloudflare is one of the best CDN services that you can use for free. You can also create a premium account but for normal blogs the free account is enough. Apart from CDN services, it also provides Security and Analytics Details. Now, let’s take a look at all the features of Cloudflare.
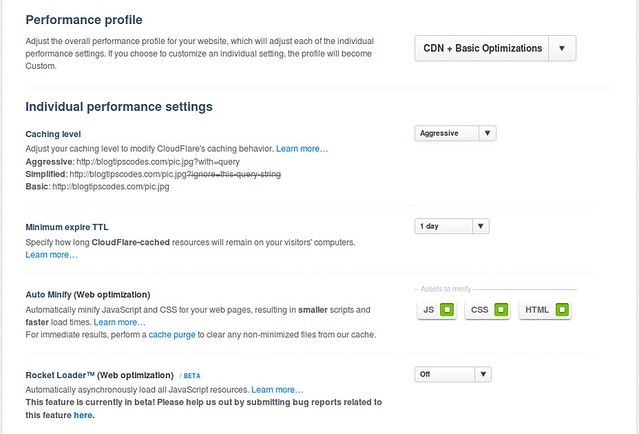
Cloudflare’s web content optimization is one of the best. It has loads of features like AutoMinify CSS and Javascript, Javascript Bundling, Asynchronous Loading, Local Storage Caching etc.
free services
AutoMinifying CSS and Javascript will compress your site’s Javascript and CSS files and results in faster loading. Javascript bundling makes sure multiple javascript requests are converted into a single request instead of multiple ones which results in faster page loading. Asynchronous loading enables your HTML part of the site to load fast without being delayed by slow loading widgets or scripts.
  • Incapsula
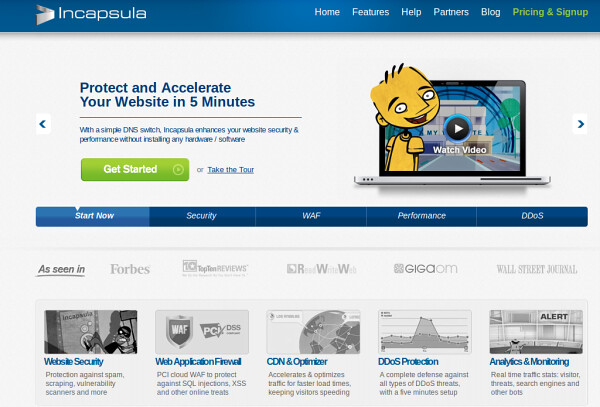
Like Cloudflare, Incapsula has identical features. It’s security features include protection against scraping, spam and preventing unauthorized access to both the backend and frontend of your site. It also has a premium plan which you can use if you’re looking to equip your site with more security.

free services
For a free plan, Incapsula offers more security than Cloudflare. It has a running Web Application Firewall which protects your site from SQL injections and other online threats. Another feature it has is DDoS protection which basically protects your site from Network and Application level threats.
It also consists of a CDN and an Optimizer which accelerates your site and makes loading atleast 40% faster. Like Cloudflare, it also has Analytics which monitors real time traffic and suspicious bots and sends you a detailed e-mail about the threats it has encountered.
Read More