Showing posts with label How to Make.... Show all posts

Make own Heart Rate Monitor

I built a relatively simple heart rate monitor circuit that is monitored and controlled by an Arduino Uno. The theory of operation is based on the fact that infrared (IR) light is partially absorbed by blood. When your index finger is placed between the IR emitter and detector, the amount of IR light absorbed by the finger (and thus transmitted into the detector) varies in sync with your heart beat.
How to Make own Heart Rate Monitor,Make own Heart Rate Monitor,own Heart Rate Monitor,Heart Rate Monitor,Homemade Heart Rate Monitor,Heart Rate Monitor project

The Arduino monitors and filters the IR detector's signal, and turns a blue LED on and off in sync with your heart beat. The signal filtering library used by the Arduino code can be found here.
How to Make own Heart Rate Monitor,Make own Heart Rate Monitor,own Heart Rate Monitor,Heart Rate Monitor,Homemade Heart Rate Monitor,Heart Rate Monitor project
I also modified some Processing code that monitors and plots the filtered signal from the serial monitor.

heart_rate_signal.ino1 KB
Plot_Heart_Rate_Signal.pde2 KB

Step 1: Building the Circuit

Build the circuit shown. I used this emitter detector pair from SparkFun. The resistor in series with the emitter is 100 Ohm, and the resistor in series with the detector is 10 kOhm. I use a blue LED (right side of bread board) in series with a 100 Ohm resistor.

Step 2: Connections to the Arduino Uno

The 5 V pin on the Arduino powers both the IR emitter and detector. The Analog 0 input pin monitors the voltage after the 10 kOhm resistor, and the Analog 8 output pin controls the voltage on the blue LED.

Step 3: Output

First upload and run the Arduino code. Second, run the Processing code. The Processing code monitors the serial port output and plots it. The shape of the output pulses is very sensitive to how the index finger is placed between the emitter and detector (position, pressure, etc.), and you can see this in the video below as it's impossible to hold my index finger perfectly still for the duration of the video.

Update: On a whim, I removed the blue LED from the circuit and retested. The new video below shows a markedly improved heart rate signal. I'm not sure what kind of interference (optical? electrical?) was occurring with the Blue LED near the IR detector, but getting rid of it certainly improved the signal.

I'll continue testing but I'm curious to see what others find.

Read More

How to Create Apple ID in iTunes without your Credit Card

Some apps like Google Earth, are available as free downloads in the iTunes Apps store but you need a UK or US based Apple ID to install them on to your iPad or Phone. Similarly, some iBooks and podcasts have geo restrictions and may only be available to iTunes users who are logged in with an Apple ID for one of the available countries.

Check this PostBest way to send mass emails Using Top Five Application

You can create multiple Apple IDs

 Like one for UK and another one for US Apps Store – and easily switch between them inside iTunes. So if you are signed-in from India, you can switch to the US store, login with your US based Apple ID and download the app that is otherwise not available in the Indian Apps Store.

When you create a new Apple ID, iTunes will require you to enter your credit card and the billing address of your card should be in that country. In other words, you need a US based credit card or PayPal account to create a Apple ID for the US iTunes Store. Apple will not let you create an Apple ID without entering valid payment information (see screenshot above).

Read alsoHow To Hack Apple's Mac App Store to Install App for Free

That said, you can take an alternate not-so-obvious route in iTunes to create an Apple ID for any country without requiring a credit card. Here’s how:

Create Apple ID in iTunes without your Credit Card


  • Launch the iTunes software on your computer and sign-out of your existing Apple ID. 
  • Choose Store in the menu and select Sign-out.
  • Next scroll to the bottom of the iTunes page, click Change Country and select one from the list for which you need an Apple ID. Alternatively, you may click the country’s flag to switch to the iTunes store of another region.
  • Now open the Apps Store inside iTunes, select any app that is free and click the Get button to download that App.
  • iTunes will now prompt you to enter your Apple ID and password. Do not enter your existing Apple ID. Instead, click the Create Apple ID button, agree to the terms & conditions, enter your email address & password and minimum age.
  • Proceed to the Payments screen and here you’ll see a new option that says NONE (see screenshot below). Select the None option, enter a dummy postal address and submit to create your new Apple ID that will be valid in the iTunes store of that country.
  • If you have kids at home, you can use this trick to create a separate Apple ID for the iPads, one that is not associated with your credit card and so they’ll never be able to make any accidental purchases.

An Easier Way to Create a New Apple ID

If you need another Apple ID but do not intend to use it with the iTunes store for download apps, there’s an easier way.
Go to icloud.com, click the Create Apple ID link and choose a different country from the dropdown. Your Apple ID will be created instantly but if you decide to use it for downloading iTunes content later, you’d still need to supply the credit card.
You Cannot Create An Apple ID Because You Do Not Meet The Minimum Age Requirement
You need to be at least 13+ years old to create an Apple ID inside iTunes. However, if you enter an incorrect date, iTunes will refuse to create your Apple ID and no matter how many times you try the process, you will keep getting an error saying “you cannot create an Apple ID because you do not meet the minimum age requirements.”

This is most like a caching related bug in the iTune software but can be easily.

  • Open Preferences inside iTunes, switch to the Advanced tab and choose Reset Cache
  • Quit iTunes and launch the Safari browser
  • Go to Preferences and under Privacy, choose the option “Remove all Website date” to clear the cache.

Open iTunes again, try downloading an app and it should not allow you to create an Apple ID without issues.
Read More

WebGL with Three.js tutorial and demo

Hello freinds in this tutorial we will be working with sprites and texture animation. If you do not know, sprites are simply images, that could be attached to objects. These sprite images are always orthogonal to our camera.

Three.js provides a special material for the sprites – THREE.SpriteMaterial, as well as a special object – THREE.Sprite. Also in this tutorial we will learn how to play the animation using sprites.

Check this tutorial : How to make a Virtual Reality 3D Tracking headset

Demo

Preparation

As usual, we have to prepare a small index.html file with necessary html markup to work on:

index.html

<!DOCTYPE html>
<html lang="en" >
  <head>
    <meta charset="utf-8" />
    <meta name="author" content="Script Tutorials" />
    <title>WebGL With Three.js - Sprites and Texture Animation | S2P Tech</title>
    <meta name="viewport" content="width=device-width, initial-scale=1.0, maximum-scale=1.0, user-scalable=no">
    <link href="css/main.css" rel="stylesheet" type="text/css" />
  </head>
  <body>
    <script src="js/three.min.js"></script>
    <script src="js/THREEx.WindowResize.js"></script>
    <script src="js/OrbitControls.js"></script>
    <script src="js/stats.min.js"></script>
    <script src="js/script.js"></script>
    <div style="position: absolute; top: 10px; left: 20px; text-align: center;"><a href="http://s2ptech.blogspot.com/2015/05/webgl-with-threejs-tutorial-and-demo.html" target="_blank">"WebGL With Three.js Tutorial"</a> is prepared by <a href="http://www.s2ptech.com/" target="_blank">S2P Tech</a> team.<br>Drag to spin</div>
  </body>
</html>
In this code, we connect the main Three.js library and few additional utilites: WindowResize event handler, Orbit controls and Stats

File Explorer and Download File

Preparation of the main webgl scene

Now let’s create the main ‘script.js’ file and place the code shown below:

Check this tutorials : How to add multiple recaptcha on same page

script.js

var lesson8 = {
  scene: null,
  camera: null,
  renderer: null,
  container: null,
  controls: null,
  clock: null,
  stats: null,
  anim1: null, anim2: null, // animations
  animReady1: false, animReady2: false,
  init: function() { // initialization
    // create main scene
    this.scene = new THREE.Scene();
    this.scene.fog = new THREE.FogExp2(0xcce0ff, 0.0003);
    var SCREEN_WIDTH = window.innerWidth,
        SCREEN_HEIGHT = window.innerHeight;
    // prepare perspective camera
    var VIEW_ANGLE = 60, ASPECT = SCREEN_WIDTH / SCREEN_HEIGHT, NEAR = 1, FAR = 1000;
    this.camera = new THREE.PerspectiveCamera(VIEW_ANGLE, ASPECT, NEAR, FAR);
    this.scene.add(this.camera);
    this.camera.position.set(100, 0, 0);
    this.camera.lookAt(new THREE.Vector3(0,0,0));
    // prepare webgl renderer
    this.renderer = new THREE.WebGLRenderer({ antialias:true });
    this.renderer.setSize(SCREEN_WIDTH, SCREEN_HEIGHT);
    this.renderer.setClearColor(this.scene.fog.color);
    this.renderer.shadowMapEnabled = true;
    this.renderer.shadowMapSoft = true;
    // prepare container
    this.container = document.createElement('div');
    document.body.appendChild(this.container);
    this.container.appendChild(this.renderer.domElement);
    // events
    THREEx.WindowResize(this.renderer, this.camera);
    // prepare controls (OrbitControls)
    this.controls = new THREE.OrbitControls(this.camera, this.renderer.domElement);
    this.controls.target = new THREE.Vector3(0, 0, 0);
    this.controls.maxDistance = 3000;
    // prepare clock
    this.clock = new THREE.Clock();
    // prepare stats
    this.stats = new Stats();
    this.stats.domElement.style.position = 'absolute';
    this.stats.domElement.style.left = '50px';
    this.stats.domElement.style.bottom = '50px';
    this.stats.domElement.style.zIndex = 1;
    this.container.appendChild( this.stats.domElement );
    // add lights
    this.scene.add( new THREE.AmbientLight(0x606060) );
    var dirLight = new THREE.DirectionalLight(0xffffff);
    dirLight.position.set(200, 200, 1000).normalize();
    this.camera.add(dirLight);
    this.camera.add(dirLight.target);
    // display skybox
    this.addSkybox();
    // display animated objects
    this.addAnimatedObjects();
  },
  addSkybox: function() {
      // define path and box sides images
      var path = 'skybox/';
      var sides = [ path + 'sbox_px.jpg', path + 'sbox_nx.jpg', path + 'sbox_py.jpg', path + 'sbox_ny.jpg', path + 'sbox_pz.jpg', path + 'sbox_nz.jpg' ];
      // load images
      var scCube = THREE.ImageUtils.loadTextureCube(sides);
      scCube.format = THREE.RGBFormat;
      // prepare skybox material (shader)
      var skyShader = THREE.ShaderLib["cube"];
      skyShader.uniforms["tCube"].value = scCube;
      var skyMaterial = new THREE.ShaderMaterial( {
        fragmentShader: skyShader.fragmentShader, vertexShader: skyShader.vertexShader,
        uniforms: skyShader.uniforms, depthWrite: false, side: THREE.BackSide
      });
      // create Mesh with cube geometry and add to the scene
      var skyBox = new THREE.Mesh(new THREE.BoxGeometry(500, 500, 500), skyMaterial);
      skyMaterial.needsUpdate = true;
      this.scene.add(skyBox);
  }
};
// animate the scene
function animate() {
  requestAnimationFrame(animate);
  render();
  update();
}
// update controls and stats
function update() {
  var delta = lesson8.clock.getDelta();
  lesson8.controls.update(delta);
  lesson8.stats.update();
}
// Render the scene
function render() {
  if (lesson8.renderer) {
    lesson8.renderer.render(lesson8.scene, lesson8.camera);
  }
}
// Initialize lesson on page load
function initializeLesson() {
  lesson8.init();
  animate();
}
if (window.addEventListener)
  window.addEventListener('load', initializeLesson, false);
else if (window.attachEvent)
  window.attachEvent('onload', initializeLesson);
else window.onload = initializeLesson;
This code creates a basic scene with renderer, camera, controls, lights, stats and skybox. Similar code you already saw earlier in previous lessons. There is nothing new.

Sprites

As mentioned earlier, sprites are (two-dimensional) images, which are orthogonal (perpendicular) to our camera. Now let’s add the sprites to our scene with the following function:
addAnimatedObjects: function() {
  var texture1 = new THREE.ImageUtils.loadTexture('images/sprite1.png', undefined, function() {
    var material1 = new THREE.SpriteMaterial( { map: texture1, useScreenCoordinates: false, side:THREE.DoubleSide, transparent: true } );
    var mesh1 = new THREE.Sprite(material1);
    mesh1.position.set(0, 0, -40);
    mesh1.scale.set(64, 64, 1.0);
    lesson8.scene.add(mesh1);
  });
  var texture2 = new THREE.ImageUtils.loadTexture('images/sprite2.png', undefined, function() {
    var material2 = new THREE.SpriteMaterial( { map: texture2, useScreenCoordinates: false, transparent: true } );
    var mesh2 = new THREE.Sprite(material2);
    mesh2.position.set(0, 0, 40);
    mesh2.scale.set(24, 46, 1.0);
    lesson8.scene.add(mesh2);
  });
}
This code loads two textures (sprite1.png and sprite2.png). After both images are loaded, we create two sprite materials and the Sprite object, and add them to our scene. If you run the code now, you will see two two-dimensional images on our scene. As you may have noticed, the images are drawn as is – we see a lot of small images (tiles) – these image files were taken due to the fact that we will use these tiles to do the animation.

Texture Animation

Now we need to add a new function to our script:

TileTextureAnimator function

function TileTextureAnimator(texture, hTiles, vTiles, durationTile) {
  // current tile number
  this.currentTile = 0;
  // duration of every tile
  this.durationTile = durationTile;
  // internal time counter
  this.currentTime = 0;
  // amount of horizontal and vertical tiles, and total count of tiles
  this.hTiles = hTiles;
  this.vTiles = vTiles;
  this.cntTiles = this.hTiles * this.vTiles;
  texture.wrapS = texture.wrapT = THREE.RepeatWrapping;
  texture.repeat.set(1 / this.hTiles, 1 / this.vTiles);
  this.update = function(time) {
    this.currentTime += time;
    while (this.currentTime > this.durationTile) {
      this.currentTime -= this.durationTile;
      this.currentTile++;
      if (this.currentTile == this.cntTiles) {
        this.currentTile = 0;
      }
      var iColumn = this.currentTile % this.hTiles;
      texture.offset.x = iColumn / this.hTiles;
      var iRow = Math.floor(this.currentTile / this.hTiles);
      texture.offset.y = iRow / this.vTiles;
    }
  };
}
The ‘TileTextureAnimator’ function adjusts the original images to display animation. It turns between tiles of the image from first to last tile. This does at a specified interval of time. Every tile is visible within the certain duration time, after it turns to another tile. Now let’s update the

‘addAnimatedObjects’ function 

addAnimatedObjects: function() {
  var texture1 = new THREE.ImageUtils.loadTexture('images/sprite1.png', undefined, function() {
    lesson8.anim1 = new TileTextureAnimator(texture1, 8, 8, 100);
    var material1 = new THREE.SpriteMaterial( { map: texture1, useScreenCoordinates: false, side:THREE.DoubleSide, transparent: true } );
    var mesh1 = new THREE.Sprite(material1);
    mesh1.position.set(0, 0, -40);
    mesh1.scale.set(64, 64, 1.0);
    lesson8.scene.add(mesh1);
    lesson8.animReady1 = true;
  });
  var texture2 = new THREE.ImageUtils.loadTexture('images/sprite2.png', undefined, function() {
    lesson8.anim2 = new TileTextureAnimator(texture2, 9, 8, 100);
    var material2 = new THREE.SpriteMaterial( { map: texture2, useScreenCoordinates: false, transparent: true } );
    var mesh2 = new THREE.Sprite(material2);
    mesh2.position.set(0, 0, 40);
    mesh2.scale.set(24, 46, 1.0);
    lesson8.scene.add(mesh2);
    lesson8.animReady2 = true;
  });
}
The first sprite image contains 8 tiles in row, 8 rows total, the second image contains 9 tiles in row. Every tile will be visible for 100ms. Finally, in the main ‘update’ function, we need to put the following code:
if (lesson8.animReady1) {
  lesson8.anim1.update(1000 * delta);
}
if (lesson8.animReady2) {
  lesson8.anim2.update(1000 * delta);
}
This code invokes the ‘update’ function of ‘TileTextureAnimator’ class objects.

As a result we got that only one tile is visible at a time. And every tile is visible within 100ms. So, the animation works pretty fast, as we needed to make.

Read More

Best way to send mass emails Using Top Five Application

Mass mailing applications are commonly used for opt-in advertising, communicating with group members (clubs, churches, etc.), or for newsletter or blog post distribution.

OK, so you want to know how to send a mass email to your subscribers, but you don’t want it to sound like spam and you want it to be effective. Also, you want to get it out quickly so you don’t have time to read a hundred guides about email marketing. You want to review the most important points and make sure your email sounds good.

1. Bigg Mass Mailer

Bigg Mass Mailer is a free tool for generating mass mailings. The best thing about this tool (aside from the price) is probably its simplicity. Bigg Mass Mailer has a very clean and straightforward interface that allows you to specify your mail server’s credentials, compose your message, import your mailing list, and click Send. This utility could not be any simpler to use.


2. e-Campaign

e-Campaign is a full featured mass E-mail tool that is a good fit for those who wish to create and monitor an E-mail marketing campaign. The software allows you to create a series of mailing jobs, and messages can be sent in HTML or plain text. More importantly, the tool has rich reporting features and offers tracking capabilities so that you know who has opened your message and who has unsubscribed.

e-Campaign sells for $149.95, but a free trial version is available for download.


3. MailList Controller Free

MailList Controller Free is a free tool for generating mass mailings. The initial setup process walks you through setting up your SMTP server and setting up your first mailing list, but you can create additional lists later on. It is worth noting however, that the free version only allows for a single list with up to 100 recipients. The professional edition allows for ten lists with up to 10,000 recipients, while the extreme edition is unlimited.

The software seems to have all of the basics covered. It allows you to import list members or add members manually. There is also a very rich interface for composing messages. You can also keep track of outgoing messages and previously sent messages.


4. GroupMail Free Edition

GroupMail Free Edition is a free tool for sending out bulk E-mail messages. This application has all of the basics covered, but it also has a few nice extras. For example, the software can use its own internal database, but it can also connect to an existing external database or pull recipients directly from your address book. There is also a scheduler feature, but to use it you have to upgrade to the paid version. My personal favorite feature is that even if you decide to use the internal database, you can create and modify database fields so that you can create rich, personalized messages.

5. Sendblaster Free Edition

Sendblaster Free Edition is a free tool for mass messaging. The tool is full featured and provides a very nice reporting and tracking engine. The software is also designed to work with Google Analytics so that you can track which of your recipients actually made a purchase after receiving your E-mail. Another nice thing about this application is that it includes a number of different message templates that you can use, although some of the templates are only available in the paid version.

Read More

How to make a Virtual Reality 3D Tracking headset

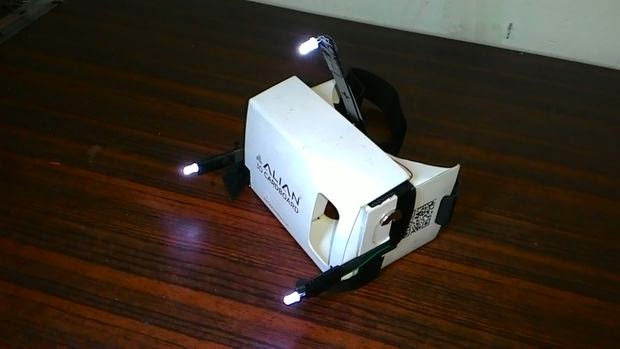
Picture of How to make a Virtual Reality 3D Tracking headset for under 10$


From the past 5 years, the increasingly popular Virtual reality devices like Oculus Rift, Google cardboard, Microsoft HoloLens, have currently dominated the consumer electronics sector to such extent that they much frequently grab a space in most tech magazines, blogs, websites,etc. With the collaboration of head-mounted displays/digital glasses and computer technology, these devices create a simulated, three-dimensional world that a user can manipulate and explore while feeling as if he were in that world.

This Instructable will guide you to make your very own virtual reality device which is very very much like the popular device Oculus rift which on the contrary costs 350$. The skills required for this device is pretty basic in tech and more basic in electronics. This device works with most Oculus rift games like Call of Duty, Silent hill, Flight simulator,etc and VR applications. So..Let`s get started!.........

Step 1: Items to grab...


  • An official/Unofficial cardboard headset - These headsets can purchased online fully assembled for 2-4 dollars like I did it else can be made at home for more cheap. The lens required for construction can be taken from any standard binoculars, the distance between the lens and the phone for display will be about 1.5 inch. For construction reference, see the pics.
  • 3 No. mid-size white LED
  • 3 No. 2-4 inch straight equal length sticks
  • A single 9 volt battery with a 5-10k resistor or 2 AA Batteries
  • 1-2 Ft. wire
  • Super glue/an quick adhesive

Home Items


  • 4.7-5.3 inch screen Android/IOS Phone
  • Laptop/Computer with Webcam

Downloads to do


And on to the construction........

Step 2: The circuit


Using the reference pic above build a simple circuit connecting the three LED to the Battery. You also can add a simple switch for convenience and solder joints for durability. Make sure to give adequate wire length on each LED to avoid future inconvenience.

Step 3: Attaching the sticks


Using glue, attach 2 equal length sticks parallel to each other on either side of the frame, allotting 1/4 length of the stick to be attached to the frame. Attach a third stick in a slanted 60 degree position half-way thru the top of the frame. Use adequate amount of glue for increased sturdiness and durability.

Step 4: Adding the LED circuit


With the help of tape and glue, firmly attach the three LEDs onto the end of the sticks, positioning them to face the front side of the headset. Using a stickpad/battery holder, attach the battery to one side of the headset that allows both circuit wire to reach the corresponding battery terminal easily. Tape the wires to the headset for durability and neatness.

Completing these finishes us off with the headset, now we`ll start work with our PC and mobile.

Step 5: Configure PC and Phone


Download and install the soft wares mentioned in step 1.


  1. Tridef 3D- TriDef 3D automatically converts DVDs, PC media files and photo files to 3D. You can play back originally made 3D content encoded in a variety of popular 3D formats – top/bottom, 2D plus depth and side by side. Play hundreds of the latest DirectX 9, 10 and 11 PC games, converted to 3D automatically. (*Note- During installation, select side-by-side 3D for the headset to work)
  2. FaceTrackNoIR- Modular headtracking program that supports multiple face-trackers, filters and game-protocols. Among the trackers are the SM FaceAPI, AIC Inertial Head Tracker and PointTracker (IR-tracker derived from FreeTrack). After installing, Select Game Protocol to Mouse Look and Tracker Source to PointTracker. For this program to work properly, you should sit in a well lit room with a good position so your webcam can track the LEDs easily within its range.
  3. KinoConsole- It is remote desktop application optimised for streaming games to your smartphone or tablet device. It basically mirrors PC display to an Android phone. Play games in windowed fullscreen mode for this to work.

Step 6: Testing


Follow the steps for a successful start up, First open FaceTrackNoIR and tweak settings as required. Different games has different setting so trial and error method have to be used sometimes. Then run Desktop streamer and the paired-up android app, after successful streaming to android screen run Tridef 3D. In Tridef 3D, browse a 3D game and launch through it. Slide your phone at the front of the headset with running streaming app. Turn on the LEDs and position yourself in-front of your webcam. Run the game in full screen windowed mode and tweak in game 3D settings for a smoother experience. Now you should be up and running.

Step 7: Finished

So by now the device should be up and running. Supporting hundreds of games it can set you off at cheap and easy.
Read More

How to Face Detection in Java using JJIL

A requirement came up on a recent project to automatically crop displayed profile images of people to just the "face" area for a thumbnail.

This seems like a job for a face detection algorithm. Searching for appropriate open-source Java implementations didn't yield too many results,
I was successful with JJIL - Jon's Java Imaging Library, which is open sourced under the LGPL licence.

JJIL is targeted at Java ME / Android platforms and doesn't have much documentation or a particularly intuitive API (not complaining, as clearly some stellar work has gone into it, kudos to Jon Webb, it's creator).

In the end I muddled through, detecting faces in an image in a standard Java project, but given it took me a while to get everything working, I thought I'd write a quick guide to help out others that are trying to achieve similar results.

Getting the Right JARs

First things first, I had trouble getting the published JAR files to work happily together. There seems to be some sort of version mismatch issue between the core and J2SE versions.

So I built my own copy - you can download it here - JJIL-visural-build-20110112.zip

This is a build of the current trunk JJIL code, and the Java SE additions (jjil-j2se).

This build is guaranteed to work with the code examples below.

Basic Process

I'm going to try to explain the basic process of detecting the faces in terms of input and output data.

The key file provided by JJIL for easy face (and other body part) detection is Gray8DetectHaarMultiScale.java

This operation is applied to an 8-bit greyscale input image, in combination with a pre-defined Haar Cascade profile. The profile determines which areas of the image are "detected". So you would want (for example) a profile to detect the frontal face features. JJIL provides several profiles out of the box.

The output image is a mask of the area of image where faces are detected (white) and the areas where no face was detected (black). This isn't tremendously useful, as we'd usually rather just have the rectangular areas in coordinate form - I'll address this later, after walking through the process.


  • Read an image from disk (.JPG, etc.)


  • Convert it into a jjil.core.Image
  • Generally we'll have an RGB image (colored image) and so need to convert it to 8-bit greyscale, which is what the Gray8DetectHaarMultiScale class requires.


  • Create a new instance of Gray8DetectHaarMultiScale with the Haar profile for detecting faces (or other body part if that's what you're looking for).
  • Apply Gray8DetectHaarMultiScale to our 8-bit grey image.
  • Retrieve result from Gray8DetectHaarMultiScale.


  • Resulting Haar mask for test image for face detection

The figure below shows, the source image, overlayed with the resulting mask, from step #6

So as you can see, the masks correctly identify the faces the two people in the image.

Here's a small Java class that demonstrates how to read an image and apply the process described above.

Note: all the code in the article can be downloaded as a full project at the end of the article.

The Code

package jjilexample;
import java.awt.image.BufferedImage;
import java.io.File;
import java.io.InputStream;
import javax.imageio.ImageIO;
import jjil.algorithm.Gray8Rgb;
import jjil.algorithm.RgbAvgGray;
import jjil.core.Image;
import jjil.core.RgbImage;
import jjil.j2se.RgbImageJ2se;
import jjil.algorithm.Gray8DetectHaarMultiScale;
public class Main {
    public static void findFaces(BufferedImage bi, int minScale, int maxScale, File output) {
        try {
            // step #2 - convert BufferedImage to JJIL Image
            RgbImage im = RgbImageJ2se.toRgbImage(bi);
            // step #3 - convert image to greyscale 8-bits
            RgbAvgGray toGray = new RgbAvgGray();
            toGray.push(im);
            // step #4 - initialise face detector with correct Haar profile
            InputStream is  = Main.class.getResourceAsStream("/jjilexample/haar/HCSB.txt");
            Gray8DetectHaarMultiScale detectHaar = new Gray8DetectHaarMultiScale(is, minScale, maxScale);
            // step #5 - apply face detector to grayscale image
            detectHaar.push(toGray.getFront());
            // step #6 - retrieve resulting face detection mask
            Image i = detectHaar.getFront();
            // finally convert back to RGB image to write out to .jpg file
            Gray8Rgb g2rgb = new Gray8Rgb();
            g2rgb.push(i);
            RgbImageJ2se conv = new RgbImageJ2se();
            conv.toFile((RgbImage)g2rgb.getFront(), output.getCanonicalPath());
        } catch (Throwable e) {
            throw new IllegalStateException(e);
        }
    }
    public static void main(String[] args) throws Exception {
        // step #1 - read source image
        BufferedImage bi = ImageIO.read(Main.class.getResourceAsStream("test.jpg"));
        // onto following steps...
        findFaces(bi, 1, 40, new File("c:/Temp/result.jpg")); // change as needed
    }
}

Getting Face Rectangles Instead

It would be more useful in many cases, to get a collection of Rectangles, in coordinate form, instead of an image mask.

There is a version of DetectHaarMultiScale in the JJIL project SVN, which implements a "getRectangles" method to retrieve this data. Unfortunately the source is incompatible with the rest of the library in SVN, so it may be WIP or an abandoned version of the code.

To get around this, I created my own version of Gray8DetectHaarMultiScale, which you can download here - Gray8DetectHaarMultiScale

Here are the important changes below -

    public void push(Image image)  throws jjil.core.Error {
        pushAndReturn(image);
    }
    public List pushAndReturn(Image image) throws jjil.core.Error
    {
        List result = new ArrayList();
....
                    if (hcc.eval(imSub)) {
                        // Found something.
                        nxLastFound = imSub.getXOffset();
                        nyLastFound = imSub.getYOffset();
                        // assign Byte.MAX_VALUE to the feature area so we don't
                        // search it again
                        result.add(new Rect(nxLastFound*nScale, nyLastFound*nScale,
                                this.hcc.getWidth()*nScale,
                                this.hcc.getHeight()*nScale));
                        Gray8Rect gr = new Gray8Rect(nxLastFound,
                                nyLastFound,
                                this.hcc.getWidth(),
                                this.hcc.getHeight(),
                                Byte.MAX_VALUE);
                        gr.push(imMask);
                        imMask = (Gray8Image) gr.getFront();
                     }
....
        return result;
    }
So now we can call "pushAndReturn(...)" instead of just push() to apply the process to our image, and get a List back of the detected faces. Perfect!

Using this here is a version of the example code above which prints out the rectangles where faces were detected -
package jjilexample;
import java.awt.image.BufferedImage;
import java.io.File;
import java.io.InputStream;
import java.util.List;
import javax.imageio.ImageIO;
import jjil.algorithm.Gray8Rgb;
import jjil.algorithm.RgbAvgGray;
import jjil.core.Image;
import jjil.core.Rect;
import jjil.core.RgbImage;
import jjil.j2se.RgbImageJ2se;
public class Main {
    public static void findFaces(BufferedImage bi, int minScale, int maxScale, File output) {
        try {
            InputStream is  = Main.class.getResourceAsStream("/jjilexample/haar/HCSB.txt");
            Gray8DetectHaarMultiScale detectHaar = new Gray8DetectHaarMultiScale(is, minScale, maxScale);
            RgbImage im = RgbImageJ2se.toRgbImage(bi);
            RgbAvgGray toGray = new RgbAvgGray();
            toGray.push(im);
            List results = detectHaar.pushAndReturn(toGray.getFront());
            System.out.println("Found "+results.size()+" faces");
            Image i = detectHaar.getFront();
            Gray8Rgb g2rgb = new Gray8Rgb();
            g2rgb.push(i);
            RgbImageJ2se conv = new RgbImageJ2se();
            conv.toFile((RgbImage)g2rgb.getFront(), output.getCanonicalPath());
        } catch (Throwable e) {
            throw new IllegalStateException(e);
        }
    }
    public static void main(String[] args) throws Exception {
        BufferedImage bi = ImageIO.read(Main.class.getResourceAsStream("test.jpg"));
        findFaces(bi, 1, 40, new File("c:/Temp/result.jpg")); // change as needed
    }
}

If you run this, you will note that it actually detects 3 faces in the image. This is common, as the way the Haar algorithm works, is by resizing the image to different scales and running a fixed size matrix over the image. It is possible for the same face to be detected at different scales and so you end up with rectangles within rectangles. It is a pretty trivial matter to remove these "extra" rectangles though by just checking if they are fully contained by another and ignoring them accordingly.

Download the Project

To save you some time, here's the full example as a Netbeans project that you can download and run, play with, etc. Have fun!
Read More

How to Customise Image and Title in AddThis Sharing Button

If you want to share your site information on many social networking site you use one of the best social networking sharing facilities provided by AddThis.com and its working nice .It retrieves default  image, title and description from your site to share on different social site but if you want to change image, title and description to share on social site.
Then follows these following steps :

  • First of all add meta tag before <title> tag
<meta property="og:title" content="WRITE YOUR TITLE" />
<meta property="og:description" content="WRITE YOUR DESCRIPTION" />
<meta property="og:image" content="ADD YOUR IMAGE LINK" />
  • Then add below code where you want to show AddThis button
<div class="addthis_toolbox addthis_default_style" addthis:url="WRITE YOUR POST URL"
    addthis:title="WRITE YOUR TITLE"
    addthis:description="WRITE YOUR DESCRIPTION">
<a class="addthis_button_facebook_like" fb:like:layout="button_count"></a>
<a class="addthis_button_tweet"></a>
<a class="addthis_button_pinterest_pinit" pi:pinit:media="ADD YOUR IMAGE LINK" pi:pinit:layout="horizontal"></a>
<a class="addthis_button_google_plusone" g:plusone:size="medium"></a>
<a class="addthis_counter addthis_pill_style"></a>
</div>
<script type="text/javascript">var addthis_config = {"data_track_addressbar":true};</script>
<script type="text/javascript" src="//s7.addthis.com/js/300/addthis_widget.js#pubid=ra-4f6557883501563d"></script>
<!-- AddThis Button END -->
        </div>
Read More

How to Control Arduino Robot using Android

I would like to explore the connection between Arduino and Android.
The goal here is to drive a small Arduino bot of the simplest kind with an Android app, through Bluetooth connection. The robot itself will have nothing extraordinary and is inspired by the many tutorials out there on the Interwebs.
But I have not found tutorials on how to create an Android remote control - so here it is simple steps to do its.
Step 1: All Materials


  • Arduino UNO or equivalent
  • Arduino-compatible 1A Motor Shield
  • 2x GM9 geared motors
  • 2x GMPV wheels
  • (optional) 2x mounting brackets
  • 1 ball caster
  • a 6 AA battery holder with 2.1mm jack
  • Bluetooth module (5€) such as this one on Ebay
  • 2mm MDF plate
  • some wires
  • some screws and nuts
  • a breadboard if you don't want to solder
  • 6 Alkaline AA batteries or 6 NiMh rechargeable batteries (they provide 7.5V instead of 9V, but this is still sufficient for the GM9 motors)
Step 2: Mounting  all electronics parts 


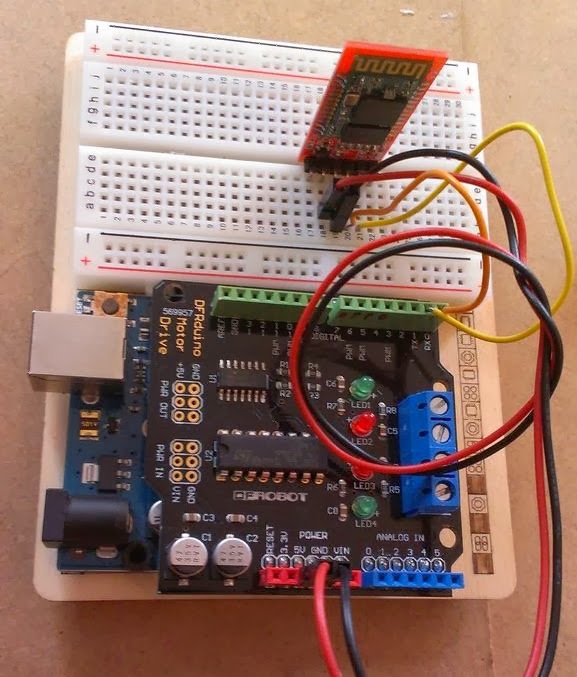
  • Mount the shield onto the UNO board. I assume your shield comes with soldered header. If not, you can find a nice picture on how to do it on this other instructable.
  • Mount the Bluetooth tranceiver on a breadboard.
  • Connect with wires the +5V and Ground from the Arduino board (actually, from the shield) to the +5V and Ground pins of the BT module
  • Connect with wires the Tx and Rx pins of the Arduino (ie, pins 0 and 1) to the Tx and Rx of the Bluetooth module.
Warning :
  • Some Bluetooth tutorials mention that you cross the connection (ie Tx to Rx and Rx to Tx). The way my module works, it needs to be parallel, ie Tx to Tx and Rx to Rx. You can try one way, and swap the connections if it doesn't work.
  • Remember to unplug the BT module while loading the script on the Arduino. The Tx and Rx plug are actually the same as the Serial port used to communicate with your computer through USB, and the BT module will mess up the communication.
Step 3: Prepare the motors

Solder wires on each motor electrodes. If one motor turns much slower than the other, it is likely due to poor soldering .
Step 4: Finish the assembly

  • Cut a piece of MDF - approximately 20x20cm
  • Mount the Arduino + shield on it as well as the battery pack on the MDF, as well as the ball caster on the back side. You can screw them or use double-sided tape
  • Mount the motors on each side of the MDF. Here again you can use tape or screws, but I chose to screw them for better stability
  • Connect the motors wires to the motor shield
  • That's it ! As you can see, it's a really simple robot layout.
Step 5 : Its Software time
  •  An Android app gives user the ability to connect to and disconnect from the bluetooth module. When connected, a serial link will exist between the smartphone and the Arduino robot
  • The user can then use arrows to drive the robot and a "stop" button to, well, stop it. Every time the user presses a button, the app sends a character (eg "f" for forward, "s" for stop and so on)
  • The Arduino board listens to the Serial port. When a character is received, it drives the motors accordingly.
Step 6: The Arduino sketch
Upload the attached code to the Arduino Uno. Remember, to unplug the bluetooth module while doing so.
Download the source code of arduino_for_android_remote
As you can see 5 intructions are defined : move forward, backwards, left, right, and stop. All motions are executed at full speed (the GM9 motors are geared, and thus not turning very fast) but you could change the speed value if you want. 
 Step 7: The Android App
 For Next Step you need to read next Post :
Control Your Robot Using Android Apps
Read More

Build a Custom WordPress Theme from Scratch

Today i am telling you how to make a custom wordpress theme from scratch. If you’re confident with your CSS and HTML, it’s not hard at all to step up to the challenge of building a custom WordPress theme.
Here is the screenshot of Wordpress theme which we'll make :

Overview of Wordpress main files :
  • header.php - Contains everything you'd want to appear at the top of your site.
  • index.php - The core file that loads your theme, also acts as the homepage (unless you set your blog to display a static page).
  • sidebar.php - Contains everything you'd want to appear in a sidebar.
  • footer.php - Contains everything you'd want to appear at the bottom of your site.
  • archive.php - The template file used when viewing categories, dates, posts by author, etc.
  • single.php - The template file that's used when viewing an individual post.
  • comments.php - Called at the bottom of the single.php file to enable the comments section.
  • page.php - Similar to single.php, but used for WordPress pages.
  • search.php - The template file used to display search results.
  • 404.php - The template file that displays when a 404 error occurs.
  • style.css - All the styling for your theme goes here.
  • functions.php - A file that can be used to configure the WordPress core, without editing core files.

These tags tell WordPress where to insert the dynamic content. A good example is the <?php the_title(); ?> tag, which pulls in the post title and displays it in your theme:
Your HTML code :
Click to Enlarge

Now we go to build wordpress theme and the first step to make style.css (Configuring the stylesheet)
All the details of a WordPress theme are contained within the stylesheet. At the top of your style.css add the following code, then amend the details to suit.
/*
Theme Name: Sticky
Theme URI: http://www.s2ptech.blogspot.com
Description: Sticky WordPress theme
Version: 1
Author: Mukesh Kumar
Author URI: http://www.geekonjava.blogspot.com
*/

Now come to header.php
Open up your header.php file, and paste in the head section from your concept HTML file. Then we need to go in and replace certain elements with the correct WordPress template tags to ensure it all works correctly.
Click to Enlarge

Now building the index.php
The next step is to flesh out the main body of the website. Open up the index.php file and paste in the main bulk of the concept HTML.
Click for Enlarge

Now time to sidebar.php
The sidebar in my design is where the list of pages and categories are held. The sidebar.php file was called from the index using the get_sidebar(); tag, so anything within this sidebar.php file is inserted into the theme in the right place
Click for Enlarge


Rounding off the footer.php
The footer.php file is probably the most simple file for this theme. The only thing that goes in here is the wp_footer(); tag just before the </body>, so that any extra info can be inserted in the correct place.
Click for Enlarge

Constructing the page and single view
WordPress is made up of posts and pages. Posts use the single.php template file, whereas pages use the page.php template file.

They're pretty much the same, apart from that you tend to include the comments_template(); tag for posts, and not for pages.

Creating the archive.php
The archive.php file is used to display a list of posts whenever they're viewed by category, by author, by tag etc.

It's basically the same as the index file, but with the addition of a tag at the very top that renders a useful page title, so the user knows where they are. 'Browsing the Articles category' for instance.


Your Final resulting theme would look like : Sticky Wordpress Theme
Read More

Run php page from any location on Localhost

As you know, If you want to run php pages using Xampp, You have to put your php pages under
htdocs folder.

But this is not necessary. You can put your files anywhere in your system.
Follow these steps to make this thing working:

If you are using Xampp

1. Open Xampp Control Panel, Click on "Config" button.

2. Then Click "Apache(httpd.conf)". A notepad will open.

If you are using Wamp

1. Goto apache --->  conf

2. Open "httpd.conf" with Notepad


3. Under this notepad, search for the term "DocumentRoot"

    You will see following line:
          
           DocumentRoot "C:/xampp/htdocs"
          <Directory "C:/xampp/htdocs">

4. Replace Red colored text with your desired path.

Now you can put your files under your desired path and you can run it successfully.

That's it.
Read More

How to find list of sensors built in you android mobile.

I am going to teach you. How can you create an apps that displays all the sensors in the phone reporting the following characteristics:
  1. Name: Name of the sensor
  2. Version: Version of the sensor’s module
  3. Vendor: Vendor of this sensor
  4. Type: Type of this sensor
  5. Max Range: maximum range of the sensor
  6. Resolution: resolution of the sensor
  7. Min Delay: minimum delay allowed between two events (equals to zero if this sensor only returns a value when the data it’s measuring changes)
  8. Power: the power of the sensor
Lets start to develop this app. Follow these steps:
  1. Create a project.
  2. Open file res/values/strings.xml and replace all content with following:
<resources>
    <string name="app_name">Sensor List</string>
    <string name="hello_world">Hello world!</string>
    <string name="menu_settings">Settings</string>
    <string name="name_label">Name</string>
    <string name="vendor_label">Vendor</string>
    <string name="default_text">not found</string>
    <string name="type_label">Type</string>
    <string name="version_label">Version</string>
    <string name="maximum_range_label">Max Range</string>
    <string name="min_delay_label">Min Delay</string>
    <string name="resolution_label">Resolution</string>
    <string name="power_label">Power</string>
</resources>
             These string name, we will use in entire project.

      3.  Now create the file res/values/types.xml
<?xml version="1.0" encoding="utf-8"?>
<resources>
    <string name="accelerometer">accelerometer sensor</string>
    <string name="ambient_temperature">ambient temperature sensor</string>
    <string name="gravity">gravity sensor</string>
    <string name="gyroscope">gyroscope sensor</string>
    <string name="light">light sensor</string>
    <string name="linear_acceleration">linear acceleration sensor</string>
    <string name="magnetic_field">magnetic field sensor</string>
    <string name="orientation">orientation sensor (deprecated)</string>
    <string name="pressure">pressure sensor</string>
    <string name="proximity">proximity sensor</string>
    <string name="relative_humidity">relative humidity sensor</string>
    <string name="rotation_vector">rotation vector sensor</string>
    <string name="temperature">temperature sensor (deprecated)</string>
    <string name="unknown">unknown sensor</string>
</resources>
      4.  Open the file res/values/styles.xml  and replace with following code:

<resources xmlns:android="http://schemas.android.com/apk/res/android">

 <style name="AppTheme" parent="android:Theme.Light" />

 <style
  name="TitleLabel"
  parent="@android:style/Widget.TextView">
  <item name="android:textStyle">italic</item>
  <item name="android:textSize">14sp</item>
 </style>

 <style
  name="BodyLabel"
  parent="@android:style/Widget.TextView">
  <item name="android:textStyle">italic</item>
  <item name="android:textSize">12sp</item>
 </style>

 <style
  name="TitleView"
  parent="@android:style/Widget.TextView">
  <item name="android:textStyle">bold</item>
  <item name="android:textSize">14sp</item>
 </style>

 <style
  name="BodyView"
  parent="@android:style/Widget.TextView">
  <item name="android:textSize">12sp</item>
 </style>

</resources>
  5. There are many sensors using in your mobile. To view all sensors in a list. Create  the resource res/layout/list_item.xml
<HorizontalScrollView xmlns:android="http://schemas.android.com/apk/res/android"
    android:layout_width="match_parent"
    android:layout_height="match_parent" >

    <RelativeLayout
        android:layout_width="wrap_content"
        android:layout_height="wrap_content"
        android:paddingTop="10sp"
        android:paddingBottom="10sp" >

        <TextView
            android:id="@+id/nameLabel"
            style="@style/TitleLabel"
            android:layout_width="wrap_content"
            android:layout_height="wrap_content"
            android:layout_alignParentLeft="true"
            android:layout_alignParentTop="true"
            android:layout_marginLeft="10dp"
            android:text="@string/name_label" />

        <TextView
            android:id="@+id/vendorLabel"
            style="@style/TitleLabel"
            android:layout_width="wrap_content"
            android:layout_height="wrap_content"
            android:layout_alignLeft="@id/nameLabel"
            android:layout_below="@id/nameLabel"
            android:text="@string/vendor_label" />

        <TextView
            android:id="@+id/typeLabel"
            style="@style/BodyLabel"
            android:layout_width="wrap_content"
            android:layout_height="wrap_content"
            android:layout_alignLeft="@id/vendorLabel"
            android:layout_below="@id/vendorLabel"
            android:text="@string/type_label" />

        <TextView
            android:id="@+id/maximumRangeLabel"
            style="@style/BodyLabel"
            android:layout_width="wrap_content"
            android:layout_height="wrap_content"
            android:layout_alignLeft="@id/typeLabel"
            android:layout_below="@id/typeLabel"
            android:text="@string/maximum_range_label" />

        <TextView
            android:id="@+id/resolutionLabel"
            style="@style/BodyLabel"
            android:layout_width="wrap_content"
            android:layout_height="wrap_content"
            android:layout_alignLeft="@id/maximumRangeLabel"
            android:layout_below="@id/maximumRangeLabel"
            android:text="@string/resolution_label" />

        <TextView
            android:id="@+id/minDelayLabel"
            style="@style/BodyLabel"
            android:layout_width="wrap_content"
            android:layout_height="wrap_content"
            android:layout_alignLeft="@id/resolutionLabel"
            android:layout_below="@id/resolutionLabel"
            android:text="@string/min_delay_label" />

        <TextView
            android:id="@+id/powerLabel"
            style="@style/BodyLabel"
            android:layout_width="wrap_content"
            android:layout_height="wrap_content"
            android:layout_alignLeft="@id/minDelayLabel"
            android:layout_below="@id/minDelayLabel"
            android:text="@string/power_label" />

        <TextView
            android:id="@+id/nameView"
            style="@style/TitleView"
            android:layout_width="wrap_content"
            android:layout_height="wrap_content"
            android:layout_alignBaseline="@id/nameLabel"
            android:layout_alignBottom="@id/nameLabel"
            android:layout_marginLeft="40dp"
            android:layout_toRightOf="@id/nameLabel"
            android:singleLine="true"
            android:text="@string/default_text" />

        <TextView
            android:id="@+id/versionLabel"
            style="@style/BodyLabel"
            android:layout_width="wrap_content"
            android:layout_height="wrap_content"
            android:layout_alignBaseline="@id/nameView"
            android:layout_alignBottom="@id/nameView"
            android:layout_marginLeft="10dp"
            android:layout_toRightOf="@id/nameView"
            android:text="@string/version_label" />

        <TextView
            android:id="@+id/vendorView"
            style="@style/TitleView"
            android:layout_width="wrap_content"
            android:layout_height="wrap_content"
            android:layout_alignBaseline="@id/vendorLabel"
            android:layout_alignBottom="@id/vendorLabel"
            android:layout_alignLeft="@id/nameView"
            android:singleLine="true"
            android:text="@string/default_text" />

        <TextView
            android:id="@+id/typeView"
            style="@style/BodyView"
            android:layout_width="wrap_content"
            android:layout_height="wrap_content"
            android:layout_alignBaseline="@id/typeLabel"
            android:layout_alignBottom="@id/typeLabel"
            android:layout_alignLeft="@id/nameView"
            android:text="@string/default_text" />

        <TextView
            android:id="@+id/versionView"
            style="@style/BodyView"
            android:layout_width="wrap_content"
            android:layout_height="wrap_content"
            android:layout_alignBaseline="@id/versionLabel"
            android:layout_alignBottom="@id/versionLabel"
            android:layout_marginLeft="10dp"
            android:layout_toRightOf="@id/versionLabel"
            android:text="@string/default_text" />

        <TextView
            android:id="@+id/maximumRangeView"
            style="@style/BodyView"
            android:layout_width="wrap_content"
            android:layout_height="wrap_content"
            android:layout_alignBaseline="@id/maximumRangeLabel"
            android:layout_alignBottom="@id/maximumRangeLabel"
            android:layout_alignLeft="@id/nameView"
            android:text="@string/default_text" />

        <TextView
            android:id="@+id/unitsRangeView"
            style="@style/BodyView"
            android:layout_width="wrap_content"
            android:layout_height="wrap_content"
            android:layout_alignBaseline="@id/maximumRangeView"
            android:layout_alignBottom="@id/maximumRangeView"
            android:layout_marginLeft="2dp"
            android:layout_toRightOf="@id/maximumRangeView"
            android:text="" />

        <TextView
            android:id="@+id/minDelayView"
            style="@style/BodyView"
            android:layout_width="wrap_content"
            android:layout_height="wrap_content"
            android:layout_alignBaseline="@id/minDelayLabel"
            android:layout_alignBottom="@id/minDelayLabel"
            android:layout_alignLeft="@id/nameView"
            android:text="@string/default_text" />

        <TextView
            android:id="@+id/unitsDelayView"
            style="@style/BodyView"
            android:layout_width="wrap_content"
            android:layout_height="wrap_content"
            android:layout_alignBaseline="@id/minDelayView"
            android:layout_alignBottom="@id/minDelayView"
            android:layout_marginLeft="2dp"
            android:layout_toRightOf="@id/minDelayView"
            android:text="" />

        <TextView
            android:id="@+id/powerView"
            style="@style/BodyView"
            android:layout_width="wrap_content"
            android:layout_height="wrap_content"
            android:layout_alignBaseline="@id/powerLabel"
            android:layout_alignBottom="@id/powerLabel"
            android:layout_alignLeft="@id/nameView"
            android:text="@string/default_text" />

        <TextView
            android:id="@+id/unitsPowerView"
            style="@style/BodyView"
            android:layout_width="wrap_content"
            android:layout_height="wrap_content"
            android:layout_alignBaseline="@id/powerView"
            android:layout_alignBottom="@id/powerView"
            android:layout_marginLeft="2dp"
            android:layout_toRightOf="@id/powerView"
            android:text="" />

        <TextView
            android:id="@+id/resolutionView"
            style="@style/BodyView"
            android:layout_width="wrap_content"
            android:layout_height="wrap_content"
            android:layout_alignBaseline="@id/resolutionLabel"
            android:layout_alignBottom="@id/resolutionLabel"
            android:layout_alignLeft="@id/nameView"
            android:text="@string/default_text" />

        <TextView
            android:id="@+id/unitsResolutionView"
            style="@style/BodyView"
            android:layout_width="wrap_content"
            android:layout_height="wrap_content"
            android:layout_alignBaseline="@id/resolutionView"
            android:layout_alignBottom="@id/resolutionView"
            android:layout_marginLeft="2dp"
            android:layout_toRightOf="@id/resolutionView"
            android:text="" />

    </RelativeLayout>

</HorizontalScrollView>

    You have created all xml files required to display contents . Now its time to play with Java coding to make this apps live.

     6.   Open your MainActivity.java page (Check in src\YOUR PACKAGE\)     and replace all content with following content except first line (indicating import your package)
import java.util.ArrayList;
import java.util.Iterator;
import java.util.List;

import android.app.ListActivity;
import android.content.Context;
import android.hardware.Sensor;
import android.hardware.SensorEvent;
import android.hardware.SensorEventListener;
import android.hardware.SensorManager;
import android.os.Bundle;

public class MainActivity extends ListActivity implements SensorEventListener {

    private SensorAdapter adapter;
    private List<MySensor> sensorList;

    public void onAccuracyChanged(Sensor sensor, int accuracy) {
    }

    @Override
    public void onCreate(Bundle savedInstanceState) {
    super.onCreate(savedInstanceState);

    sensorList = new ArrayList<MySensor>(); /* It is an array containing the Sensor objects that are the sensors of the phone */
    sensorList = getSensors();
    adapter = new SensorAdapter(this, R.layout.list_item, sensorList);
    setListAdapter(adapter);
    }

    public void onSensorChanged(SensorEvent event) {
    }

    private List<MySensor> getSensors() {    /*I find all the sensors of the phone and I add them as objects of the class MySensor to a List that I set to ArrayList<MySensor> in the onCreate event*/

    List<MySensor> list = new ArrayList<MySensor>();

    SensorManager sm = (SensorManager) getSystemService(Context.SENSOR_SERVICE);
    List<Sensor> phoneSensor = sm.getSensorList(Sensor.TYPE_ALL);

    Iterator<Sensor> it = phoneSensor.iterator();
    while (it.hasNext()) {
        Sensor s = it.next();
        list.add(new MySensor(s, getApplicationContext()));
    }

    return list;
    }
}

Check this line: public class MainActivity extends ListActivity implements SensorEventListener
Here MainActivity is extended by ListActivity. Because it's easy to show contents in list view using ListActivity.

7.   Create SensorAdapter.java class on same folder where your MainActivity.java file stored.
8.   Open this page. Copy following content and paste it.
      import java.util.List;

import android.content.Context;
import android.os.Build;
import android.text.Html;
import android.view.LayoutInflater;
import android.view.View;
import android.view.ViewGroup;
import android.widget.ArrayAdapter;
import android.widget.LinearLayout;
import android.widget.TextView;

public class SensorAdapter extends ArrayAdapter<MySensor> {

    private static final int SDK = Build.VERSION.SDK_INT;
    private int resource;

    public SensorAdapter(Context context, int resource, List<MySensor> items) {
    super(context, resource, items);
    this.resource = resource;
    }

    @Override
    public View getView(int position, View convertView, ViewGroup parent) {
    LinearLayout newView;

    if (convertView == null) {
        newView = new LinearLayout(getContext());
        String inflater = Context.LAYOUT_INFLATER_SERVICE;
        LayoutInflater li;
        li = (LayoutInflater) getContext().getSystemService(inflater);
        li.inflate(resource, newView, true);
    } else {
        newView = (LinearLayout) convertView;
    }

    TextView nameView = (TextView) newView.findViewById(R.id.nameView);
    TextView vendorView = (TextView) newView.findViewById(R.id.vendorView);
    TextView typeView = (TextView) newView.findViewById(R.id.typeView);
    TextView versionView = (TextView) newView
        .findViewById(R.id.versionView);
    TextView maximumRangeView = (TextView) newView
        .findViewById(R.id.maximumRangeView);
    TextView minDelayView = (TextView) newView
        .findViewById(R.id.minDelayView);
    TextView powerView = (TextView) newView.findViewById(R.id.powerView);
    TextView resolutionView = (TextView) newView
        .findViewById(R.id.resolutionView);
    TextView unitsRangeView = (TextView) newView
        .findViewById(R.id.unitsRangeView);
    TextView unitsResolutionView = (TextView) newView
        .findViewById(R.id.unitsResolutionView);
    TextView unitsDelayView = (TextView) newView
        .findViewById(R.id.unitsDelayView);
    TextView unitsPowerView = (TextView) newView
        .findViewById(R.id.unitsPowerView);

    if (SDK < Build.VERSION_CODES.GINGERBREAD) {
        TextView minDelayLabel = (TextView) newView
            .findViewById(R.id.minDelayLabel);
        minDelayLabel.setVisibility(View.GONE);
        minDelayView.setVisibility(View.GONE);
        unitsDelayView.setVisibility(View.GONE);
    }

    MySensor mySensor = getItem(position);

    nameView.setText(mySensor.getName());
    vendorView.setText(mySensor.getVendor());
    typeView.setText(mySensor.getTypeDescription());
    versionView.setText(String.valueOf(mySensor.getVersion()));
    maximumRangeView.setText(String.valueOf(mySensor.getMaximumRange()));
    if (SDK >= Build.VERSION_CODES.GINGERBREAD)
        minDelayView.setText(String.valueOf(mySensor.getMinDelay()));
    powerView.setText(String.valueOf(mySensor.getPower()));
    resolutionView.setText(String.format("%f", mySensor.getResolution()));
    unitsRangeView.setText(Html.fromHtml(mySensor.getUnits()));
    unitsResolutionView.setText(Html.fromHtml(mySensor.getUnits()));
    if (SDK >= Build.VERSION_CODES.GINGERBREAD)
        unitsDelayView.setText(Html.fromHtml(mySensor.getDelayUnits()));
    unitsPowerView.setText(Html.fromHtml(mySensor.getPowerUnits()));

    return newView;

    }
}
 When you extend an ArrayAdapter, you override the method getView to set the layout (res/layout/list_item.xml)
I display and set the text views related to “Min Delay” only if the API level is equal to or greater than Gingerbread
some strings are displayed using the method Html.fromHtml(String source) because they contain special characters (µ or ²).

  9.  Create a class MySensor.java  on same package where MainActivity.java class stored. Copy following content and paste into MySensor.java class.
import android.annotation.TargetApi;
import android.content.Context;
import android.hardware.Sensor;
import android.os.Build;

public class MySensor {

    private final static String MICRO = "&amp;#x3BC;";
    private static final int SDK = Build.VERSION.SDK_INT;
    private final static String SQUARE = "&amp;#xB2;";
    private Context context;
    private float maximumRange, minDelay, power, resolution;
    private String name, vendor;
    private int type, version;

    @TargetApi(Build.VERSION_CODES.GINGERBREAD)
    public MySensor(Sensor sensor, Context context) {
    this.name = sensor.getName();
    this.vendor = sensor.getVendor();
    this.type = sensor.getType();
    this.version = sensor.getVersion();
    this.maximumRange = sensor.getMaximumRange();
    if (SDK >= Build.VERSION_CODES.GINGERBREAD)
        this.minDelay = sensor.getMinDelay();
    this.power = sensor.getPower();
    this.resolution = sensor.getResolution();
    this.context = context;
    }

    public String getDelayUnits() {
    return MICRO + "s";
    }

    public float getMaximumRange() {
    return maximumRange;
    }

    public float getMinDelay() {
    return minDelay;
    }

    public String getName() {
    return name;
    }

    public float getPower() {
    return power;
    }

    public String getPowerUnits() {
    return "mA";
    }

    public float getResolution() {
    return resolution;
    }

    public int getType() {
    return type;
    }

    public String getTypeDescription() {
    String description = null;

    switch (type) {
    case Sensor.TYPE_ACCELEROMETER:
        description = context.getResources().getString(
            R.string.accelerometer);
        break;
    case Sensor.TYPE_AMBIENT_TEMPERATURE:
        description = context.getResources().getString(
            R.string.ambient_temperature);
        break;
    case Sensor.TYPE_GRAVITY:
        description = context.getResources().getString(R.string.gravity);
        break;
    case Sensor.TYPE_GYROSCOPE:
        description = context.getResources().getString(R.string.gyroscope);
        break;
    case Sensor.TYPE_LIGHT:
        description = context.getResources().getString(R.string.light);
        break;
    case Sensor.TYPE_LINEAR_ACCELERATION:
        description = context.getResources().getString(
            R.string.linear_acceleration);
        break;
    case Sensor.TYPE_MAGNETIC_FIELD:
        description = context.getResources().getString(
            R.string.magnetic_field);
        break;
    case Sensor.TYPE_ORIENTATION:
        description = context.getResources()
            .getString(R.string.orientation);
        break;
    case Sensor.TYPE_PRESSURE:
        description = context.getResources().getString(R.string.pressure);
        break;
    case Sensor.TYPE_PROXIMITY:
        description = context.getResources().getString(R.string.proximity);
        break;
    case Sensor.TYPE_RELATIVE_HUMIDITY:
        description = context.getResources().getString(
            R.string.relative_humidity);
        break;
    case Sensor.TYPE_ROTATION_VECTOR:
        description = context.getResources().getString(
            R.string.rotation_vector);
        break;
    case Sensor.TYPE_TEMPERATURE:
        description = context.getResources()
            .getString(R.string.temperature);
        break;
    default:
        description = context.getResources().getString(R.string.unknown);
        break;
    }

    return description;
    }

    public String getUnits() {
    String units = null;

    switch (type) {
    case Sensor.TYPE_ACCELEROMETER:
        units = "m/s" + SQUARE;
        break;
    case Sensor.TYPE_AMBIENT_TEMPERATURE:
        units = "°C";
        break;
    case Sensor.TYPE_GRAVITY:
        units = "m/s" + SQUARE;
        break;
    case Sensor.TYPE_GYROSCOPE:
        units = "rad/s";
        break;
    case Sensor.TYPE_LIGHT:
        units = "SI lux";
        break;
    case Sensor.TYPE_LINEAR_ACCELERATION:
        units = "m/s" + SQUARE;
        break;
    case Sensor.TYPE_MAGNETIC_FIELD:
        units = MICRO + "T";
        break;
    case Sensor.TYPE_ORIENTATION:
        units = "°";
        break;
    case Sensor.TYPE_PRESSURE:
        units = "hPa";
        break;
    case Sensor.TYPE_PROXIMITY:
        units = "cm";
        break;
    case Sensor.TYPE_RELATIVE_HUMIDITY:
        units = "";
        break;
    case Sensor.TYPE_ROTATION_VECTOR:
        units = "";
        break;
    case Sensor.TYPE_TEMPERATURE:
        units = "°C";
        break;
    default:
        units = "unknown";
        break;
    }

    return units;
    }

    public String getVendor() {
    return vendor;
    }

    public int getVersion() {
    return version;
    }

    public void setMaximumRange(float maximumRange) {
    this.maximumRange = maximumRange;
    }

    public void setMinDelay(float minDelay) {
    this.minDelay = minDelay;
    }

    public void setName(String name) {
    this.name = name;
    }

    public void setPower(float power) {
    this.power = power;
    }

    public void setResolution(float resolution) {
    this.resolution = resolution;
    }

    public void setType(int type) {
    this.type = type;
    }

    public void setVendor(String vendor) {
    this.vendor = vendor;
    }

    public void setVersion(int version) {
    this.version = version;
    }

    @Override
    public String toString() {
    return name;
    }

}
The method getMinDelay of the class Sensor is new with GingerBread (API 9, Android 2.3), then you can use it only after the condition that the API level of the device is equal to or greater than 9
the annotation @TargetApi avoids a compilation error
the variables MICRO e SQUARE define some special characters in the method Html.fromHtml(String source) of the class SensorAdapte.


Read More