How to make Simon Game

Recall your childhood with a JavaScript version of Simon Says. Click the buttons in the same order as Simon (the computer) does to advance to the next level. Each level gets increasingly difficult. 


See how far you can go.
Just download Coding in notepad and save as SimonGame.html.
That's it.


Level


Free JavaScripts provided

by The JavaScript Source


Download Full Coding
Read More

How to make own Text Editor

First of all we have to create the HTML elements that we will use to change the content and appearance of what's inside the rich text editor:


| | |


First of all we have to create the HTML elements that we will use to change the content and appearance of what's inside the rich text editor:

<body onLoad="def()">
<div style="width:500px; text-align:left; margin-bottom:10px ">
<input type="button" id="bold" style="height:21px; width:21px; font-weight:bold;" value="B" />
<input type="button" id="italic" style="height:21px; width:21px; font-style:italic;" value="I" />
<input type="button" id="underline" style="height:21px; width:21px; text-decoration:underline;" value="U" /> |
<input type="button" style="height:21px; width:21px;"value="L" title="align left" />
<input type="button" style="height:21px; width:21px;"value="C" title="center" />
<input type="button" style="height:21px; width:21px;"value="R" title="align right" /> |
<select id="fonts">
<option value="Arial">Arial</option>
<option value="Comic Sans MS">Comic Sans MS</option>
<option value="Courier New">Courier New</option>
<option value="Monotype Corsiva">Monotype</option>
<option value="Tahoma">Tahoma</option>
<option value="Times">Times</option>
</select>
<select id="size">
<option value="1">1</option>
<option value="2">2</option>
<option value="3">3</option>
<option value="4">4</option>
<option value="5">5</option>
</select>
<select id="color">
<option value="black">-</option>
<option style="color:red;" value="red">-</option>
<option style="color:blue;" value="blue">-</option>
<option style="color:green;" value="green">-</option>
<option style="color:pink;" value="pink">-</option>
</select> |
<input type="button" style="height:21px; width:21px;"value="1" title="Numbered List" />
<input type="button" style="height:21px; width:21px;"value="●" title="Bullets List" />
<input type="button" style="height:21px; width:21px;"value="←" title="Outdent" />
<input type="button" style="height:21px; width:21px;"value="→" title="Indent" />
</div>


Next we need to create an iFrame, this is where the text will be written and edited.

<iframe id="textEditor" style="width:500px; height:170px;">
</iframe>


We can now write the Javascript code.
First of all, in order to use the iFrame we have to set it to design mode. Then we have to open, write and close that iFrame.

<script type="text/javascript">
<!--
textEditor.document.designMode="on";
textEditor.document.open();
textEditor.document.write('<head><style type="text/css">body{ font-family:arial; font-size:13px;}</style></head>');
textEditor.document.close();


You can see that the write() method has some CSS for a parameter - that is because I wanted to set the iFrame's default font and font size.
It's time to write the function that will be called by the HTML elements created earlier. This is a very simple function, we only need 2 iFrame methods: execCommand() and focus(). execCommand() will execute a command on the current document, current selection, or the given range, and focus() will give the focus back to the iFrame.

function fontEdit(x,y)
{
textEditor.document.execCommand(x,"",y);
textEditor.focus();
}


We will use this function with all the HTML elements. Let's start with the Bold button.
We just have to set the event which will call the function, and give a parameter to the function. Because it's a button, we will use the onClick event.

<input type="button" id="bold" style="height:21px; width:21px; font-weight:bold;" value="B" onClick="fontEdit('bold')" />

When called, the function will make the text bold. We do the same thing for the rest of the buttons, changing the parameter.

<input type="button" id="italic" style="height:21px; width:21px; font-style:italic;" value="I" onClick="fontEdit('italic')" />
<input type="button" id="underline" style="height:21px; width:21px; text-decoration:underline;" value="U" onClick="fontEdit('underline')" /> |
<input type="button" style="height:21px; width:21px;"value="L" onClick="fontEdit('justifyleft')" title="align left" />
<input type="button" style="height:21px; width:21px;"value="C" onClick="fontEdit('justifycenter')" title="center" />
<input type="button" style="height:21px; width:21px;"value="R" onClick="fontEdit('justifyright')" title="align right" /> |

Now it's time to take care of the dropdown Font, Size and Color lists. Because these lists have multiple values, we have pass the selected index value as the second parameter. Also, the event that will call the function will be onChange.
<select id="fonts" onChange="fontEdit('fontname',this[this.selectedIndex].value)">
   <option value="Arial">Arial</option>
   <option value="Comic Sans MS">Comic Sans MS</option>
   <option value="Courier New">Courier New</option>
   <option value="Monotype Corsiva">Monotype</option>
   <option value="Tahoma">Tahoma</option>
   <option value="Times">Times</option>
</select>
<select id="size" onChange="fontEdit('fontsize',this[this.selectedIndex].value)">
   <option value="1">1</option>
   <option value="2">2</option>
   <option value="3">3</option>
   <option value="4">4</option>
   <option value="5">5</option>
</select>
<select id="color" onChange="fontEdit('ForeColor',this[this.selectedIndex].value)">
   <option value="black">-</option>
   <option style="color:red;" value="red">-</option>
   <option style="color:blue;" value="blue">-</option>
   <option style="color:green;" value="green">-</option>
   <option style="color:pink;" value="pink">-</option>
</select> |
For example fontEdit('fontname','times') will change the font to Times. It's easy to figure out how the other dropdown lists will work.
Finally, I made a function to set the dropdown lists' default state; this will help the Font dropdown list avoid writing "Times" after refresh (when the default font is Arial), for example. The function will be called on load, by <body onLoad="def()">.
Here is the entire code for a JavaScript text editor:

<html>
<head>
</head>
<body onLoad="def()"><center>
<div style="width:500px; text-align:left; margin-bottom:10px ">
<input type="button" id="bold" style="height:21px; width:21px; font-weight:bold;" value="B" onClick="fontEdit('bold')" />
<input type="button" id="italic" style="height:21px; width:21px; font-style:italic;" value="I" onClick="fontEdit('italic')" />
<input type="button" id="underline" style="height:21px; width:21px; text-decoration:underline;" value="U" onClick="fontEdit('underline')" /> |
<input type="button" style="height:21px; width:21px;"value="L" onClick="fontEdit('justifyleft')" title="align left" />
<input type="button" style="height:21px; width:21px;"value="C" onClick="fontEdit('justifycenter')" title="center" />
<input type="button" style="height:21px; width:21px;"value="R" onClick="fontEdit('justifyright')" title="align right" /> |
<select id="fonts" onChange="fontEdit('fontname',this[this.selectedIndex].value)">
   <option value="Arial">Arial</option>
   <option value="Comic Sans MS">Comic Sans MS</option>
   <option value="Courier New">Courier New</option>
   <option value="Monotype Corsiva">Monotype</option>
   <option value="Tahoma">Tahoma</option>
   <option value="Times">Times</option>
</select>
<select id="size" onChange="fontEdit('fontsize',this[this.selectedIndex].value)">
   <option value="1">1</option>
   <option value="2">2</option>
   <option value="3">3</option>
   <option value="4">4</option>
   <option value="5">5</option>
</select>
<select id="color" onChange="fontEdit('ForeColor',this[this.selectedIndex].value)">
   <option value="black">-</option>
   <option style="color:red;" value="red">-</option>
   <option style="color:blue;" value="blue">-</option>
   <option style="color:green;" value="green">-</option>
   <option style="color:pink;" value="pink">-</option>
</select> |
<input type="button" style="height:21px; width:21px;"value="1" onClick="fontEdit('insertorderedlist')" title="Numbered List" />
<input type="button" style="height:21px; width:21px;"value="●" onClick="fontEdit('insertunorderedlist')" title="Bullets List" />
<input type="button" style="height:21px; width:21px;"value="←" onClick="fontEdit('outdent')" title="Outdent" />
<input type="button" style="height:21px; width:21px;"value="→" onClick="fontEdit('indent')" title="Indent" />
</div>
<iframe id="textEditor" style="width:500px; height:170px;">
</iframe>
</center>
<script type="text/javascript">
<!--
textEditor.document.designMode="on";
textEditor.document.open();
textEditor.document.write('<head><style type="text/css">body{ font-family:arial; font-size:13px; }</style> </head>');
textEditor.document.close();
function def()
{
   document.getElementById("fonts").selectedIndex=0;
   document.getElementById("size").selectedIndex=1;
   document.getElementById("color").selectedIndex=0;
}
function fontEdit(x,y)
{
   textEditor.document.execCommand(x,"",y);
   textEditor.focus();
}
-->
</script>
</body>
</html>
Read More

How to Send and Receive SMS from GSM modem Using AT commands

This AT command tutorial is written to support our Teltonika T-ModemUSB, a USB2.0 GSM modem based on the Nokia 12i GSM module - fast EDGE technology is supported. Some of the most popular applications are SMS based telemetry, security and news broadcasting.
And, Published by LinktoHow.


After succesfully sending and receiving SMS using AT commands via the HyperTerminal, developers can 'port' the ASCII instructions over to their programming environment, eg. Visual Basic, C/C++ or Java and also programmically parse ASCII messages from modem.

1. Setting up your GSM modem

Most GSM modems comes with a simple manual and necessary drivers. To setup your T-ModemUSB, download the USB GSM Modem Quick Start ( Windows ) guide (460kB PDF). You would be able to send SMS from the Windows application and also setup GPRS connectivity. The GSM modem will map itself as a COM serial port on your computer.
T-ModemUSB Windows Control Tool and SMS sending application
Windows based control panel to setup GSM modem, GPRS and send SMS

2. Using the HyperTerminal

Hint :: By developing your AT commands using HyperTerminal, it will be easier for you to develop your actual program codes in VB, C, Java or other platforms.

Go to START\Programs\Accessories\Communications\HyperTerminal (Win 2000) to create a new connection, eg. "My USB GSM Modem". Suggested settings ::

 - COM Port :: As indicated in the T-Modem Control Tool
 - Bits per second :: 230400 ( or slower )
 - Data Bits : 8
 - Parity : None
 - Stop Bits : 1
 - Flow Control : Hardware

You are now ready to start working with AT commands. Type in "AT" and you should get a "OK", else you have not setup your HyperTerminal correctly. Check your port settings and also make sure your GSM modem is properly connected and the drivers installed.

3. Initial setup AT commands

We are ready now to start working with AT commands to setup and check the status of the GSM modem.
ATReturns a "OK" to confirm that modem is working
AT+CPIN="xxxx"  To enter the PIN for your SIM ( if enabled )
AT+CREG?A "0,1" reply confirms your modem is connected to GSM network
AT+CSQIndicates the signal strength, 31.99 is maximum.

4. Sending SMS using AT commands

We suggest try sending a few SMS using the Control Tool above to make sure your GSM modem can send SMS before proceeding. Let's look at the AT commands involved ..
AT+CMGF=1To format SMS as a TEXT message
AT+CSCA="+xxxxx"  Set your SMS center's number. Check with your provider.

To send a SMS, the AT command to use is AT+CMGS ..

AT+CMGS="+yyyyy" <Enter>
> Your SMS text message here <Ctrl-Z>

The "+yyyyy" is your receipent's mobile number. Next, we will look at receiving SMS via AT commands.

5. Receiving SMS using AT commands
The GSM modem can be configured to response in different ways when it receives a SMS.

a) Immediate - when a SMS is received, the SMS's details are immediately sent to the host computer (DTE) via the +CMT command
AT+CMGF=1To format SMS as a TEXT message
AT+CNMI=1,2,0,0,0  Set how the modem will response when a SMS is received

When a new SMS is received by the GSM modem, the DTE will receive the following ..

+CMT :  "+61xxxxxxxx" , , "04/08/30,23:20:00+40"
This the text SMS message sent to the modem

Your computer (DTE) will have to continuously monitor the COM serial port, read and parse the message.

b) Notification - when a SMS is recieved, the host computer ( DTE ) will be notified of the new message. The computer will then have to read the message from the indicated memory location and clear the memory location.

AT+CMGF=1To format SMS as a TEXT message
AT+CNMI=1,1,0,0,0  Set how the modem will response when a SMS is received
When a new SMS is received by the GSM modem, the DTE will receive the following ..
+CMTI: "SM",3Notification sent to the computer. Location 3 in SIM memory
AT+CMGR=3 <Enter> AT command to send read the received SMS from modem

The modem will then send to the computer details of the received SMS from the specified memory location ( eg. 3 ) ..

+CMGR: "REC READ","+61xxxxxx",,"04/08/28,22:26:29+40"
This is the new SMS received by the GSM modem

After reading and parsing the new SMS message, the computer (DTE) should send a AT command to clear the memory location in the GSM modem ..

AT+CMGD=3 <Enter>   To clear the SMS receive memory location in the GSM modem

If the computer tries to read a empty/cleared memory location, a +CMS ERROR : 321 will be sent to the computer.

6. Using a computer program to send and receive SMS

Once we are able to work the modem using AT commands, we can use high-level programming ( eg. VB, C, Java ) to send the AT ASCII commands to and read messages from the COM serial port that the GSM modem is attached to.
Read More

How to Control your PC using GSM mobile


This time something different but related to mobile phone. Sometimes you may think that you can control your PC with your mobile phone. This is a simple example to control your PC with your mobile phone. Actually, I did this for my college project.
I dreamed to control my PC like shutting down, sending mails, sending files, starting or stopping services etc. from any where from this universe using my mobile phone with lesser cost. Finally I did it with simple logic.
Logic behind the scene
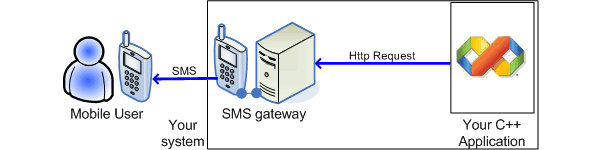
I am having a mobile phone and I can send SMS to my mail id. My mobile phone service provider allows me to send Mail through SMS service. I will send message to my mail Id like SHUTDOWN(Command to shutdown machine). Assume my system is switched on and opened Outlook 2000 (I did not tried with other versions). I set Outlook to check my mail account every 60 seconds.
ControlPCWithMobilePhone Control your PC using GSM mobile
I have written a listener application in VB. This application will be running in my system. This listener will check if any new mail is arrived to my inbox. If any new mail received then it will open the mail and check if the message is sent from my mobile phone. If it is verified then it will read the command, that I sent in mail. If the command matches to the pre-configured command in my program, then it will fire the event to the Operating system.
I used Outlook as my mail client. Create an outlook application object. From that getting name space of my inbox. After that checking each unread mail is it sent from my mobile phone. If it so then it parse the message and sent it to API function.
Here is the code to parse mail
Collapse
Private Function ParseMail() As String
‘Lets iterate through an each mail
For Each oMails In oNpc.GetDefaultFolder(olFolderInbox).Items
If oMails.UnRead Then
sParam = “”
‘Change the Subject comparition string
‘based on your service provider message
If UCase(oMails.Subject) = UCase(Trim(txtSubject.Text)) Then
sCommand = Mid(oMails.Body, 1, InStr(1, oMails.Body, Chr(13)) – 1)
If InStr(1, sCommand, “~”) <> 0 Then
ParseMail =
Mid(sCommand, 1, InStr(1, sCommand,
“~”) – 1)
sParam =
Mid(sCommand, InStr(1, sCommand,
“~”) + 1) Else
ParseMail =
sCommand End If
oMails.UnRead = False End If ‘ If
Send Unread mail Header is checked then
send
info to
mobile If
chkUnReadMail.Value =
1 Then If
UCase(oMails.Subject) <> UCase(Trim(txtSubject.Text)) Then
If InStr(1, sAlertedMails, Trim(oMails.EntryID)) = 0 Then
sAlertedMails = sAlertedMails & Trim(oMails.EntryID) & “,”
sMsgHead = “From: ” & oMails.SenderName & vbCrLf
sMsgHead = sMsgHead & “Sub: ” & oMails.Subject & vbCrLf
sMsgHead = sMsgHead & “DT: ” & oMails.SentOn & vbCrLf
sMsgHead = sMsgHead & “MSGID: ” & oMails.EntryID & “~”
SendSMS sMsgHead
End If
End If
End If
End If
Next oMails
�.
�.
End Function
I used more API functions and you can find it in
Using this application we can send commands to the system and also the system will report the status.
For example I like to know is there any new mail in my inbox then I will send command like CHECKMAIL. When the Listener receives this information then it will check count of unread mails and sends it to my mobile as SMS. Here is the code to parse mail
I thank Team for providing special SMS service for doing this application. I used XMLHTTP to pass the information as SMS to my Mobile.
Collapse
Private Sub SendSMS(sMessage As String,
Optional sFrom As String = “rasheedsys”)


Dim oXml As New MSXML2.XMLHTTP
Call oXml.Open(“POST”,
& sFrom & “&msg=” & sMessage & “~”)
‘Cange your vendor URL appropriately
Call oXml.setRequestHeader(“Content-Type”, “text/xml”)
Call oXml.Send
txtLog = txtLog & “Status of: “
& sFrom & “&msg=” & sMessage & “~” & vbCrLf
txtLog = txtLog & oXml.responseText & vbCrLf


End Sub
Here is the Command list and it�s functionality
SHUTDOWN
If we send SMS as SHUTDOWN then the machine will get shout downed
FILELIST~Folder Path~email Id
This command receives two parameters, Folder path and email Id to which we have to send the file list.
If we know the filename and file path we can use SENDFILE command to send a file from the machine to any email Id. In case we do not know the file name and path we can use FILELIST command. This command will get list of files, which is in the particular folder or Drive.
Example
FILELIST~C:temp~masterinblogging@gmail.com
When this message reaches my inbox then it search Temp folder in C drive and builds file list. The same is sent to the specified email id. In our example this file will be sent to
SENDFILE~File Name With Path~email Id
This command used to send a specific file from my system to specific email Id.
Example
SENDFILE~C:myfile.txt~masterinblogging@gmail.com
The file myfile.txt will be sent to the mail id
WHO
This command used to find the user who currently logged in the machine
NETSEND~System name~Message to send
Using this command we can send message from one machine to another machine without physical presence.
Example
NETSEND~SYS1~Hi
A message Hi will be sent to the machine named SYS1
CHECKMAIL
This command used to check number of unread mails in inbox. This command counts number unread mails in inbox and sends SMS to your mobile device
READMAILHEADER
This command used to check important information about the mail like from whom the message received, subject, Date time and message id (Used to read message).Read mail header info like From, Subject and Message id
READMSG~msgid
We can get message important detail using READMAILHEADER function. This function will returns message id. If we pass that message id like READMSG~adwerv354yjgh5fgrweg then the content of mail is sent to your mobile phone.
Using the application
You need VB runtime in your machine. I am not used any additional component in this application. You need MSXML 3.0 parser in your machine. You can find it in download section
When you compile and run this application an icon will be displayed in the system tray
ControlPCWithMobilePhone3 Control your PC using GSM mobile
Conclusion
We all know that we can control a PC from another PC. This is an initial approach to control PC using mobile phone. Not only controlling a PC we can get report from PC, File list, PC status, any other information stored in PC and much more. It is a beginning�
History
Initial version 0.1.0
Version 0.1.1
Commands Added
FILELIST
SENDFILE
WHO
NETSEND
CHECKMAIL
READMAILHEADER
READMSG
Read More

How to hack security code patch of Nokia or Symbian phone


here have been several tutorials and questions on internet that shows how to reset the security locking code of your Nokia Symbian Phones. But honestly speaking, non of the tutorial works. Because, most of them keeps talking about Master Code security code which really does not work in every phone.
The technique behind Master code is that, every phone has unique International Mobile Equipment Identity (IMEI) number and with the help of this number, a specific software will calculate your so called master code. This might work in some phone but not always. Because how can you be so sure about that the Master Code generated is the correct one? If it has been the straight right security code then there won’t be any use of security code. Because, Lock codes and master codes are meant for security purpose in case if it’s stolen or lost some where.
Therefore this might not be much practical. The good thing you can do is, contact the authorized service center to have your code reseted. If you don’t want to do that then still you have a choice left. That is, you’ll have to hack the phone. Don’t worry with the term ‘hack’ we’ll do nothing like hacking.
We’ll use a backdoor to reset the security code. This might be illegal, but can be helpful if you badly need it. Here is how you do it.
First of all download the. Once you have downloaded it extract it with your favorite unzipper.  Now reate a new folder ‘Recogs‘ in your desktop.
za How to reset Nokia Lock Code without any software
New Recogs folder in desktop
Once it has been created, copy the THC-NOKIA-UNLOCK.MDLfile from the extracted file toRecogs folder.
zb How to reset Nokia Lock Code without any software
Drag or copy the file to Recogs folder
Now take out the memory card from your Nokia phone and plug it in to you card reader and open it from my computer.
zc How to reset Nokia Lock Code without any software
Open your card from my computer
Once you open go to System folder. If it is not there then don’t worry it is hidden folder. To go to System folder, type ‘system‘ next to your card location as shown in the image below (in this tutorial the drive letter for the memory card is H:).
zd How to reset Nokia Lock Code without any software
Type-in system to go to system folder
Instantly you’ll be inside system folder.
ze How to reset Nokia Lock Code without any software
The System folder
Once you are inside the system folder copy the Recogs folder from desktop to the system.
zf How to reset Nokia Lock Code without any software
Recogs folder being copied to system folder
Finally when it’s copied, eject your memory card and insert it to your phone which you want to unlock. Once you insert the memory card, it will automatically start the unclocker file and resets the Locking code.
Once it succesfully resets your Locking code, it will prompt a message on white screen with, ‘Press a Key’. Press any key and your code is rested to 12345. Now you can change it any time.
Thats it, you are done. No need of any electronic device, no need of any data cards no need of any complicated and insecure software and the phone is yours again.
Read More

How to Hack Admin Password From User Mode Using Cmd


We  tell you a simple trick to hack admin password in easy ways.


Follow these steps:
1. Open command prompt (Start->Run->cmd),

2. Enter the following command, then press ENTER


3. Enter the followin command, then press ENTER:
compmgmt.mscThis should open the computer management console.


4. Go to local users & groups->users. Right click on any user and select "set password".


NOTE : If you get a "access denied" do the following:

start>run>cmd
then use following commands


1) net user test /add (this command will make test named user)


2) net localgroup administrators test /add (this command will make test user as administrators rights)

and use net user command to reset your admin. password.


Disclaimer: I don’t take Responsibility for what you do with this script, served for Educational purpose only. … 
Read More