Introduction
This article is the first part in my Mobile Game Programming for Beginners series. The series starts out with a super-simple game, but will continue to show how to implement a variety of different game types and the techniques used to code them.The series is a four part series, where I'll go through the following games:
- Basics
- BreakOut
- Top Down Scroller
- 3D Space Game
In this game, the goal is to navigate your avatar to a target, no obstacles, and the target isn't even moving. There's no way to "die", no way to loose, but it's a good starting point to show the basics of game programming. The areas I'll cover in this first part are:
- Tools of the Trade, the applications required (or at least, the ones I like to use).
- Creating a MIDlet, an application that can run on your mobile phone.
- Basic Game Loop, the foundation of any game.
- Reading user input.
Tools of the Trade
All the games in this series have been developed using three software packages:- Java 6 SDK
- NetBeans
- Paint.NET
Java 6 SDK
The Java SDK (or JDK, Java Development Kit) is a collection of class libraries, tools, and documentation, used when developing Java applications. It is not to be confused with a JRE, Java Runtime Environment, which is something that is used to run Java based applications. I downloaded my JDK from here. You'll need a JDK installed to use the next tool on the list, NetBeans, so make sure this is the first thing you download.NetBeans
NetBeans is an Integrated Development Environment, IDE, mainly for Java development. It is free, which is good, but the best thing about it is that it truly rocks. According to me, it's by far the best Java IDE around right now. NetBeans is the tool that you'll use to implement and test your game as it comes bundled with a neat emulator so that you don't have to install the game on your mobile phone before you know it works.Go here and download the Mobility pack and get that installed. The Mobility pack includes the J2ME JDK (Java 2 Mobile Edition), which contains the class libraries required to write a MIDlet (which is a Java application that can run on a mobile device) and the tools required (such as emulators for testing the game without having to install it on an actual handset).
Paint.NET
Almost all games need some sort of graphics to make them enjoyable. I prefer to use Paint.NET to create the graphics for my games (when it's not generated by the game itself, but more on that in the second part of the series). The reason I'm not using Paint that comes bundled with Windows is that it's simply not packed with all the nice features that Paint.NET has, such as support for transparent PNG files.Head on over to Paint.NET's download page and download it.
Once you have these three tools installed, you're almost ready to start coding.
Basic Game Loop
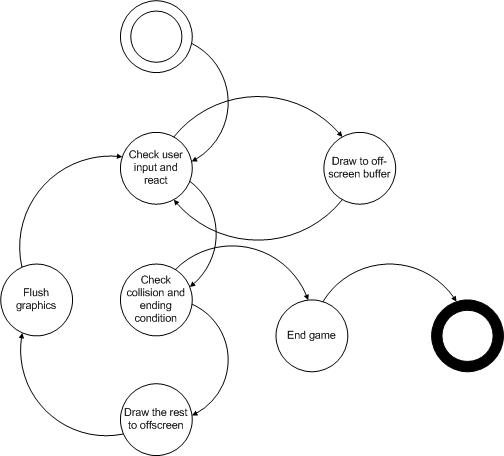
Almost all games rely on a central game loop, it is the loop that manages or controls the game. As the games you write become more and more complicated, the methods called from the game loop will have to contain more and more logic, but the actual game loop will still be a fairly simple loop. In its simplest form, it might look something like this:while(gameShouldStillBeRunning) {
// Capture input readInput();
// Update the game state updateGameState();
// Present the game to the user, i. e. render or draw it to screen renderGameState();
// Check for game over checkGameState();
}Reading Input
This method is responsible for reading or capturing the current state of the input. This includes, for example, checking which keys are pressed and how far the mouse has moved since the last check. The method typically stores the input that is relevant to the game in a place where theupdateGameState method can access it.Storing the game state can be as easy as setting a boolean value to
true if a key is pressed, and to false it it's not pressed. The reason for checking the input and storing it first, instead of checking it when you actually need it (i.e., when updating the game state), is because it is often quite expensive CPU wise to read the input, and it is best to get all the input required at once. Otherwise, different parts of the code that updates the game state might query the OS several times for the same key input, which would be unnecessary. Making the games run smooth and fast is a major part of game development, and I will discuss this in a later part of this series.You'll notice that the game included in this article doesn't read the input state in the game loop, that is because it's relying on a built-in functionality of
javax.microedition.lcdui.Canvas; more on this later.Update Game State
Updating the game state includes all the actual processing of the game logic, such as moving the player's character according to the input captured, moving enemies according to their AI, updating the environment, checking for game over state, and many more things, all depending on what kind of game is being developed.In this first part, updating the game state includes only moving the avatar and checking if the avatar has reached the goal.
Render Game State
When the game state is rendered, the state of the game (i.e., the location of the player, the map, and for example, the current score) is drawn to the screen. TheCanvas class in the javax.microedition.lcdui package is used to render things to the screen in kind of the same way as java.awt or javax.swing components, by overriding Canvas.paint(Graphics graphics). Note that the Graphics parameter isn't the java.awt.Graphics object that you might recognize from desktop development, it is a javax.microedition.lcdui.Graphics object, which is like a cut down version of the AWT one.Check for Game Over
This is where the game primarily detects if the player has lost or beaten the game, but it will also detect and act on any major state changes. Such as completing a level and moving into a game state where the level summary is shown before the next level is started (yet another state).Getting Started
Setting up the Project
The first thing to do to get started is setting up a project in NetBeans; it is important to pick the right type of project as the project type dictates the JDK that will be used (remember, we need the J2ME JDK to get this to run on a mobile device).Create a MIDP Application Project
In NetBeans, select File->New Project... and select the project category Mobility and project type MIDP Application, then click Next.
Give your project a name; in this example, it is called Basics.GameLoop. Then, make sure to un-tick the Create Hello MIDlet as that will create a template designed to handle a control based UI (with buttons and lists), and for a game, all rendering is custom, so no standard controls will be used. Then, click Next.

The next screen shows the configuration options. The settings picked here must match the target device's capabilities. That means that a game written for MIDP-2.1 will not run on a mobile phone that only supports MIDP-1.0, for example. For now, leave this page with its default settings, and click Finish.

In your new project's source package, create a package (as keeping classes in the root package is discouraged). You can call the package whatever you want; in the example application, it is called
com.bornander.games.basics.Create a class called
BasicsMIDlet in the package you just created, this will be the entry point for the application. This is the class that the Java runtime on the mobile device will instantiate when the the user selects your MIDlet. Make sure the BasicsMIDlet class extends javax.microedition.midlet.MIDlet, as this class defines the interface used by the runtime to control a MIDlet. javax.microedition.midlet.MIDlet is an abstract class, and there are three methods that must be overridden:startApp()This method is called by the runtime to start the MIDlet, either when a start is requested by the user by selecting the MIDlet in some menu, or when the mobile device decides to return the control back to a previously paused MIDlet.pauseApp()This method is called by the runtime to indicate to a MIDlet that it will lose focus, possibly due to an incoming call. It is entirely up to the MIDlet to actually pause something. The example game included in this article will ignore this method, which means the game would continue to run when a call comes in.
If a MIDlet decides to pause itself, after taking steps to suspend itself in a controlled manner, call theresumeRequest()method to notify the framework that it is interested to know when it can resume processing.destroyApp(boolean conditional)This method is called when a MIDlet is being destroyed (closed), to allow it to clean up its resources in a safe and controlled way.
BasicsMIDlet implements these three, abstract methods, after which your class should look something like this:package com.bornander.games.basics;
import javax.microedition.midlet.MIDlet;
public class BasicsMIDlet extends MIDlet {
public BasicsMIDlet() {
}
public void startApp() {
}
public void pauseApp() {
}
public void destroyApp(boolean unconditional) {
}
}The next step is to add the the MIDlet to the Application Descriptor, which is a set of meta data that holds information about the mobile application. One mobile application can contain several MIDlets, but for this example, there's only going to be one.Right-click Basics.GameLoop and click Properties, then select Application Descriptor, the MIDlets tab, and click Add.... This will let you select a MIDlet class, give it a name and icon, and add it to the descriptor. The dialog auto-detects classes that extends
javax.microedition.midlet.MIDlet, so just click OK to accept the default proposal.
And that's it! The mobile application is created. Click Run Main Project to try it out on the emulator. This will launch a mobile phone emulator from where the MIDlet just created can be started. Note that since there's no actual implementation yet, it won't do anything. Add a
System.out.println("Hello, world!"); to the BasicMIDlet.startApp method, and run the application again to see that it's actually started. The text will be printed to the NetBeans IDE, so do not expect to see it on the screen of the emulator.Rendering to Screen
When writing MIDlets, there's a set of classes for labels, text fields, checkboxes and such, that are used in a similar way to the corresponding classes in Swing or AWT. As this article is about game programming, it won't discuss any of these controls as they're not very well suited for graphical games.The class used to render to screen is
javax.microedition.lcdui.Canvas. By extending this class, it is possible to override its paint method and implement custom rendering. Create a new class called MainCanvas and have it extend javax.microedition.lcdui.Canvas. Override paint to render red text on a blue background:package com.bornander.games.basics;
import javax.microedition.lcdui.Canvas;
import javax.microedition.lcdui.Font;
import javax.microedition.lcdui.Graphics;
public class MainCanvas extends Canvas implements Runnable {
public MainCanvas() {
}
// The Graphics object is used to render images, lines, shapes and // text to the screen using different draw methods. protected void paint(Graphics graphics) {
// Get the width and height of the screen in pixels int w = getWidth();
int h = getHeight();
// Set the current color to blue (hex RGB value ) and draw a filled // rectangle the size of the screen graphics.setColor(0x00007F);
graphics.fillRect(0, 0, w, h);
// Set the current color to red, the font to the default font and // draw a string to the center of the screen. graphics.setColor(0xFF0000);
graphics.setFont(Font.getDefaultFont());
graphics.drawString("Hello, world!", w / 2, h / 2,
Graphics.BASELINE | Graphics.HCENTER);
}
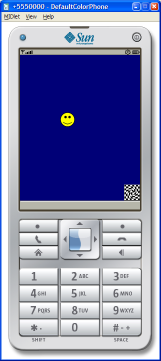
}In order to get the MIDlet to use this Canvas, it has to be set as the current one for the display. Modify BasicMIDlet.startApp to create a MainCanvas, and set it to the default Display:public void startApp() {
MainCanvas mainCanvas = new MainCanvas();
Display.getDisplay(this).setCurrent(mainCanvas);
}Run the MIDlet again; this time is should look something like this:
Now, it's time to start implementing the actual game.
Implementing the Game
Loading Resources
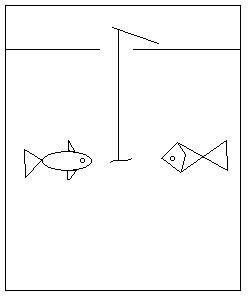
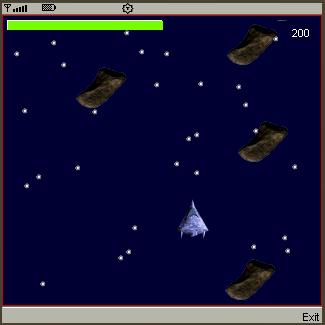
Even though it would be possible to render all aspects of a game using the different draw methods injavax.microedition.lcdui.Graphics, it is more common to use images created in an image editing program (such as Paint.NET). This game will use two different images: one for the player or avatar, and one for the target.- Avatar:

- Target:

By adding the resources to a Java package, it is possible to load them into
javax.microedition.lcdui.Image objects which can then be drawn onto javax.microedition.lcdui.Graphics. A convenient way of loading resources is to use the Class.getResourceAsStream method, as it allows for referencing resources using Java package names (but with forward slashes instead of dots). Also, since the easiest way to get a Class instance is to call Object.getClass, there's always a simple way to reference resources in the same bundle as the current class.Image resources can therefore be placed in the normal Java package structure:

By adding two
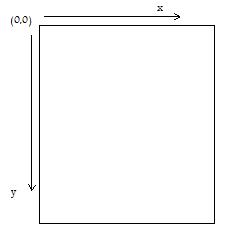
javax.microedition.lcdui.Images as members to MainCanvas, and loading the resources in the constructor, the paint method can be modified to draw the avatar in the upper left corner and the target in the lower right. Notice that it's good practice not to use absolute coordinates (such as 100, 100), but instead calculate the coordinates based on the current screen width and height. Obviously, 0, 0 is always going to be the upper left corner, but the coordinates of the lower right will vary on different mobile devices. By finding the width and height of the screen, and then subtracting the width and height of the image, the target image is guaranteed to always appear in the lower right corner, regardless of screen resolution.package com.bornander.games.basics;
import java.io.IOException;
import javax.microedition.lcdui.Canvas;
import javax.microedition.lcdui.Font;
import javax.microedition.lcdui.Graphics;
import javax.microedition.lcdui.Image;
public class MainCanvas extends Canvas implements Runnable {
// Declare members for the images private Image avatar;
private Image target;
public MainCanvas() throws IOException {
// Load the image resources avatar = Image.createImage(getClass().getResourceAsStream(
"/com/bornander/games/basics/resources/avatar.png"));
target = Image.createImage(getClass().getResourceAsStream(
"/com/bornander/games/basics/resources/target.png"));
}
protected void paint(Graphics graphics) {
int w = getWidth();
int h = getHeight();
graphics.setColor(0x00007F);
graphics.fillRect(0, 0, w, h);
// Draw the images graphics.drawImage(avatar, 0, 0, 0);
graphics.drawImage(target, w - target.getWidth(),
h - target.getHeight();
graphics.setColor(0xFF0000);
graphics.setFont(Font.getDefaultFont());
graphics.drawString("Hello, world!", w / 2, h / 2,
Graphics.BASELINE | Graphics.HCENTER);
}
}Making the Avatar Controllable
Always painting the Avatar in the upper left corner isn't going to make for a very interesting game. By declaring members for position, and also travel direction, it will be possible to control the Avatar using the keypad. Normally, I'd prefer to store the location of an Avatar in 2D space as some sort ofPoint object, but as the J2ME libraries is a cut down version of the J2SE, there is no such class. I could have written my own (as I have for the other games in this series), but decided to store the position as two separate integers. I store the direction as four separate booleans, for up, down, left, and right.public class MainCanvas extends Canvas implements Runnable {
// The two images private Image avatar;
private Image target;
// The coordinates of the player. private int x = 0;
private int y = 0;
// Flags indicating which buttons are pressed. private boolean up = false;
private boolean down = false;
private boolean left = false;
private boolean right = false;
...
}Moving the avatar (i.e., updating its X and Y coordinates according to the direction flags) is delegated to a method that also does constraint checking. By constraint checking, I mean the process in which the position is constrained to a valid one. In this example, it is invalid for the avatar to be outside the bounds of the screen.public class MainCanvas extends Canvas implements Runnable {
...
private void moveAvatar() {
if (up)
--y;
if (down)
++y;
if (left)
--x;
if (right)
++x;
if (y < 0)
y = 0;
if (y > getHeight() - avatar.getHeight())
y = getHeight() - avatar.getHeight();
if (x < 0)
x = 0;
if (x > getWidth() - avatar.getWidth())
x = getWidth() - avatar.getWidth();
}
}Notice again the use of getWidth/getHeight and avatar.getWidth/avatar.getHeight to make the constraint checking independent of screen size as well as image size. This method, MainCanvas.moveAvatar, will be called by the game loop for each iteration to update the position of the player. Obviously, this also requires a small change to the MainCanvas.paint method, as the avatar is no longer drawn at (0, 0), but at (x, y).Capturing the Input
By extendingCanvas, it's easy to capture the input by simply overriding some methods. Canvas exposes three methods related to key input:void keyPressed(int keyCode)void keyReleased(int keyCode)void keyRepeated(int keyCode)
keyPressed and keyReleased, and to control the Avatar, the only thing the methods needs to do is to set up, down, left, and right according to which key was pressed or released.The
keyCode parameter passed to the key handling can be converted to key codes better suited for game programming using the aptly named function Canvas.getGameAction; this will convert the key code into one that can be checked for buttons such as up and down./**
* This gets called for us whenever a key is pressed.
* @param key The pressed key.
*/
protected void keyPressed(int key) {
int gameKey = getGameAction(key);
switch(gameKey) {
case Canvas.UP: up = true; break;
case Canvas.DOWN: down = true; break;
case Canvas.LEFT: left = true; break;
case Canvas.RIGHT: right = true; break;
case Canvas.FIRE: shouldRun = false; break;
}
}
/**
* This gets called for us whenever a key is released.
* @param key The released key.
*/
protected void keyReleased(int key) {
int gameKey = getGameAction(key);
switch(gameKey) {
case Canvas.UP: up = false; break;
case Canvas.DOWN: down = false; break;
case Canvas.LEFT: left = false; break;
case Canvas.RIGHT: right = false; break;
}
}Checking for Game Over state
All games need to check the Game Over state; this can occur either when the player loses the game or when he beats it. In any case, it has to be checked, or the game can neither be won or lost.In this first example, Game Over can only occur when the player has beaten the game. Yep, that's right. This is a game you can't fail at. You can choose not to win, but you can't lose. This implementation calls a method called
isGameCompleted to check if the game is over. This method sets a member variable, completed. To change the behaviour of the game when the Game Over state is reached, the run method looks at the completed flag set when the Avatar has reached the Goal, and if it's true, then the Avatar isn't moved anymore, regardless of key presses. Also, the paint message draws a Game Over message at the center of the screen./**
* Detects if the game has been completed
* (i.e. the avatar has navigated to the target).
* @return true if the game is completed.
*/
private boolean isGameCompleted() {
return x == targetX && y == targetY;
}This method is called in the run method:protected void paint(Graphics graphics) {
...
if (completed) {
graphics.setColor(0xA0A0FF);
graphics.setFont(Font.getDefaultFont());
graphics.drawString("Game Over", w / 2, h / 2,
Graphics.BASELINE | Graphics.HCENTER);
}
}
public void run() {
while(shouldRun) {
completed = isGameCompleted();
if (!completed) {
moveAvatar();
}
repaint();
try {
Thread.sleep(20);
}
catch (InterruptedException ex) {
}
}
owner.exit();
}And that's it! That's the whole game. It's not the most addictive game in the world, but it is enough to show how to set up a NetBeans project and the basics of a game.Next Part
In the next part, I'll cover menus, simple AI, and basic collision detection as I demonstrate how to write a BreakOut style game.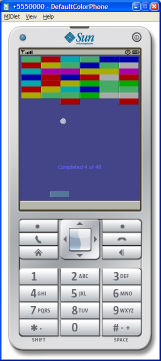
As always, any comments on the article or the code are most welcome.
 In the