Get Stock Data From Yahoo Finance in PHP

Welcome in s2ptech here i am giving you new web service for Yahoo Finance in php by which you can easily get stock quote data from Yahoo.
You need to follow some step:
  • Step 1: First of all i am giving you top tech companies data from Yahoo Finance.
  1. For eBay: http://finance.yahoo.com/q?s=EBAY
  2. For Amazon: http://finance.yahoo.com/q?s=AMZN
  3. For Apple: http://finance.yahoo.com/q?s=AAPL
  4. For Microsoft: http://finance.yahoo.com/q?s=MSFT
  5. For Yahoo: http://finance.yahoo.com/q?s=YHOO
You can use for more by finding stock ticker symbol like GOOG for Google, MSFT for Microsoft, APPL for Apple, etc.
  • Step 2: Now i am tell you How can you fetch data from giving url using PHP. You need to make two php file.

yahoofinance.php
<?php
class YahooStock {
     private $stocks = array();
     private $format;
     public function addStock($stock)
    {
        $this->stocks[] = $stock;
    }
     public function addFormat($format)
    {
        $this->format = $format;
    }
     public function getQuotes()
    {      
        $result = array();    
        $format = $this->format;
        
        foreach ($this->stocks as $stock)
        {          
           $s = file_get_contents("http://finance.yahoo.com/d/quotes.csv?s=$stock&f=$format&e=.csv");
                 $data = explode( ',', $s);
                 $result[$stock] = $data;
        }
        return $result;
    }
  • Step 3: Now make another php file


index.php (main php file)
<?php
include_once('yahoofinance.php ');

$objYahooStock = new YahooStock;

/**
    Add format/parameters to be fetched
    
    s = Symbol
    n = Name
    l1 = Last Trade (Price Only)
    d1 = Last Trade Date
    t1 = Last Trade Time
    c = Change and Percent Change
    v = Volume
 */
$objYahooStock->addFormat("snl1d1t1cv");

/**
    Add company stock code to be fetched
    
    msft = Microsoft
    amzn = Amazon
    yhoo = Yahoo
    goog = Google
    aapl = Apple  
 */
$objYahooStock->addStock("msft");
$objYahooStock->addStock("amzn");
$objYahooStock->addStock("yhoo");
$objYahooStock->addStock("goog");
$objYahooStock->addStock("vgz");

/**
 * Printing out the data
 */
foreach( $objYahooStock->getQuotes() as $code => $stock)
{
    ?>
    Code: <?php echo $stock[0]; ?> <br />
    Name: <?php echo $stock[1]; ?> <br />
    Last Trade Price: <?php echo $stock[2]; ?> <br />
    Last Trade Date: <?php echo $stock[3]; ?> <br />
    Last Trade Time: <?php echo $stock[4]; ?> <br />
    Change and Percent Change: <?php echo $stock[5]; ?> <br />
    Volume: <?php echo $stock[6]; ?> <br /><br />
    <?php
}
?>
  •  Step 4: Just run index.php file and thats it.

Note: If you think it is valuable post then please give some time to comment and feel free to give suggestion.
Read More

MDU BTECH Result Announces 2013

Hello Frnds,
Best of Luck for your results In April BTech Result also come soon.
MDU BE/B.Tech/MBA/M.Tech/BBA/BCA/MA/MCA/BA All semester results 2013- MDU (Maharshi Dayanand University), Rohtak will soon decleared the examination results of courses like MBA, MCA, B.tech, B.E, BBA, MA, BA etc on its official wesite portal
 http://result.mdurohtak.ac.in/resultsearch.aspx

Outcomes Results:
  • ADV. Post Graduate
  • Bach. of Computer Application
  • Bach. of Art in Yoga
  • Bach. of Business Admi.
  • Bach. of Hotel Mgmt
  • Master of Business Admi.
  • Master of Computer App.
  • Master of Hotel Mgmt
  • MSC (Computer Sc)
  • Diploma in Yoga
  • BA(Honors)
  • B. Pharmacy
and many more .....

Incoming Results:
  • BA (Honors)
  • Bach. of Technology
  • Bach. of Engineering
  • Bach. of Journalism
  • Bach. of Journalism & Mass Com.
  • Bach. of Tourist Mgmt
  • Bach in Social Work
  • Bach. of Science
  • Bach. of Pharmacy
and many more....

Read More

How to Control DC Motor using Bluetooth

In this project we will control a DC motor with a smartphone via bluetooth. This project is great to learn more about:
  1. DC motor
  2. Interfacing Arduino with your smartphone
  3. Bluetooth module
  4. L293D
6bluethumb.JPG 
  •  Step 1: Parts Required

IMG_0244.JPG
  1. 1x Arduino Uno
  2. 1x Bluetooth Module (for example: HC-05)
  3. 1x Smartphone (any Android will work)
  4. BlueTerm application
  5. 1x L293D IC
  6. 1x DC motor
  7. 1x Breadboard
  8. Jumper Cables
  • Step 2: Schematics and common mistakes
Screenshot from 2013-02-23 17:15:28.png
Two common mistakes:
-You need to remove the RX and TX cables when you’re uploading the sketch to your Arduino.
-Sometimes people connect the TX from the bluetooth module to the TX of the Arduino… that’s wrong and it won’t work. Make sure you connect it properly, the TX into RX and the RX into the TX.
Note:
If the HC-05 Bluetooth Module asks for a password, It's '1234'.
  • Step 3:  Now Audrino Coding
/*
* created by Rui Santos, http://randomnerdtutorials.wordpress.com
* Control DC motor with Smartphone via bluetooth
* 2013
*/
int motorPin1 = 3; // pin 2 on L293D IC
int motorPin2 = 4; // pin 7 on L293D IC
int enablePin = 5; // pin 1 on L293D IC
int state;
int flag=0; //makes sure that the serial only prints once the state

void setup() {
// sets the pins as outputs:
pinMode(motorPin1, OUTPUT);
pinMode(motorPin2, OUTPUT);
pinMode(enablePin, OUTPUT);
// sets enablePin high so that motor can turn on:
digitalWrite(enablePin, HIGH);
// initialize serial communication at 9600 bits per second:
Serial.begin(9600);
}

void loop() {
//if some date is sent, reads it and saves in state
if(Serial.available() > 0){
state = Serial.read();
flag=0;
}
// if the state is '0' the DC motor will turn off
if (state == '0') {
digitalWrite(motorPin1, LOW); // set pin 2 on L293D low
digitalWrite(motorPin2, LOW); // set pin 7 on L293D low
if(flag == 0){
Serial.println("Motor: off");
flag=1;
}
}
// if the state is '1' the motor will turn right
else if (state == '1') {
digitalWrite(motorPin1, LOW); // set pin 2 on L293D low
digitalWrite(motorPin2, HIGH); // set pin 7 on L293D high
if(flag == 0){
Serial.println("Motor: right");
flag=1;
}
}
// if the state is '2' the motor will turn left
else if (state == '2') {
digitalWrite(motorPin1, HIGH); // set pin 2 on L293D high
digitalWrite(motorPin2, LOW); // set pin 7 on L293D low
if(flag == 0){
Serial.println("Motor: left");
flag=1;
}
}
}
For the android communication with our bluetooth module I’ve used the BlueTerm app, It’s completely free, so you just need to go to “Play store” and download it. Then you just need to connect your smarthphone with the bluetooth module. Remember to remove the TX and RX cables. (you can see in youtube video below how that’s done).
  • Step 4: Now Connect all Products
IMG_0232.JPG 
I've only set 3 commands to control the DC motor:

    ’0′ – Turns off the DC motor
    ’1′ – DC motor rotates to right
    ’2′ – DC motor rotates to left

Demo:
Read More

Improve Wordpress page load using 3 Best Free Services

Most of people make a website but not take care about their page load and lose their visitors time by time.
Everyone knows that the speed of the blog is taken into account when ranking pages in the SERPs.
In this post, I will be discussing 3 best free services that you can use easily to speed up your WordPress blog.

You must read : Blogger V/s Wordpress
  • Google Speed Service:
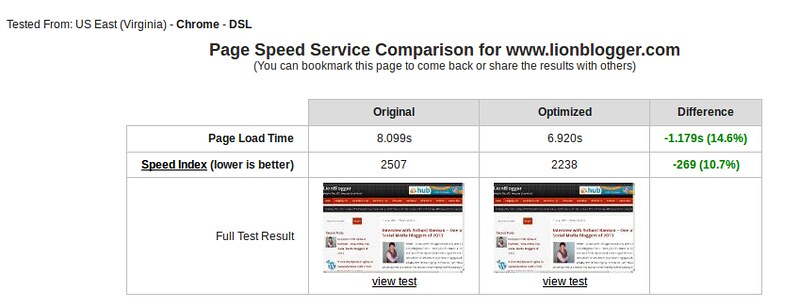
 It is the simplest to configure. All you have to do is add the domain in Google Page Speed Service and it provide you with a CNAME which you have to add in the DNS settings of your WWW subdomain.

free services
Detailed data about the bandwidth, requests, traffic is shown in the Console API itself.You can also check out the official guide on how to use the pagespeed service here.

free services
It is provided for free but Google has plans to make this a premium service. So, you can still use it as long as it’s free.
  • CloudFlare:
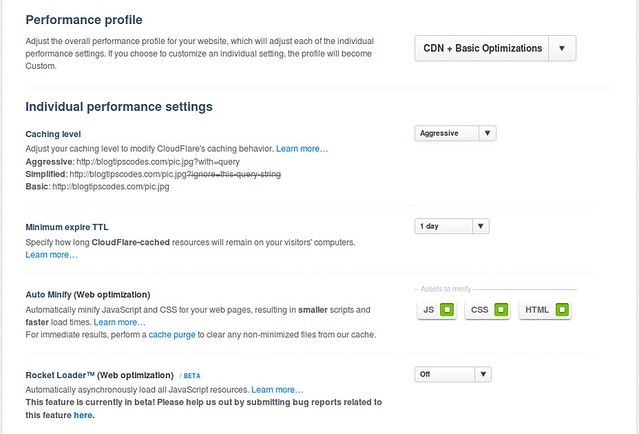
Cloudflare is one of the best CDN services that you can use for free. You can also create a premium account but for normal blogs the free account is enough. Apart from CDN services, it also provides Security and Analytics Details. Now, let’s take a look at all the features of Cloudflare.
Cloudflare’s web content optimization is one of the best. It has loads of features like AutoMinify CSS and Javascript, Javascript Bundling, Asynchronous Loading, Local Storage Caching etc.
free services
AutoMinifying CSS and Javascript will compress your site’s Javascript and CSS files and results in faster loading. Javascript bundling makes sure multiple javascript requests are converted into a single request instead of multiple ones which results in faster page loading. Asynchronous loading enables your HTML part of the site to load fast without being delayed by slow loading widgets or scripts.
  • Incapsula
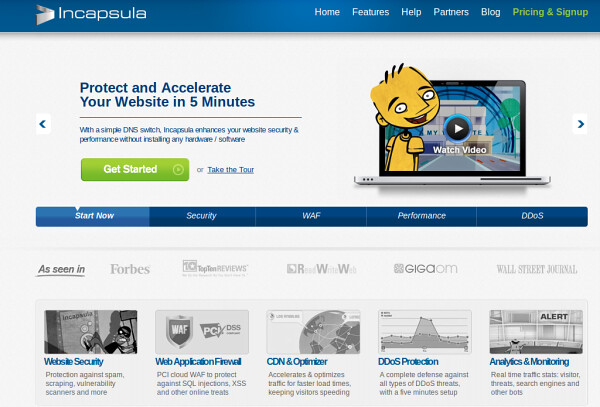
Like Cloudflare, Incapsula has identical features. It’s security features include protection against scraping, spam and preventing unauthorized access to both the backend and frontend of your site. It also has a premium plan which you can use if you’re looking to equip your site with more security.

free services
For a free plan, Incapsula offers more security than Cloudflare. It has a running Web Application Firewall which protects your site from SQL injections and other online threats. Another feature it has is DDoS protection which basically protects your site from Network and Application level threats.
It also consists of a CDN and an Optimizer which accelerates your site and makes loading atleast 40% faster. Like Cloudflare, it also has Analytics which monitors real time traffic and suspicious bots and sends you a detailed e-mail about the threats it has encountered.
Read More

Add Thumb Up and Down in Blogger

Thumbs up and Thumbs Down is a process to elaborate the visitors view on your post and it give an new look to your website.
Very interesting widget for your blogger which give you a professional look.
If your visitors feel good your article they will thumb up your post or if they do not get impressed , they simply thumb down.
You need to follow some step to add Thumbs Up and Thumbs Down Widget.
Step 1: First of all go to Blogger > Design > Edit HTML.
Step 2: Click the box "Expand Widget Templates" and Search
<data:post.body/>
Step 3: Paste the below code just after above code.
<b:if cond='data:blog.pageType == &quot;item&quot;'>
<div class='js-kit-rating' expr:path='data:post.url' expr:permalink='data:post.url' expr:title='data:post.title' view='score'> </div> </b:if>
Note:
If you paste the code before <data:post.body/> your thumb up and thumb down widget can be showed just after the post title if you paste the code just after <data:post.body/> The widget can be displayed at the last of the entire post only at post pages and not on homepage.
Step 4: Now search for <body>  Just above it paste the following code:
<script src="https://sites.google.com/site/funwithcomputer/linktohow/ratings.js"></script>
Step 5: Now save the template and view your blog.

You feel this post is helpful for you then give your precious time for comment and feel free to give suggestion if any.

Read More

How to make adsense ads responsive

Google is supporting the revolutionary responsive web-design technology it was important to allow compatible ads according website need. Till now it was very confusing to adopt the responsive ads due to no clear stand responsive AdSense code modification.

You must read : How to make Responsive web design.

On one hand Google was promoting responsive web design, on another hand there was no easy way to implement AdSense on such site without modifying the code. This is why they allowed to modify AdSense code in certain way (This is a really good news. Isn’t it?)

How to make adsense ads responsive,Google allows responsive AdSense officially,AdSense and Responsive Design Google AdSense,responsive ads,responsive google adsense

Now i'll tell you how can you do that
<script type="text/javascript">
google_ad_client = "ca-publisher-id",
if (window. innerWidth> = 800) {
google_ad_slot = " ad-unit-1 ";
google_ad_width = 728;
google_ad_height = 90;
} Else if (window.innerWidth <400) {
google_ad_slot = " ad-unit-2 ";
google_ad_width = 300;
google_ad_height = 250;
Else {}
google_ad_slot = " ad-unit-3 ";
google_ad_width = 468;
google_ad_height = 60;
}
</ script>
<script type = "text / javascript"
src = " http://pagead2.googlesyndication.com/pagead/show_ads.js ">
</ script>
Note:
  1. If you're using blogger then you need to parsing this code before implementing
  2. Above code is not work in Internet Explorer 8.
If you think this post is useful for you then give some time to comment and feel free for suggestion if any.
Read More

How to make Responsive Web Design

Responsive web design (RWD) is a web design approach aimed at crafting sites to provide an optimal viewing experience—easy reading and navigation with a minimum of resizing, panning, and scrolling—across a wide range of devices (from desktop computer monitors to mobile phones).
Now everyone want to make their website responsive but they don't want to switch to new theme or templates. Then don't take problem just follow some step and you can make your current theme or template responsive easily.

You must read: Make Responsive adsense ads

How to make Responsive Web Design,responsive web design,responsive,What The Heck Is Responsive Web Design,What is responsive design,

You need to forget the HTML properties like px(pixels) and use em or %(percentage).
Example:
Before responsive we use
<div style="margin-left:25px;">S2P Tech</div>
But after that you need to use
<div style="margin-left:10%">S2PTech</div>
You can see DEMO for better understanding.
Here in this demo i use only % or em. I provide you full coding for you.
<html>
<title>Responsive Tutorial By S2P Tech</title>
<head>
</head>
<body>
<div style=" border:solid; height:20%; background-color:#75A772;">
<center><strong >Header</strong></center>
</div>
<div style=" border:solid; float:left; height:60%;width:20%; background-color:#FF8080;">
<strong ><center>Left SideBar</center></strong>
</div>
<div style=" border:solid; float:right; height:60%; width:20%; background-color:#FF8080;">
<strong ><center>Right SideBar</center></strong>
</div>
<div style=" border:solid; height:60%; background-color:#C2DDE0;">
<strong ><center>Body</center></strong>
</div>
<div style=" border:solid; height:20%; margin-top:0.01em; background-color:#579841;">
<strong ><center>Footer</center></strong>
</div>
</body>
</html>
Read More

Top 10 Useful Website for SEO

Now I'll tell you top 15 useful website for seo -2013 and provide you a useful list of that website which get really improve their service.
Here you'll get all best resource for Search Engine Optimization.


1,400,000 - Estimated Unique Monthly Visitors
1,534 - Compete Rank
4,005 - Quantcast Rank
1,036 - Alexa Rank.
 
 700,000 - Estimated Unique Monthly Visitors
 2,034 - Compete Rank
10,100 - Quantcast Rank
1,946 - Alexa Rank.
 
650,000 - Estimated Unique Monthly Visitors
2,479 - Compete Rank
9,274 - Quantcast Rank
2,485 - Alexa Rank

645,000 - Estimated Unique Monthly Visitors
3,479 - Compete Rank
10,620 - Quantcast Rank
3,022 - Alexa Rank

550,000 - Estimated Unique Monthly Visitors
3,462 - Compete Rank
11,900 - Quantcast Rank
3,275 - Alexa Rank

500,000 - Estimated Unique Monthly Visitors
6,634 - Compete Rank
10,300* - Quantcast Rank
2,235 - Alexa Rank

440,000 - Estimated Unique Monthly Visitors
5,788 - Compete Rank
12,400 - Quantcast Rank
4,524 - Alexa Rank

 410,000 - Estimated Unique Monthly Visitors
13,105 - Compete Rank
10,409 - Quantcast Rank
1,003 - Alexa Rank

400,000 - Estimated Unique Monthly Visitors
6,794 - Compete Rank
13,500* - Quantcast Rank
5,815 - Alexa Rank
SubmitExpress

390,000 - Estimated Unique Monthly Visitors
12,313 - Compete Rank
11,000* - Quantcast Rank
2,834 - Alexa Rank

If you got this post is useful for you then please feel free to comment/suggestion.
Read More

Blogger Or Wordpress is better ?

Blogger and WordPress are best and popular blogging platforms today. More and more Internet users are going to use it. But the most confusing part is what to choose and why. So, here’s full comparison of Blogger and WordPress with all pros and cons.


Blogger :

  • Blogger is free blogging platform owned by Google. And the best part of Blogger is it’s completely free. As Well, it also provides free domain with extension blogspot.com. And you can also use your own custom domain with it. It’s extremely easy to setup and manage blogspot blog.
  • Publishing content is really easy with blogger. And you don’t need to backup database or anything. Allow you to display ads like Google Adsense and amazon, etc. As well as it’s completely ad free.
  • There are also some cons of blogger. Like, Maximum of 1GB Storage, No FTP support, Limitation of designing compared to WordPress and many more.

WordPress :

  • WordPress is Most Powerful and popular CMS (Content Management System) of all time. It’s divided in 2 parts : WordPress.com and WordPress.org self-hosted. WordPress.com is a hosted version of WordPress.org Providing free platform with limited features as well paid with premium features. I personally not recommended WordPress.com because most of the themes and plugins not working with free version.
  • WordPress.org is open source free software. Anyone can download WordPress software from wordpress.org and install on their server. It’s completely free and no limitation to use it. But you need to pay your hosting fees to your hosting provider.
  • Self hosted WordPress is very flexible since it’s open source. You can customize it as you want. You own it on your server so you have full control over it. You can use and install any free or premium themes and plugins on it. There are tons of themes and plugins available on web. It’s fully search engine friendly and you can also define your own custom meta tags. And it’s take less than 5 minutes to install it on your server.
Read More

How to Make Android Apps In Minutes Using PhoneGap Framework

PhoneGap is a free and open source framework that allows you to create mobile apps using the web technologies you’re already familiar with: HTML, CSS, and JavaScript. Use standardized web APIs and target the platforms you care about. Download PhoneGap for free right now and try it out.
You need Eclipse and Android SDK.

Make Android Apps Using PhoneGap Framework,make android apps,phonegap tutorials,android apps,phonegap framework,apk apps easily
You need to follow some step to make your first android apps easily.
  • Step 1: First of all you need to install Eclipse, Android SDK and PhoneGap.
  • Step 2: Open Eclipse and Choose New > Android Project 

Figure 1. Creating a new Android project.
  • Step 3: In the New Android Project dialog box, type a project name and select Create New Project In Workspace and Click Next.
Figure 2. The New Android Project dialog box.
  • Step 4: Select the Android 2.2 build target, and click Next .
Figure 3. Selecting a build target
Note: Choosing the Android 2.2 build target will configure the compiler to target the Android 2.2 SDK, and will ensure that your PhoneGap application will work on devices running Android 2.2 and newer versions of the operating system.
  • Step 5: On the Application Info screen, type a package name for your main Android application. This should be a namespace that logically represents your package structure; for example, com.yourcompany.yourproject and Click Finish. 
Figure 4. Specifying a package name.

Read More

How to make Android Apps Using Eclipse

Hello Friends, I am glad to talk with you and share a valuable information about Android with all beginners.

First of all i introduce myself . I am Sawan Kumar, mobile and Web Developer and having worked on PHP,Java and recently switch on Android. As i teach on Android as i share with you.
So lets get started with your first basic setup for Android development.
  • Step 1:  Download and Install the Android SDK
  1. Download the Android SDK
  2. Install/Extract the downloaded SDK.
  3. Go to the directory where you installed the SDK and open SDK Manager to open Android SDK and AVD Manager.
  4. In AVD manager under Avaliable Packages you can see different versions of SDK’s
  5. Select SDK versions and Development tools
  6. Select SDK Platform tools and one of the version of SDK and click on install
Select SDK versions and Development tools
  • Step 2: Downloading Eclipse
There are lot of IDE out there Eclipse is recommended IDE which will give you best support for Android app development.

You can download Eclipse IDE from here.
  • Step 3: Installing Android Development Toolkit
  1. Open Eclipse and under Help -> Install New Software.
  2. Now you will see a window which allows you to install new plug-in.
  3. Click on Add button and in Name and in Location give the link https://dl-ssl.google.com/android/eclipse/ and proceed with further steps.
Add plug-in Name and URL 
android plug-in tools
  • Step 4: Creating Sample Project

Creating a sample android project involves very few steps
  1. In your Eclipse IDE go to File -> Android Project
  2. Give Project Name, Select Build Target, Application Name, Package Name, Activity Name, Min SDK version and click Finish.
android create new project
     3. Now you can see bunch of files created in the project explorer.
Eclipse package explorer 
  • Step 5:  Creating New Android Virtual Device 
The AVD is an emulator which provides you android hardware and software environment to test application on computer.
  1. In Eclipse open SDK Manager under Windows -> Android SDK and AVD Manager.
SDK AVD Manager
     2. Click on New on the right side.
android virtual device 
    3. Give Name, Select Target give SD Card size and click on Create AVD.
android create avd 
   4. Now a new AVD is created with the specification you provided and Close the Android SDK and AVD Manager.
  • Step 6:  Running the Project
Once you successfully created AVD you are ready to test your application.
  1. Right Click on the project in Package Explore and click on Run As -> Android Application.
android compile app 
    2. Now you can see an AVD is opened and booting up.( It will take much time to launch AVD for the first time).
    3. Once the AVD started you can see the output on the AVD screen.
Read More