How to make Smartphone Charger Powered By Fire


Hello Friends Now i am teaching you about electricity friendly charger .You can Charge you smartphone just by fire not by Electricity How cool isn't it.
Just follow below step to do that

First of all we know about concept behind it
I´m using a thermoelectic module, also called peltier element, TEC or TEG. You have one hot side and one cold. The temperature difference in the module will start producing electricity. The physical concept when you use it as a generator it's called the Seebeck effect. Thermoelectic modules are mainly used for the opposite effect, the Peltier effect. Then you apply a electric load and it will force a heat transfer from one side to the other. Often used in smaller refrigerators and coolers. 
For more follow below link : http://en.wikipedia.org/wiki/Thermoelectric_effect
Now go ahead to made them

DSC_4517.jpg

Step 1: Material Requirement
  • 1x high temperature TEG module: TEP1-1264-1.5
  • 2x voltage step-up 
  • 1x small heat sink. From old PC (BxWxH=60x57x36mm)
  • 1x Aluminum plate: BxWxH=90x90x6mm
  • 1x 5V brushless DC motor with plastic fan (could be hard to find, check this link)
  • Fixation for heat sink: Aluminum bar (6x10x82mm)
  • 2x M3 bolts+2nuts+2x washers for heat sink: 25mm long
  • 2x M3 1mm thick metal washers
  • 4x M4 bolts+8x nuts+4x washers as construction base: 70mm long
  • 4x M4 1mm thick metal washers
  • 4x M4 bolts: 15-20mm long
  • 4x Drywall screw (35mm)
  • 2x heat insulated washers: Constructed from cardboard and old plastic food turner
  • 80x80x2mm corrugated cardboard (Not very good at high temperatures)
  • 2x pull springs: 45mm extended
  • (Optional) Components for a temperature monitor and voltage limiter. 
Step 2: Construction of Base Plate
Now we need to arrange base plate as given figure show you.
DSC_4450.jpg

This will be the "hot side". It will also act as construction base plate to fixate heat sink and some legs.
  1. How you construct this depends on what heat sink you are using and how you want to fixate it.
  2. I started to drill two 2.5mm holes to match my fixation bar. 68mm between them and the position is matched of where I want to put the heat sink. Holes are then threaded as M3.
  3. Drill four 3.3mm holes at the corners (5x5mm from outer edge). Use a M4 tap for threading.
  4. Make some nice looking finishing. I used a rough file, a fine file and two types of sand paper to gradually make it shine! You could also polish it but it would be too sensitive to have outside.
  5. Screw the M4 bolts through the corner holes and lock it with two nuts and one washer per bolt plus the 1mm washer on the top side. Alternative one nut per bolt is enough as long as the holes are threaded. You can also use the short 20mm bolts, depends on what you will use as heat source.
Step 3: Construction of Heat Sink
Most important is to fixate the heat sink on top of the base plate but at the same time isolate the heat. You want to keep the heat sink as cooled as possible. The best solution I could came up with was two layers of heat insulated washers. That will block the heat from reaching the heat sink through the fixating bolts. It need to handle about 200-300ºC. I created my own but it would be better with a plastic bush like this. I could not find any with high temperature limit. The heat sink needs to be under high pressure to maximize the heat transfer through the module. Maybe M4 bolts would be better to handle higher force.
DSC_4445.jpg

  1. Modified (filed) aluminum bar to fit in the heat sink
  2. Drilled two 5mm holes (should not be in contact with bolts in order to isolate heat)
  3. Cut two washers (8x8x2mm) from old food turner (plastic with max temp of 220ºC)
  4. Cut two washers (8x8mmx0.5mm) from hard cardboard
  5. Drilled 3.3mm hole through plastic washers
  6. Drilled 4.5mm hole through cardboard washers
  7. Glued cardboard washers and plastic washers together (concentric holes)
  8. Glued plastic washers on top of aluminum bar (concentric holes)
  9. Put M3 bolts with metal washers through the holes (will later be screwed on top of aluminum plate)
Step 4: Assembly of Parts
  1. Mount TEG-module on heat sink.
  2. Place cardboard on heat sink and TEG-module is now temporally fixated.
  3. The two M3 bolts go through the aluminum bar and then through the cardboard with nuts on top.
  4. Mount heat sink with TEG and cardboard on base plate with two 1mm thick washers in between to separate cardboard from the "hot" base plate.
  5. The assembly order from top is bolt, washer, plastic washer, cardboard washer, aluminum bar, nut, 2mm cardboard, 1mm metal washer and base plate.
  6. Add 4x 1mm washers on the upper side of base plate to isolate cardboard from contact
DSC_4459.jpg

Step 5: Electronics Parts
The main idea was to have a regulated output voltage to charge or power different kind of gadgets. Since the TEG-module produce very low voltage (0-5V depending on heat source) I needed a good voltage step-up and regulator.
TEG_complete.png
 I wanted to build everything myself and therefore created a whole different project for this since it turned out to be very useful. The voltage step up is not powerful enough so I built two of them. One will power the 3-5V fan and one will power other electronics.
DSC_4467.jpg

Top and Bottom Side of PC Board
MCP6002_monitor&limiter_circuit.png

Step 6: Assembly of Electronics Part
The circuit boards will be placed around the motor and above the heat sink. Hopefully they will not get too warm.
DSC_4485.jpg
  1. Tape the motor to avoid shortcuts and to get better grip
  2. Glue the cards together so that they fit around the motor
  3. Place them around the motor and add two pull springs to hold it together
  4. Glue the USB connector somewhere (I did not find a good place, had to improvise with melted plastic)
  5. Connect all cards together according to my layout
  6. Connect the PT1000 thermal sensor as close as possible to the TEG-module (cold side). I placed it beneath the upper heat sink between the heat sink and cardboard, very close to the module. Make sure it has good contact! I used super glue that can handle 180ºC.
  7. I advise to test all circuits before connected to the TEG-module and start heating it
DSC_4488.jpg
You are now good to go!

Step 7: Test and See the Result
It is a bit delicate to get started. One candle for example is not enough to power the fan and soon enough the heat sink will get as warm as the bottom plate. When that happen it will produce nothing. It must be started quickly with for example four candles. 
DSC_4520.jpg
Then it produce enough power for the fan to start and can start cool off the heat sink. As long as the fan keeps running it will be enough air flow to get even higher output power, even higher fan RPM and even higher output to USB.


Read More

Get Stock Data From Yahoo Finance in PHP

Welcome in s2ptech here i am giving you new web service for Yahoo Finance in php by which you can easily get stock quote data from Yahoo.
You need to follow some step:
  • Step 1: First of all i am giving you top tech companies data from Yahoo Finance.
  1. For eBay: http://finance.yahoo.com/q?s=EBAY
  2. For Amazon: http://finance.yahoo.com/q?s=AMZN
  3. For Apple: http://finance.yahoo.com/q?s=AAPL
  4. For Microsoft: http://finance.yahoo.com/q?s=MSFT
  5. For Yahoo: http://finance.yahoo.com/q?s=YHOO
You can use for more by finding stock ticker symbol like GOOG for Google, MSFT for Microsoft, APPL for Apple, etc.
  • Step 2: Now i am tell you How can you fetch data from giving url using PHP. You need to make two php file.

yahoofinance.php
<?php
class YahooStock {
     private $stocks = array();
     private $format;
     public function addStock($stock)
    {
        $this->stocks[] = $stock;
    }
     public function addFormat($format)
    {
        $this->format = $format;
    }
     public function getQuotes()
    {      
        $result = array();    
        $format = $this->format;
        
        foreach ($this->stocks as $stock)
        {          
           $s = file_get_contents("http://finance.yahoo.com/d/quotes.csv?s=$stock&f=$format&e=.csv");
                 $data = explode( ',', $s);
                 $result[$stock] = $data;
        }
        return $result;
    }
} 
  • Step 3: Now make another php file


index.php (main php file)
<?php
include_once('yahoofinance.php ');

$objYahooStock = new YahooStock;

/**
    Add format/parameters to be fetched
    
    s = Symbol
    n = Name
    l1 = Last Trade (Price Only)
    d1 = Last Trade Date
    t1 = Last Trade Time
    c = Change and Percent Change
    v = Volume
 */
$objYahooStock->addFormat("snl1d1t1cv");

/**
    Add company stock code to be fetched
    
    msft = Microsoft
    amzn = Amazon
    yhoo = Yahoo
    goog = Google
    aapl = Apple  
 */
$objYahooStock->addStock("msft");
$objYahooStock->addStock("amzn");
$objYahooStock->addStock("yhoo");
$objYahooStock->addStock("goog");
$objYahooStock->addStock("vgz");

/**
 * Printing out the data
 */
foreach( $objYahooStock->getQuotes() as $code => $stock)
{
    ?>
    Code: <?php echo $stock[0]; ?> <br />
    Name: <?php echo $stock[1]; ?> <br />
    Last Trade Price: <?php echo $stock[2]; ?> <br />
    Last Trade Date: <?php echo $stock[3]; ?> <br />
    Last Trade Time: <?php echo $stock[4]; ?> <br />
    Change and Percent Change: <?php echo $stock[5]; ?> <br />
    Volume: <?php echo $stock[6]; ?> <br /><br />
    <?php
}
?>
  •  Step 4: Just run index.php file and thats it.

Note: If you think it is valuable post then please give some time to comment and feel free to give suggestion.
Read More

MDU BTECH Result Announces 2013

Hello Frnds,
Best of Luck for your results In April BTech Result also come soon.
MDU BE/B.Tech/MBA/M.Tech/BBA/BCA/MA/MCA/BA All semester results 2013- MDU (Maharshi Dayanand University), Rohtak will soon decleared the examination results of courses like MBA, MCA, B.tech, B.E, BBA, MA, BA etc on its official wesite portal
 http://result.mdurohtak.ac.in/resultsearch.aspx

Outcomes Results:
  • ADV. Post Graduate
  • Bach. of Computer Application
  • Bach. of Art in Yoga
  • Bach. of Business Admi.
  • Bach. of Hotel Mgmt
  • Master of Business Admi.
  • Master of Computer App.
  • Master of Hotel Mgmt
  • MSC (Computer Sc)
  • Diploma in Yoga
  • BA(Honors)
  • B. Pharmacy
and many more .....

Incoming Results:
  • BA (Honors)
  • Bach. of Technology
  • Bach. of Engineering
  • Bach. of Journalism
  • Bach. of Journalism & Mass Com.
  • Bach. of Tourist Mgmt
  • Bach in Social Work
  • Bach. of Science
  • Bach. of Pharmacy
and many more....

Read More

How to Control DC Motor using Bluetooth

In this project we will control a DC motor with a smartphone via bluetooth. This project is great to learn more about:
  1. DC motor
  2. Interfacing Arduino with your smartphone
  3. Bluetooth module
  4. L293D
6bluethumb.JPG 
  •  Step 1: Parts Required

IMG_0244.JPG
  1. 1x Arduino Uno
  2. 1x Bluetooth Module (for example: HC-05)
  3. 1x Smartphone (any Android will work)
  4. BlueTerm application
  5. 1x L293D IC
  6. 1x DC motor
  7. 1x Breadboard
  8. Jumper Cables
  • Step 2: Schematics and common mistakes
Screenshot from 2013-02-23 17:15:28.png
Two common mistakes:
-You need to remove the RX and TX cables when you’re uploading the sketch to your Arduino.
-Sometimes people connect the TX from the bluetooth module to the TX of the Arduino… that’s wrong and it won’t work. Make sure you connect it properly, the TX into RX and the RX into the TX.
Note:
If the HC-05 Bluetooth Module asks for a password, It's '1234'.
  • Step 3:  Now Audrino Coding
/*
* created by Rui Santos, http://randomnerdtutorials.wordpress.com
* Control DC motor with Smartphone via bluetooth
* 2013
*/
int motorPin1 = 3; // pin 2 on L293D IC
int motorPin2 = 4; // pin 7 on L293D IC
int enablePin = 5; // pin 1 on L293D IC
int state;
int flag=0; //makes sure that the serial only prints once the state

void setup() {
// sets the pins as outputs:
pinMode(motorPin1, OUTPUT);
pinMode(motorPin2, OUTPUT);
pinMode(enablePin, OUTPUT);
// sets enablePin high so that motor can turn on:
digitalWrite(enablePin, HIGH);
// initialize serial communication at 9600 bits per second:
Serial.begin(9600);
}

void loop() {
//if some date is sent, reads it and saves in state
if(Serial.available() > 0){
state = Serial.read();
flag=0;
}
// if the state is '0' the DC motor will turn off
if (state == '0') {
digitalWrite(motorPin1, LOW); // set pin 2 on L293D low
digitalWrite(motorPin2, LOW); // set pin 7 on L293D low
if(flag == 0){
Serial.println("Motor: off");
flag=1;
}
}
// if the state is '1' the motor will turn right
else if (state == '1') {
digitalWrite(motorPin1, LOW); // set pin 2 on L293D low
digitalWrite(motorPin2, HIGH); // set pin 7 on L293D high
if(flag == 0){
Serial.println("Motor: right");
flag=1;
}
}
// if the state is '2' the motor will turn left
else if (state == '2') {
digitalWrite(motorPin1, HIGH); // set pin 2 on L293D high
digitalWrite(motorPin2, LOW); // set pin 7 on L293D low
if(flag == 0){
Serial.println("Motor: left");
flag=1;
}
}
}
For the android communication with our bluetooth module I’ve used the BlueTerm app, It’s completely free, so you just need to go to “Play store” and download it. Then you just need to connect your smarthphone with the bluetooth module. Remember to remove the TX and RX cables. (you can see in youtube video below how that’s done).
  • Step 4: Now Connect all Products
IMG_0232.JPG 
I've only set 3 commands to control the DC motor:

    ’0′ – Turns off the DC motor
    ’1′ – DC motor rotates to right
    ’2′ – DC motor rotates to left

Demo:
Read More

Improve Wordpress page load using 3 Best Free Services

Most of people make a website but not take care about their page load and lose their visitors time by time.
Everyone knows that the speed of the blog is taken into account when ranking pages in the SERPs.
In this post, I will be discussing 3 best free services that you can use easily to speed up your WordPress blog.

You must read : Blogger V/s Wordpress
  • Google Speed Service:
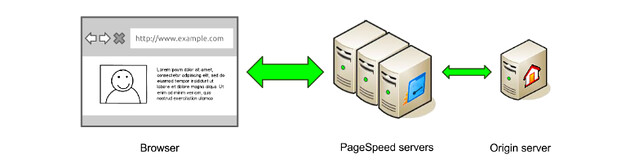
 It is the simplest to configure. All you have to do is add the domain in Google Page Speed Service and it provide you with a CNAME which you have to add in the DNS settings of your WWW subdomain.

free services
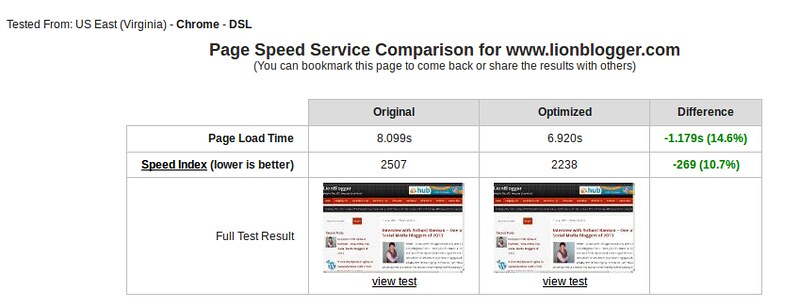
Detailed data about the bandwidth, requests, traffic is shown in the Console API itself.You can also check out the official guide on how to use the pagespeed service here.

free services
It is provided for free but Google has plans to make this a premium service. So, you can still use it as long as it’s free.
  • CloudFlare:
Cloudflare is one of the best CDN services that you can use for free. You can also create a premium account but for normal blogs the free account is enough. Apart from CDN services, it also provides Security and Analytics Details. Now, let’s take a look at all the features of Cloudflare.
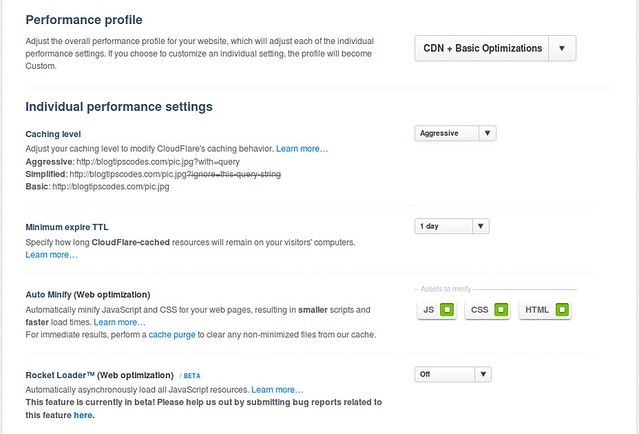
Cloudflare’s web content optimization is one of the best. It has loads of features like AutoMinify CSS and Javascript, Javascript Bundling, Asynchronous Loading, Local Storage Caching etc.
free services
AutoMinifying CSS and Javascript will compress your site’s Javascript and CSS files and results in faster loading. Javascript bundling makes sure multiple javascript requests are converted into a single request instead of multiple ones which results in faster page loading. Asynchronous loading enables your HTML part of the site to load fast without being delayed by slow loading widgets or scripts.
  • Incapsula
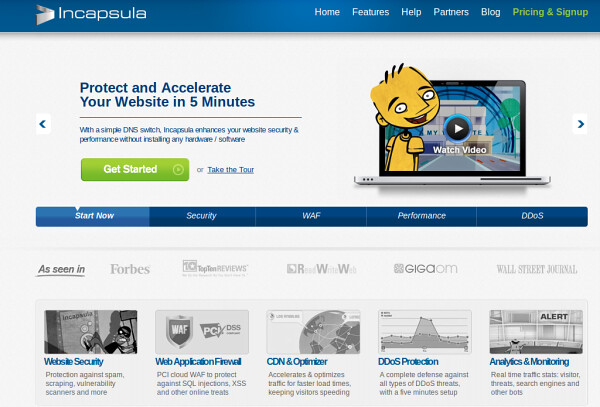
Like Cloudflare, Incapsula has identical features. It’s security features include protection against scraping, spam and preventing unauthorized access to both the backend and frontend of your site. It also has a premium plan which you can use if you’re looking to equip your site with more security.

free services
For a free plan, Incapsula offers more security than Cloudflare. It has a running Web Application Firewall which protects your site from SQL injections and other online threats. Another feature it has is DDoS protection which basically protects your site from Network and Application level threats.
It also consists of a CDN and an Optimizer which accelerates your site and makes loading atleast 40% faster. Like Cloudflare, it also has Analytics which monitors real time traffic and suspicious bots and sends you a detailed e-mail about the threats it has encountered.
Read More

Add Thumb Up and Down in Blogger

Thumbs up and Thumbs Down is a process to elaborate the visitors view on your post and it give an new look to your website.
Very interesting widget for your blogger which give you a professional look.
If your visitors feel good your article they will thumb up your post or if they do not get impressed , they simply thumb down.
You need to follow some step to add Thumbs Up and Thumbs Down Widget.
Step 1: First of all go to Blogger > Design > Edit HTML.
Step 2: Click the box "Expand Widget Templates" and Search
<data:post.body/>
Step 3: Paste the below code just after above code.
<b:if cond='data:blog.pageType == &quot;item&quot;'>
<div class='js-kit-rating' expr:path='data:post.url' expr:permalink='data:post.url' expr:title='data:post.title' view='score'> </div> </b:if>
Note:
If you paste the code before <data:post.body/> your thumb up and thumb down widget can be showed just after the post title if you paste the code just after <data:post.body/> The widget can be displayed at the last of the entire post only at post pages and not on homepage.
Step 4: Now search for <body>  Just above it paste the following code:
<script src="https://sites.google.com/site/funwithcomputer/linktohow/ratings.js"></script>
Step 5: Now save the template and view your blog.

You feel this post is helpful for you then give your precious time for comment and feel free to give suggestion if any.

Read More

How to make adsense ads responsive

Google is supporting the revolutionary responsive web-design technology it was important to allow compatible ads according website need. Till now it was very confusing to adopt the responsive ads due to no clear stand responsive AdSense code modification.

You must read : How to make Responsive web design.

On one hand Google was promoting responsive web design, on another hand there was no easy way to implement AdSense on such site without modifying the code. This is why they allowed to modify AdSense code in certain way (This is a really good news. Isn’t it?)

How to make adsense ads responsive,Google allows responsive AdSense officially,AdSense and Responsive Design Google AdSense,responsive ads,responsive google adsense

Now i'll tell you how can you do that
<script type="text/javascript">
google_ad_client = "ca-publisher-id",
if (window. innerWidth> = 800) {
google_ad_slot = " ad-unit-1 ";
google_ad_width = 728;
google_ad_height = 90;
} Else if (window.innerWidth <400) {
google_ad_slot = " ad-unit-2 ";
google_ad_width = 300;
google_ad_height = 250;
Else {}
google_ad_slot = " ad-unit-3 ";
google_ad_width = 468;
google_ad_height = 60;
}
</ script>
<script type = "text / javascript"
src = " http://pagead2.googlesyndication.com/pagead/show_ads.js ">
</ script>
Note:
  1. If you're using blogger then you need to parsing this code before implementing
  2. Above code is not work in Internet Explorer 8.
If you think this post is useful for you then give some time to comment and feel free for suggestion if any.
Read More