Read rows from database follow a specific row in mysql

Sometimes you need to show a specific row first then follow remaining rows in mysql database. For example, I want to show list of countries but a country name like Australia on top then other countries.
I am going to show you.

Suppose mysql table is "country" and query used to retrieve country information is :

 "SELECT * FROM country ORDER BY country_id ASC"

Output:

Read rows from database follow a specific row in mysql - 1


If you want to show Australia on top of the row. Use following script

SELECT *, IF(country_code = 'AU', 1, 0) AS uses_default
FROM country
ORDER BY uses_default DESC, country_id ASC


Read rows from database follow a specific row in mysql - 2

I am taking example of Australia, But you can put any country name on top. If you have any question, you can comment here. I will try to give you response as soon as possible.


Read More

How to use Ajax or Jquery to GET and Post Data - 2

In last post, I have explain a method to get or post data using ajax. Here i am going to explain a method to interact from server using Jquery.

Note: If you want to use jquery in your application, you must add a latest jquery library.

How to use Ajax or Jquery to GET and Post Data


Check carefully inside <head></head>. If a jquery library is already included then ignore to add this library.
Otherwise, add following code before </head>

<script src="http://ajax.googleapis.com/ajax/libs/jquery/1.10.2/jquery.min.js">
</script>

Next step:

You can use GET or POST to interact with server. See following example:

1. Add following code above </head> 
<script type="text/javascript" language="javascript">
  $(document).ready(function() {
       var mname = document.getElementById("myname").value;
      $("#driver").click(function(event){
          $.post(
             "result.php",
             { "name": mname },
             function(data) {
                $('#mydata').html(data);
                 document.getElementById("getname").value = data;
             }
          );
      });
   });
   </script>
2. Add following code anywhere inside body

<div id="stage"></div>
<input id="myname" name="myname" value="" /><br />
<input id="getname" name="getname" value = "" />
<input type="button" id="driver" value="Load Data" />

3. Create a page "result.php" on server (localhost or Online server). Put following code
<?php
      echo 'Welcome '.$_POST['name'];
?>

4. When you click "Load Data" button
You will get output on browser without page refresh.

Explanation:

Check below code:
var mname = document.getElementById("myname").value;
Here javascript variable  "mname" is string data from input field having id "myname".

 $("#driver").click(function(event)
   {
      // Your code
   }
);

When you click a html tag having id = "driver", Your code will work. You can also use other events in the place of click. For example, onclick, onkeyup, onchange etc.

$.post(
             "result.php",
             { "name": mname },
             function(data) {
                $('#mydata').html(data);
               document.getElementById("getname").value = data;
             }
          );

Here I am using post method to send data to server. You can use get method in place of post.

See parameters of post method. 

Parameter 1: URL of  the server, where you want to send the data. In this example, I am using "result.php"
Parameter 2: {"key1" : "value1", "key2": "value2"}. You will get $_POST['key1'] = value1 and $_POST['key2'] = value2 on result.php page. If you use get method, then you will get data like $_GET['key1'] and $_GET['key2'] on result.php
Parameter 3:
function(data) {
                $('#mydata').html(data);
             }
Its a callback function, You will get response from server. In this example, data is string echo value from result.php and storing into html tag having id "mydata" and id "getname".


Read More

How to use Ajax or Jquery to GET and Post Data

AJAX allows web pages to be updated asynchronously by exchanging small amounts of data with the server behind the scenes. This means that it is possible to update parts of a web page, without reloading the whole page.

How to use Ajax or Jquery to GET and Post Data

How does it work?

Ans:

There are two section Ajax coding:

Http Request:

To make browser compatibility, we write code for different browsers:

For IE6 and IE5:
Create an instance for ActiveXObject. Check below code
xmlhttp=new ActiveXObject("Microsoft.XMLHTTP");

For IE7+, Firefox, Chrome, Opera, Safari:
Create an instance for XMLHttpRequest. Check below code
xmlhttp=new XMLHttpRequest();

Next thing is to check your browser running this script:

If window.XMLHttpRequest is true. It means that your code is compatible with IE7+ or Firefox or Chrome, Opera or Safari.

If we combine above codes, You get a new on to send Http Request


if (window.XMLHttpRequest)
   {
        // code for IE7+, Firefox, Chrome, Opera, Safari
      xmlhttp=new XMLHttpRequest();
   }
else  {
             // code for IE6, IE5
           xmlhttp=new ActiveXObject("Microsoft.XMLHTTP");
 }


Http Response:

Check few terms before writing codes for http response
if xmlhttp.readyState = 4, It means your http request sent completed
if xmlhttp.status = 200, It means you  get http response successfully


Following is code for Http response:

xmlhttp.onreadystatechange=function()
 {
     if (xmlhttp.readyState==4 && xmlhttp.status==200)  
        {  
             document.getElementById("ID OF HTML TAG").innerHTML=xmlhttp.responseText;  
         }
 }

Now open http response under "getmydata" using method GET

xmlhttp.open("GET","URL WITH QUERYSTRINGS",true);xmlhttp.send();
Now i am combining above codes to make a complete code to use.


<script>
    function sendData(str)  
    {    
         if (str=="")      
            {            
               document.getElementById("getmydata").innerHTML="";        
               return;      
            }  
         if (window.XMLHttpRequest)      
           {            
                    // code for IE7+, Firefox, Chrome, Opera, Safari            
                xmlhttp=new XMLHttpRequest();  
   
            }  
        else      
           {
                    // code for IE6, IE5          
               xmlhttp=new ActiveXObject("Microsoft.XMLHTTP");        
             }
 
       xmlhttp.onreadystatechange=function()    
             {        
                 if (xmlhttp.readyState==4 && xmlhttp.status==200)              
                     {                    
                          document.getElementById("getmydata").innerHTML=xmlhttp.responseText;            
                     }      
               }
        xmlhttp.open("GET","test.php?p="+str,true);    
        xmlhttp.send();
   }
</script>

1. Put this javascript before </head>
2. Suppose i have a form with dropdown. See Below
<select name="mydate" onChange="sendData(this.value)">
   <option value="2001">2001</option>
   <option value="2002">2002</option>
   <option value="2003">2003</option>
</select>
If you see this dropdown form carefully, you can see that an even is running onchange. When you change dropdown selection. Selected value send to SendData function.

When you are using ajax coding, few browsers are not supporting that syntax. So, We should write browser compatible code.
In ajax operation, You send http request to server on events like onClick, onChange, onKeyup etc and get back a http response.


SendData function calling an ajax. Under SendData function, Your selected value transfer using str. Here str storing your selected value.

Suppose you have selected "2002" from dropdown form. Then SendData transfer value "2002" to str.

Using following syntax to transfer value to your server,

xmlhttp.open("GET","test.php?p=2002",true);

Next thing, Where do you want to show result from test.php?p=2002

Write a html tag with id to see your result on webpage.

For example:

I have created a tag, <div id="getmydata"></div>

Now your test.php page:

Create a page test.php.
Write following code and put following code
<?php
      echo $_GET['p'];
?>
You will see output of $_GET['p'] under div with id getmydata.

Note:
1. You can take any unique id, it's not necessary to write "getmydata" always.
2. You can use any html tag, depends on your requirement. It's not necessary to write div only.
3. Similarly you can replace test.php and its querystrings.

In next post, I will show you a different code for ajax.

Enjoy coding.
Read More

Delete article and category using REST Api in Shopware

Q. How to delete article and category in Shopware using REST Api?

You have already read my last posts of Shopware. If not, Please read last posts to start shopware from beginning..

Delete article and category using REST Api in Shopware


Shopware Section:

    1. Rest API in Shopware PHP
    2. Create REST Api for Shopware using php and curl
    3. Retrieve Articles and Category using REST Api in Shopware
    4. Post Article, Category and Image using REST Api in Shopware

Now Lets start.

Follow these steps:

1. Create a page "deletedata.php"
2. Put following code under this page
     <?php
                 include 'config.php';
               $client->delete('articles/' . ArticleId);   //Delete Article
               $client->delete('categories/' . CategoryId);   //Delete Article
     ?>
3. If you are confused about the code of config.php. Must read 1st post of shopware section

4. Run this page. If you have write all correct coding. You will get success to delete data.

That's it.
    
Read More

How to retrieve data from feed using php

If you want to get data from feed and show on your website. There are few steps to follow.

s2pfeedparser

Requirement:


  1. Localhost (Xampp/Wamp) or Online host
  2. Feed url something like http://feeds.feedburner.com/ours2ptech . It may be different
  3. Basic knowledge php
  4. Some time (30 Mins)


  • If you have fulfill all requirement. Then lets try to make a feed parser. I am taking example of retrieving BBC news from feed.
  • If you are running localhost. Then start xampp or wamp.
  • I have a BBC new feed like http://feeds.bbci.co.uk/news/rss.xml. When you open this link. You will not see its data in xml format. You can see it by view source.
  • Click Ctrl+u on keyboard. You can see its xml.
  • Now you are ready to start. Follow these steps


  1. Create a folder in htdocs. You can give any name. For example s2pfeed.
  2. Create a page index.php . I write php codes in this page.
  3. We are retrieving data from other websites or feeds. So i am using curl. This is the best way to carry data from other websites. We can use php inbuilt class SimpleXmlElement to extract xml data.
  4. Flow chart: FeedUrl ----- Curl data ---- Data array

try{
$ch = curl_init("http://feeds.bbci.co.uk/news/rss.xml");
curl_setopt($ch, CURLOPT_RETURNTRANSFER, true);
curl_setopt($ch, CURLOPT_HEADER, 0);
$data = curl_exec($ch);
curl_close($ch);
$doc = new SimpleXmlElement($data, LIBXML_NOCDATA);
}
catch(Exception $e)
{
  echo 'Invalid Feed';
  //exit;
}
Before move to next step. Check carefully source code of feedurl. You will see something like following
<?xml version="1.0" encoding="UTF-8"?>
<?xml-stylesheet title="XSL_formatting" type="text/xsl" href="/shared/bsp/xsl/rss/nolsol.xsl"?>
<rss xmlns:media="http://search.yahoo.com/mrss/" xmlns:atom="http://www.w3.org/2005/Atom" version="2.0">
<channel>
<title>BBC News - Home</title>
<link>http://www.bbc.co.uk/news/#sa-ns_mchannel=rss&amp;ns_source=PublicRSS20-sa</link>
<description>The latest stories from the Home section of the BBC News web site.</description>
<language>en-gb</language>
<lastBuildDate>Wed, 19 Feb 2014 20:57:35 GMT</lastBuildDate>
<copyright>Copyright: (C) British Broadcasting Corporation, see http://news.bbc.co.uk/2/hi/help/rss/4498287.stm for terms and conditions of reuse.</copyright>
<image>
<url>http://news.bbcimg.co.uk/nol/shared/img/bbc_news_120x60.gif</url>
<title>BBC News - Home</title>
<link>http://www.bbc.co.uk/news/#sa-ns_mchannel=rss&amp;ns_source=PublicRSS20-sa</link>
<width>120</width>
<height>60</height>
</image>
<ttl>15</ttl>
<atom:link href="http://feeds.bbci.co.uk/news/rss.xml" rel="self" type="application/rss+xml"/>
<item>
<title>Blair 'advised Brooks before arrest'</title>
<description>Former Prime Minister Tony Blair gave advice to News International boss Rebekah Brooks on handling the developing phone-hacking scandal days before her arrest, a court hears.</description>
<link>http://www.bbc.co.uk/news/uk-26259956#sa-ns_mchannel=rss&amp;ns_source=PublicRSS20-sa</link>
<guid isPermaLink="false">http://www.bbc.co.uk/news/uk-26259956</guid>
<pubDate>Wed, 19 Feb 2014 16:24:51 GMT</pubDate>
<media:thumbnail width="66" height="49" url="http://news.bbcimg.co.uk/media/images/73083000/jpg/_73083312_021157970-1.jpg"/>
<media:thumbnail width="144" height="81" url="http://news.bbcimg.co.uk/media/images/73086000/jpg/_73086069_021157970-1.jpg"/>
</item>
<item><title>Ukraine president sacks army chief</title>
<description>Ukrainian President Viktor Yanukovych sacks the head of the armed forces, amid protests that have turned Kiev into a battle zone.</description>
<link>http://www.bbc.co.uk/news/world-europe-26265808#sa-ns_mchannel=rss&amp;ns_source=PublicRSS20-sa</link>
<guid isPermaLink="false">http://www.bbc.co.uk/news/world-europe-26265808</guid>
<pubDate>Wed, 19 Feb 2014 20:09:37 GMT</pubDate>
<media:thumbnail width="66" height="49" url="http://news.bbcimg.co.uk/media/images/73097000/jpg/_73097274_73097252.jpg"/> 
<media:thumbnail width="144" height="81" url="http://news.bbcimg.co.uk/media/images/73097000/jpg/_73097275_73097252.jpg"/>
</item>
.
.
.
<item> ... </item>
 This is making chain like
xml
   channel
       title
       link
       description
       ...
       item
          title
          description
          link
          guid --- isPermaLink
          pubDate
          media --- thumbnail
  Item node represents individual post on feed.  Now come back to php coding.  Check above mentioned curl script.
$doc = new SimpleXmlElement($data, LIBXML_NOCDATA);  
Here $doc is an instance carrying all data of xml.

If you want to get data of channel such as title, link, description and etc.

Use following code.
$title = $doc->channel->title;
$link = $doc->channel->link;
$description = $doc->channel->description;

If you want to retrieve single recent item (post) data

Use following code
$title = $doc->channel->item[0]->title;
$description = $doc->channel->item[0]->description;
$link = $doc->channel->item[0]->link;

You can retrieve all data.

But if you want to retrieve multiple recent post data

Use following code
$cnt = count($doc->channel->item); // this variable contains total number of posts showing in this feed
for($i=0; $i<$cnt; $i++)
    {
 $url  = $doc->channel->item[$i]->link;
 $title  = $doc->channel->item[$i]->title;
 $desc = $doc->channel->item[$i]->description;
 $pubDate = $doc->channel->item[$i]->pubDate;
     }
But you cannot retrieve node like
<media:thumbnail width="66" height="49" url="http://news.bbcimg.co.uk/media/images/73083000/jpg/_73083312_021157970-1.jpg"/>

What can we do? Very simple. Do some tricks.

In this node, you have two things namespace (media) seperated by colon (:) and some attributes.

To retrieve data from namespaces media, Check the second line of feed source code.
<rss xmlns:media="http://search.yahoo.com/mrss/" xmlns:atom="http://www.w3.org/2005/Atom" version="2.0">
Get url from media and url is http://search.yahoo.com/mrss/ .

Now your php code:

$media = $doc->channel->item[$i]->children('http://search.yahoo.com/mrss/')->thumbnail;
Is it return any value. Answer is no. Actually values are here in form of attributes.
So,
$thumb = $media->attributes();$thumburl = $thumb['url'];$thumbwidth = $thumb['width'];
Here in this feed there are multiple media. So you can use following code to retrieve media data
$thumbcount = count($media);
for($j=0;$j<=$thumbcount;$i++)
{
    $thumb = $media[$j]->attributes();
    $thumburl = $thumb['url'];
    $thumbwidth = $thumb['width'];
}
That's it.
Check complete code here:
<?php
try{
$ch = curl_init("http://feeds.bbci.co.uk/news/rss.xml");
curl_setopt($ch, CURLOPT_RETURNTRANSFER, true);
curl_setopt($ch, CURLOPT_HEADER, 0);
$data = curl_exec($ch);
curl_close($ch);
$doc = new SimpleXmlElement($data, LIBXML_NOCDATA);
}
catch(Exception $e)
{
  echo 'Invalid Feed';
  //exit;
}
$cnt = count($doc->channel->item); // this variable contains total number of posts showing in this feed
for($i=0; $i<$cnt; $i++)
    {
 $url  = $doc->channel->item[$i]->link;
 $title  = $doc->channel->item[$i]->title;
 $desc = $doc->channel->item[$i]->description;
 $pubDate = $doc->channel->item[$i]->pubDate;
                  $media = $doc->channel->item[$i]->children('http://search.yahoo.com/mrss/')->thumbnail;

$thumbcount = count($media);
for($j=0;$j<=$thumbcount;$i++)
{
    $thumb = $media[$j]->attributes();
    $thumburl = $thumb['url'];
    $thumbwidth = $thumb['width'];
}

     }
    }

?>
I think, this is a complete feed parser for you.
If you have any query. Please comment. I will try to give response as soon as possible.
Read More

Post Category using REST Api in Shopware

You have already read my last posts of Shopware Section. If not, Please read following posts first.

    1. Rest API in Shopware PHP
    2. Create REST Api for Shopware using php and curl
    3. Retrieve Articles and Category using REST Api in Shopware
    4. Post Article, Category and Image using REST Api in Shopware

Post Category using REST Api in Shopware

Post Category:


Follow these steps:

1. Create a page "postcategory.php" and put following code.

<?php
include 'config.php';     // Know more about config.php in last post. Must Read 
$s2parray = Array        (
                "id" => "A NEW CATEGORY ID",
                        "parent" => "PARENT ID",
                        "name" => "NAME",
"path" => "PATH",
"position" => "POSITION",
"metakeywords" => "META KEYWORDS",
"metadescription" =>"META DESCRIPTION",
"cmsheadline" => "CMS HEADLINE",
"cmstext" => "CMS TEXT",
"template" => "TEMPLATE",
"active" => TRUE OR FALSE,
"blog" => "BLOG",
"showfiltergroups" => "SHOW FILTER GROUPS",
"external" => "EXTERNAL",
"hidefilter" => "HIDE FILTER"
        );
$client->post('categories', $s2parray);
?>
2. Run this code.

Note: 

1. Please replace values of those fields, you don't want, to NULL.
2. You can remove "id". If you want to generate category automatically.
3. Don't remove parent. It is a required field. If you remove this field. You will get following error message:

                                             parent id is missing

Warning:

Don't delete a default row from category table. It has category id = 3 and parent id = 1
If you delete it. You will get above error message.


Read More

Post Article, Category and Image using REST Api in Shopware

In last post, I show you how to retrieve atricles and categories using REST Api. This time i am here with next step.

I will show you that how can you post data using REST Api.

Post article, category and image using REST Api in shopware
For Article:

Follow these steps:

1. Create a page "postarticle.php" and put following code.

<?php
include 'config.php';     // Know more about config.php in last post. Must Read 
            //create an array $s2parray here
$client->post('articles', $s2parray);
?>
2. Run this code.

Some questions created at this point:

1. What is "$s2parray"?

Ans.  Actually $s2parray is an array carrying all information to post into database.Such as article's name, title, description, category, ordernumber, price etc.

2. What would be the structure of this array?

Check following example:


$s2parray = array(
    'name' => "NAME",
'description' => "DESCRIPTION",
'descriptionLong' => "DESCRIPTION LONG",
    'active' => "TRUE",
    'tax' => "TAX",
    'supplier' => "SUPPLIER NAME",
    'categories' => array(
        array('id' => "CATEGORY ID"),
     
    ),
    'mainDetail' => array(
        'number' => "YOUR ORDER NUMBER",
        'prices' => array(
            array(
                'customerGroupKey' => 'EK',
                'price' => "PRICE",
            ),
        )
    ),
);

 3. Is this fix stucture for array to post article?

Ans: No, You can extend this according to your requirement.

4. How can i extend this array?

Ans: You can do some trick to make a full array.First post an test article using above array structure.
After that you retrieve this article by article id. You will get a JSON output like below:


{"data":
{
"id":307,
"mainDetailId":862,
"supplierId":24,
"taxId":1,
"priceGroupId":null,
"filterGroupId":null,
"configuratorSetId":null,
"name":"Zaunfeldpfosten Classic 42 x 1100x 1030 mm",
"description":"Zaunfeldpfosten Classic 42 x 1100x 1030 mm",
"descriptionLong":"","added":"2014-01-16T00:00:00+0100",
"active":true,
"pseudoSales":0,
"highlight":false,
"keywords":"1",
"changed":"2014-01-16T17:20:23+0100",
"priceGroupActive":false,
"lastStock":false,
"crossBundleLook":0,
"notification":false,
"template":"","mode":0,
"availableFrom":null,
"availableTo":null,
"configuratorSet":null,
"mainDetail":
{
"id":862,
"articleId":307,
"unitId":null,
"number":"BZSEZ71X1I",
"supplierNumber":null,
"kind":1,
"additionalText":null,
"active":0,
"inStock":null,
"stockMin":null,
"weight":null,
"width":null,
"len":null,
"height":null,
"ean":null,
"position":0,
"minPurchase":null,
"purchaseSteps":null,
"maxPurchase":null,
"purchaseUnit":null,
"referenceUnit":null,
"packUnit":null,
"shippingFree":false,
"releaseDate":null,
"shippingTime":null,
"prices":[
{
"id":1058,
"articleId":307,
"articleDetailsId":862,
"customerGroupKey":"EK",
"from":1,
"to":"beliebig",
"price":58.739495798319,
"pseudoPrice":0,
"basePrice":0,
"percent":0
}
],
"attribute":
{
"id":896,
"articleId":307,
"articleDetailId":862,
"attr1":null,
"attr2":null,
"attr3":null,
"attr4":null,
"attr5":null,
"attr6":null,
"attr7":null,
"attr8":null,
"attr9":null,
"attr10":null,
"attr11":null,
"attr12":null,
"attr13":null,
"attr14":null,
"attr15":null,
"attr16":null,
"attr17":null,
"attr18":null,
"attr19":null,
"attr20":null
}
},
"tax":
{
"id":1,
"tax":"19.00",
"name":"19%"
},
"categories":
{
"1":
{
"id":1,
"name":"Root"
}
},
"links":[],
"images":[],
"downloads":[],
"related":[],
"propertyValues":[],
"similar":[],
"customerGroups":[],
"supplier":
{
"id":24,
"name":"GAH Alberts",
"image":"",
"link":"",
"description":null
},
"details":[],
"propertyGroup":null
},
"success":true
}

What are you thinking? Your JSON output is not like this. Please copy your JSON data and paste into any editor like Notepad++ or Dreamweaver. Select language as Javascript.
Now rearrange manually.
Wow, you get a similar JSON.
Next work to convert this into your appropriate array. OK, I am helping you little bit. I am replacing some codes from this json and output is below.


$s2parray = array(


"mainDetailId":862,
"name":"Zaunfeldpfosten Classic 42 x 1100x 1030 mm",
"description":"Zaunfeldpfosten Classic 42 x 1100x 1030 mm",
"descriptionLong":"",
"active":true,
"pseudoSales":0,
"highlight":false,
"keywords":"1",

"priceGroupActive":false,
"lastStock":false,
"crossBundleLook":0,
"notification":false,
"template":"","mode":0,
"availableFrom":null,
"availableTo":null,
"configuratorSet":null,
"mainDetail":
{

"unitId":null,
"number":"BZSEZ71X1I",
"supplierNumber":null,
"kind":1,
"additionalText":null,
"active":0,
"inStock":null,
"stockMin":null,
"weight":null,
"width":null,
"len":null,
"height":null,
"ean":null,
"position":0,
"minPurchase":null,
"purchaseSteps":null,
"maxPurchase":null,
"purchaseUnit":null,
"referenceUnit":null,
"packUnit":null,
"shippingFree":false,
"releaseDate":null,
"shippingTime":null,
"prices":[
{

"customerGroupKey":"EK",
"from":1,
"to":"beliebig",
"price":58.739495798319,
"pseudoPrice":0,
"basePrice":0,
"percent":0
}
],
"attribute":
{

"attr1":null,
"attr2":null,
"attr3":null,
"attr4":null,
"attr5":null,
"attr6":null,
"attr7":null,
"attr8":null,
"attr9":null,
"attr10":null,
"attr11":null,
"attr12":null,
"attr13":null,
"attr14":null,
"attr15":null,
"attr16":null,
"attr17":null,
"attr18":null,
"attr19":null,
"attr20":null
}
},
"tax":
{

"tax":"19.00",
"name":"19%"
},
"categories":
{
"1":
{
"id":1,
"name":"Root"
}
},
"links":[],
"images":[],
"downloads":[],
"related":[],
"propertyValues":[],
"similar":[],
"customerGroups":[],
"supplier":
{

"name":"GAH Alberts",
"image":"",
"link":"",
"description":null
},
"details":[],
"propertyGroup":null
);


I did my work now your turn. Replace all colon (:) with => . I have removed all id attributes except unitid and category id.

Now this is your complete code to post article. If you face any problem. Don't hesitate to comment.


Read More

Retrieve Articles and Category using REST Api in Shopware

If you have api key and already create rest api. Then follow these steps to retrieve data using rest api.

Get articles and category using REST Api

  • Create a page getdata.php
  • put following code and run this code.
For Article:

If you want to search an article by Article Id:
<?php
include 'config.php';
$client->get('articles/ARTICLE_ID');  //Replace ARTICLE_ID with an article id for search
?>
If you want to search an article by Order Number:

<?php
include 'config.php';
$client->get('articles/ORDER_NUMBER?useNumberAsId=1');  //Replace ORDER_NUMBER with an article order number for search
?>
If you want to search all articles:

<?php
include 'config.php';
$client->get('articles'); 
?>
For Category:

If you want to search a category by category id:
<?php
include 'config.php';
$client->get('categories/CATEGORY_ID');  //Replace CATEGORY_ID with an article id for search
?>

If you want to search all categories:

<?php
include 'config.php';
$client->get('categories'); 
?>

  •  Thats it. Run this script and you will get your result.
Next Post: Update Data using REST Api in Shopware
Read More

Create REST Api for Shopware using php and curl

2 Comments
If you have already API key. Then read this post, otherwise read "http://s2ptech.blogspot.in/2014/02/rest-api-in-shopware-php.htm"  post to generate an api key.

Create REST API For Shopware


Follow these steps to create REST Api for shopware:
  • Create a page ApiClient.php
  • Paste following code and save.
<?php
class ApiClient {
    const METHODE_GET    = 'GET';
    const METHODE_PUT    = 'PUT';
    const METHODE_POST   = 'POST';
    const METHODE_DELETE = 'DELETE';
    protected $validMethods = array(
        self::METHODE_GET,
        self::METHODE_PUT,
        self::METHODE_POST,
        self::METHODE_DELETE
    );
    protected $apiUrl;
    protected $cURL;
    public $msg;
    public $ack = 1;

    public function __construct($apiUrl, $username, $apiKey) {
        $this->apiUrl = rtrim($apiUrl, '/') . '/';
         //Initializes the cURL instance
        $this->cURL = curl_init();
        curl_setopt($this->cURL, CURLOPT_RETURNTRANSFER, true);
        curl_setopt($this->cURL, CURLOPT_FOLLOWLOCATION, false);
        curl_setopt($this->cURL, CURLOPT_HTTPAUTH, CURLAUTH_DIGEST);
        curl_setopt($this->cURL, CURLOPT_USERPWD, $username . ':' . $apiKey);
        curl_setopt($this->cURL, CURLOPT_HTTPHEADER, array(
            'Content-Type: application/json; charset=utf-8',
        ));
    }

    public function call($url, $method = self::METHODE_GET, $data = array(), $params = array()) {
        if (!in_array($method, $this->validMethods)) {
            throw new Exception('Invalid HTTP-Methode: ' . $method);
        }
        $queryString = '';
        if (!empty($params)) {
            $queryString = http_build_query($params);
        }
        $url = rtrim($url, '?') . '?';
        $url = $this->apiUrl . $url . $queryString;
        $dataString = json_encode($data);
        //set_time_limit(30);             
        curl_setopt($this->cURL, CURLOPT_URL, $url);
        curl_setopt($this->cURL, CURLOPT_CUSTOMREQUEST, $method);
        curl_setopt($this->cURL, CURLOPT_POSTFIELDS, $dataString);
        $result   = curl_exec($this->cURL);
        $httpCode = curl_getinfo($this->cURL, CURLINFO_HTTP_CODE);

        return $this->prepareResponse($result, $httpCode);
    }

    public function get($url, $params = array()) {
        return $this->call($url, self::METHODE_GET, array(), $params);
    }

    public function post($url, $data = array(), $params = array()) {
        return $this->call($url, self::METHODE_POST, $data, $params);
    }

    public function put($url, $data = array(), $params = array()) {

            return $this->call($url, self::METHODE_PUT, $data, $params);
    }

    public function delete($url, $params = array()) {
        return $this->call($url, self::METHODE_DELETE, array(), $params);
    }
   
    public function setAck($x)
    {
        $this->ack = $x;
    }

    protected function prepareResponse($result, $httpCode) {


        if (null === $decodedResult = json_decode($result, true)) {
            echo "<h2>HTTP: $httpCode</h2>";
            $jsonErrors = array(
                JSON_ERROR_NONE => 'Es ist kein Fehler aufgetreten',
                JSON_ERROR_DEPTH => 'Die maximale Stacktiefe wurde erreicht',
                JSON_ERROR_CTRL_CHAR => 'Steuerzeichenfehler, möglicherweise fehlerhaft kodiert',
                JSON_ERROR_SYNTAX => 'Syntaxfehler',
            );
            echo "<h2>Could not decode json</h2>";
            echo "json_last_error: " . $jsonErrors[json_last_error()];
            echo "<br>Raw:<br>";
            print_r($result);
           
            error_log($jsonErrors[json_last_error()]);
           
            return;
        }
        if (!isset($decodedResult['success'])) {
            echo "<h2>HTTP: $httpCode</h2>";
            echo "Invalid Response";
            return;
        }
        if (!$decodedResult['success']) {
            if($this->ack == 1)
            {
                echo "<h2>HTTP: $httpCode</h2>";
            echo "<h2>No Success</h2>";
            echo "<p>" . $decodedResult['message'] . "</p>";
           
            error_log($decodedResult['message']);
           
            }
            return;
        }
        echo "<h2>HTTP: $httpCode</h2>";
       echo "<h2>Success</h2>";
        if (isset($decodedResult['data'])) {
            echo "<pre>" . print_r($decodedResult['data'], true) . "</pre>";
        }
       
        $this->msg = $decodedResult;
       return $decodedResult;
    }
}
?>
  • Create another page config.php and paste following code.
<?php
include "ApiClient.php";
$client = new ApiClient(
    //URL des Shopware Rest Servers
    'YOUR SHOPWARE SITE URL/api',
    //Benutzername
    'USERNAME',
    //API-Key des Benutzers
    'API KEY'
);

?>
 That's it. You have created REST Api successfully.
Now you are ready to do some action.

My next Post: Retrieve Data using Api
Read More

Rest API in Shopware PHP

There are few contents on web to use REST Api in Shopware. So, most of the users are unable to find their solutions.That's why, I am here to write some stuffs for you.

                         
Rest Api in shopware php


List of Contents:
  1. Generate Api Key.
  2. Create REST Api using php
  3. Retrieve Data using Api
  4. Post Data using Api
  5. Update Data using Api
  6. Delete Data using Api
Generate Api Key for REST Api in Shopware:
Follow these steps:
  • Login to Shopware Backend


  • When you logged in successfully. Go inside Configuration ----  User administration. See fig (below)
 Shopware user admin
  • Click Edit User:
Shopware Edit User

  •  Check Enabled checkbox under API access. An API key generated automatically. Please copy User name and API key for future use. Click Save button to enable api service.
Shopware Create API


Read More

How to Customise Image and Title in AddThis Sharing Button

If you want to share your site information on many social networking site you use one of the best social networking sharing facilities provided by AddThis.com and its working nice .It retrieves default  image, title and description from your site to share on different social site but if you want to change image, title and description to share on social site.
Then follows these following steps :

  • First of all add meta tag before <title> tag
<meta property="og:title" content="WRITE YOUR TITLE" />
<meta property="og:description" content="WRITE YOUR DESCRIPTION" />
<meta property="og:image" content="ADD YOUR IMAGE LINK" />
  • Then add below code where you want to show AddThis button
<div class="addthis_toolbox addthis_default_style" addthis:url="WRITE YOUR POST URL"
    addthis:title="WRITE YOUR TITLE"
    addthis:description="WRITE YOUR DESCRIPTION">
<a class="addthis_button_facebook_like" fb:like:layout="button_count"></a>
<a class="addthis_button_tweet"></a>
<a class="addthis_button_pinterest_pinit" pi:pinit:media="ADD YOUR IMAGE LINK" pi:pinit:layout="horizontal"></a>
<a class="addthis_button_google_plusone" g:plusone:size="medium"></a>
<a class="addthis_counter addthis_pill_style"></a>
</div>
<script type="text/javascript">var addthis_config = {"data_track_addressbar":true};</script>
<script type="text/javascript" src="//s7.addthis.com/js/300/addthis_widget.js#pubid=ra-4f6557883501563d"></script>
<!-- AddThis Button END -->
        </div>
Read More

How to Control Arduino Robot using Android

I would like to explore the connection between Arduino and Android.
The goal here is to drive a small Arduino bot of the simplest kind with an Android app, through Bluetooth connection. The robot itself will have nothing extraordinary and is inspired by the many tutorials out there on the Interwebs.
But I have not found tutorials on how to create an Android remote control - so here it is simple steps to do its.
Step 1: All Materials


  • Arduino UNO or equivalent
  • Arduino-compatible 1A Motor Shield
  • 2x GM9 geared motors
  • 2x GMPV wheels
  • (optional) 2x mounting brackets
  • 1 ball caster
  • a 6 AA battery holder with 2.1mm jack
  • Bluetooth module (5€) such as this one on Ebay
  • 2mm MDF plate
  • some wires
  • some screws and nuts
  • a breadboard if you don't want to solder
  • 6 Alkaline AA batteries or 6 NiMh rechargeable batteries (they provide 7.5V instead of 9V, but this is still sufficient for the GM9 motors)
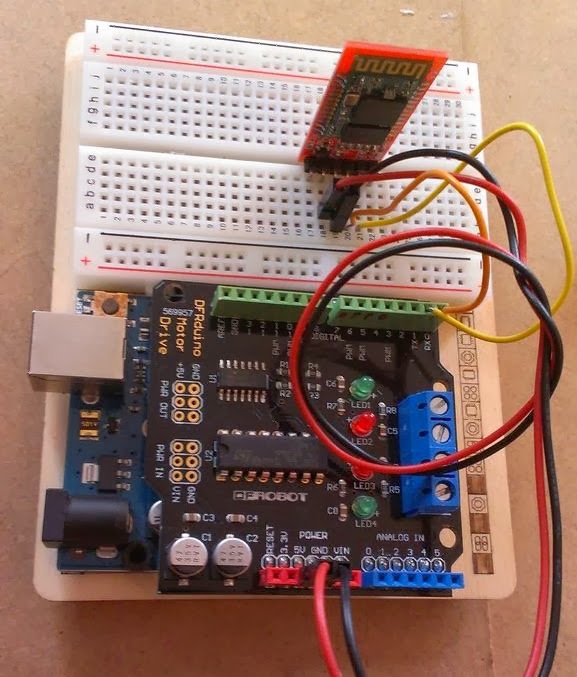
Step 2: Mounting  all electronics parts 


  • Mount the shield onto the UNO board. I assume your shield comes with soldered header. If not, you can find a nice picture on how to do it on this other instructable.
  • Mount the Bluetooth tranceiver on a breadboard.
  • Connect with wires the +5V and Ground from the Arduino board (actually, from the shield) to the +5V and Ground pins of the BT module
  • Connect with wires the Tx and Rx pins of the Arduino (ie, pins 0 and 1) to the Tx and Rx of the Bluetooth module.
Warning :
  • Some Bluetooth tutorials mention that you cross the connection (ie Tx to Rx and Rx to Tx). The way my module works, it needs to be parallel, ie Tx to Tx and Rx to Rx. You can try one way, and swap the connections if it doesn't work.
  • Remember to unplug the BT module while loading the script on the Arduino. The Tx and Rx plug are actually the same as the Serial port used to communicate with your computer through USB, and the BT module will mess up the communication.
Step 3: Prepare the motors

Solder wires on each motor electrodes. If one motor turns much slower than the other, it is likely due to poor soldering .
Step 4: Finish the assembly

  • Cut a piece of MDF - approximately 20x20cm
  • Mount the Arduino + shield on it as well as the battery pack on the MDF, as well as the ball caster on the back side. You can screw them or use double-sided tape
  • Mount the motors on each side of the MDF. Here again you can use tape or screws, but I chose to screw them for better stability
  • Connect the motors wires to the motor shield
  • That's it ! As you can see, it's a really simple robot layout.
Step 5 : Its Software time
  •  An Android app gives user the ability to connect to and disconnect from the bluetooth module. When connected, a serial link will exist between the smartphone and the Arduino robot
  • The user can then use arrows to drive the robot and a "stop" button to, well, stop it. Every time the user presses a button, the app sends a character (eg "f" for forward, "s" for stop and so on)
  • The Arduino board listens to the Serial port. When a character is received, it drives the motors accordingly.
Step 6: The Arduino sketch
Upload the attached code to the Arduino Uno. Remember, to unplug the bluetooth module while doing so.
Download the source code of arduino_for_android_remote
As you can see 5 intructions are defined : move forward, backwards, left, right, and stop. All motions are executed at full speed (the GM9 motors are geared, and thus not turning very fast) but you could change the speed value if you want. 
 Step 7: The Android App
 For Next Step you need to read next Post :
Control Your Robot Using Android Apps
Read More