How To Make USB storage devices totally useless without your permission.


To block all the storage device in your Windows, run registry editor by typing regedit in RUN command.
In the registry editor, at left side navigation pane, navigate to following location:
HKEY_LOCAL_MACHINE > SYSTEM > CurrentControlSet > Services > USBSTOR
Now at the right side double click on START.


To block USB storage Medias, change the value data to 4.


If you want to unblock USB storage Medias just navigate to the same location and change th value data to 3.

Read More

How to uninstall one of the two Windows XP in a single PC


HOW TO UNINSTALL ONE OF THE TWO WINDOWS XP SP2 SYSTEMS


  • Right click on my computer icon
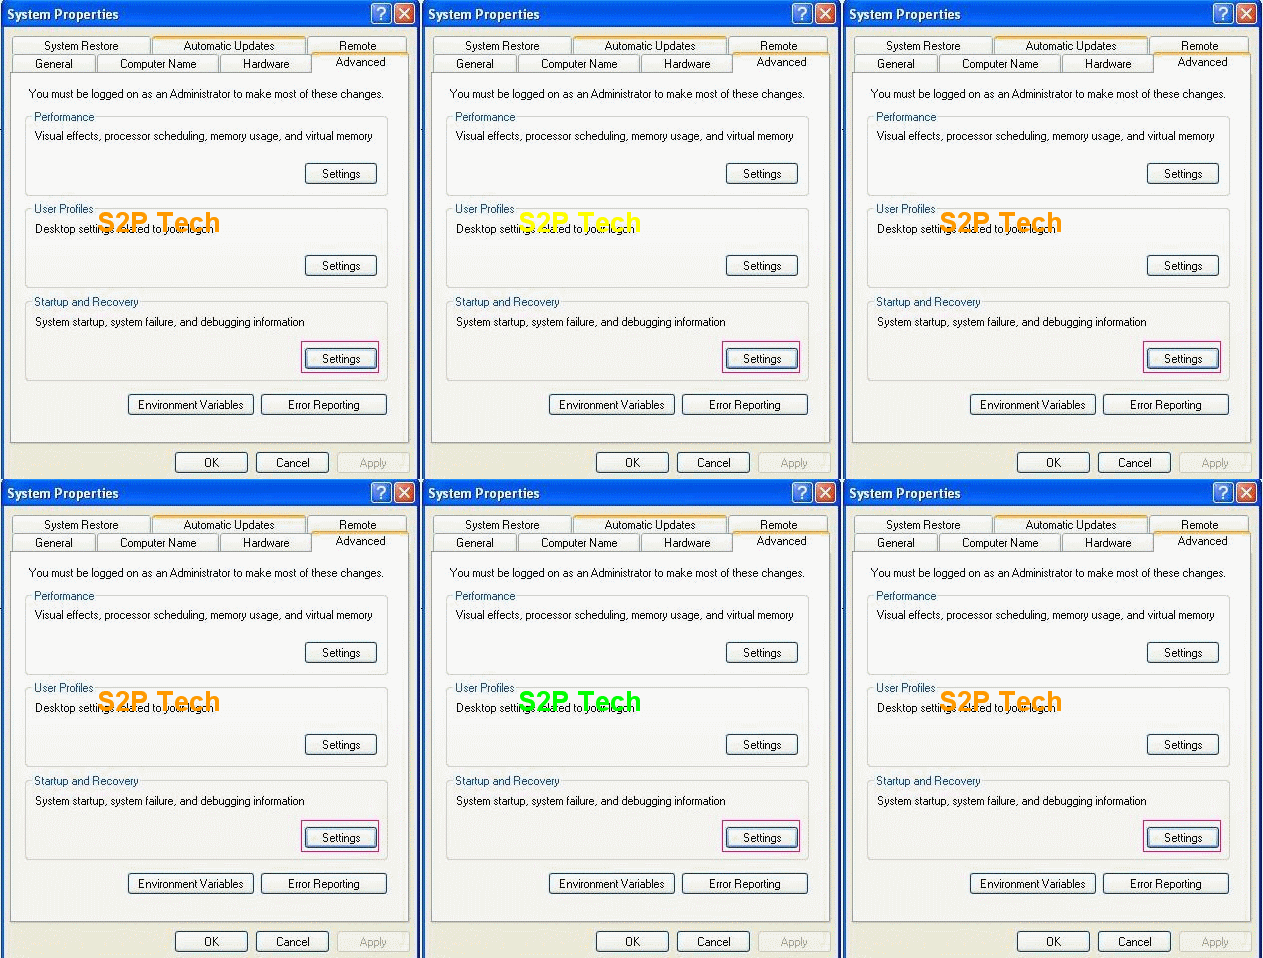
  • Click on properties on advanced tab
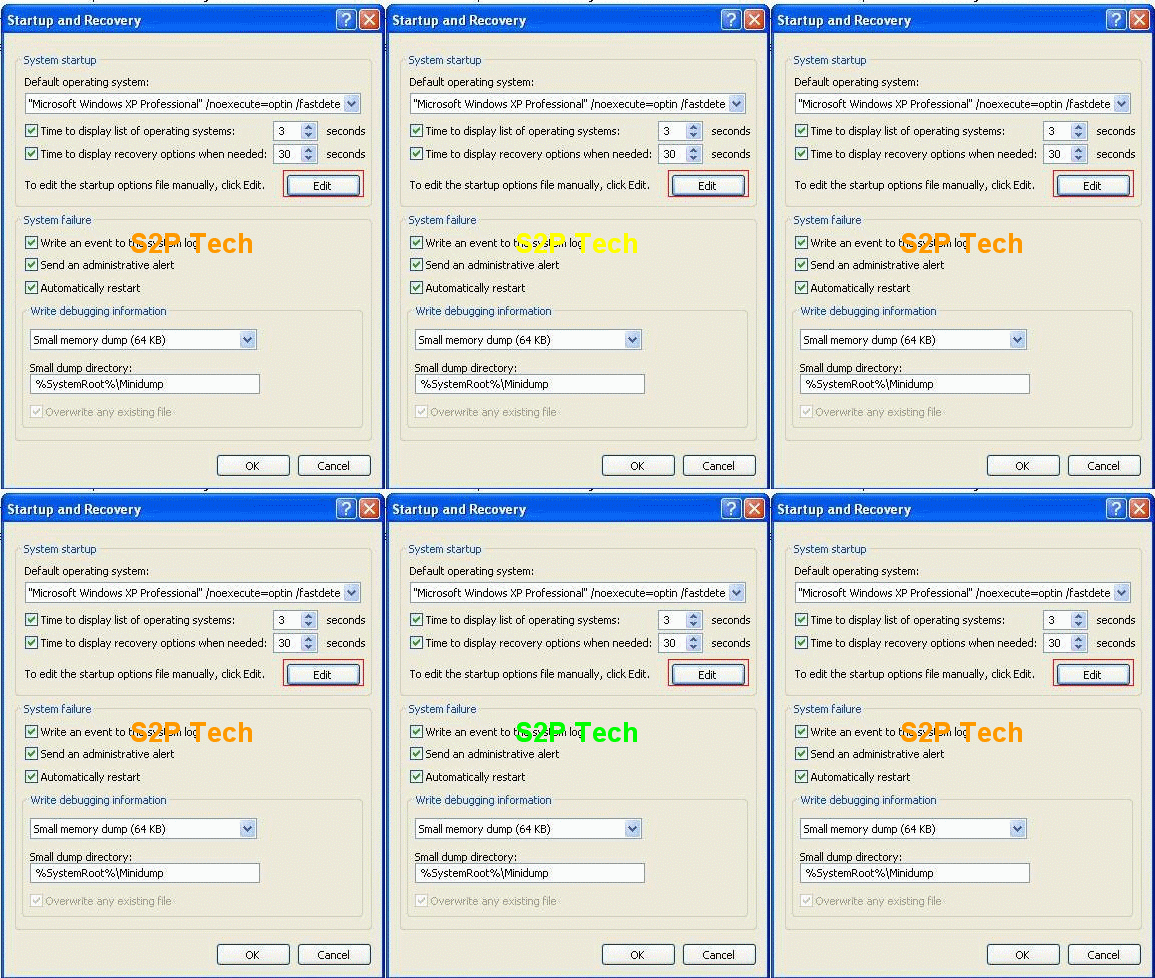
  • Select settings on startup and recovery


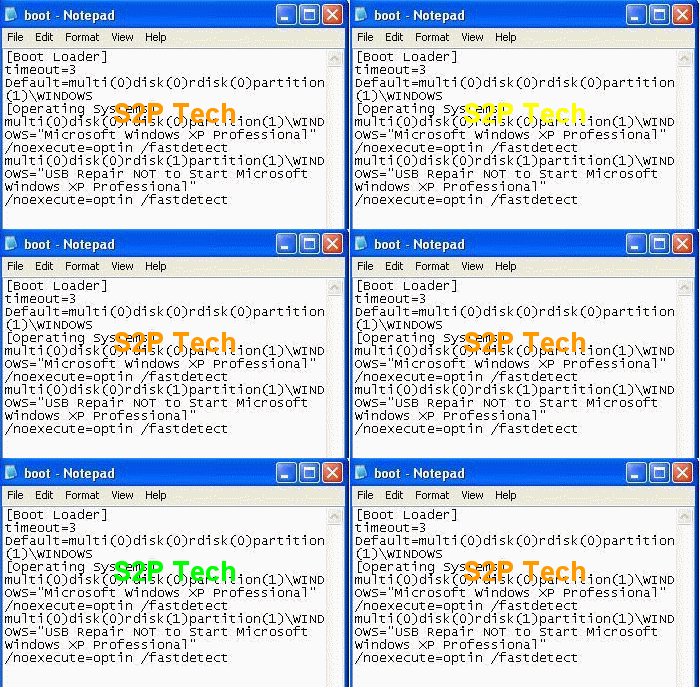
  • Click on edit startup file manually


  • Delete the entry of the os installation you want to uninstall


  • Then delete the windows files manually in the drive.


Or

Step 1

Login in that windows, which u want keep going .

Step 2

Type "msconfig" in start - >search programs then press enter .


Step 3

Then a window will appear select tab in that window.


Step 4

you will see both of your windows .If you see your favorite windows as a current OS then do noting .
if you don't find same then set your favorite windows as default .

Step 5

Now delete other windows (which you want to remove ) entry . Then close that window..

Read More

Laptop Overheating Problem [Solved]


I was facing overheat problem on my sony lappy E series....so opened the base my self and cleaned the air vents from inside with clean piece of cloth and blower...now it is fine....air vents get clogged over time.

If u want to do it here are the steps(yours is also E series so i guess steps should be same)::

  • Remove bettery
  • Remove RAM cover which is at the center(NO NEED TO REMOVE RAM just the cover)
  • Remove hard drive cover which is at the right side bottom.
  • Now remove hard drive(this part is tricky,dont pull hard drive out as it is since it is connected to motherboard by data and power ports, so first slide the drive to the side where there is some free space ,this will disconnect it from motherboard and then pull it out )
  • Now remove all the screws visible to you at bottom
  • Now remove the base from the side where battery was connected,it should come out easily.
  • Clean lappy and then connect everything back...


It is really easy to open and clean but if you are not sure that you can do it yourself then take it to service center.....get it cleaned because overheating is the biggest problem in lappy and can kill you motherboard or other parts...

Dont under estimate the laptop vent.. it can easy get dust... there are many videos in youtube.. how to open a laptop.. type your laptop name and search for a particular video...
After that get a laptop cooler.. it is around Rs. 300.. buy a single fan cooler..

Read More

How to turn your cellphone into a credit/debit card


Easy to do mod for an extra credit/debit card with RFID chip (i.e. Paypass).

How to turn your cellphone into a credit/debit card


Using this method, you will be able to locate and extract the RFID chip in your spare
Paypass-capable card and place it in your cellphone. This will allow you to present your cellphone at Paypass terminals (movie theaters, McDonalds, etc..) and pay using the RFID chip.
Step 1: Get your materials


Get your materials


Items needed:
- Spare credit/debit card with embedded RFID chip (if go to your bank and request a new card they will typically send you a new card w/ the same number and info).
- Scissors
- Cellphone
- Magic marker/ Sharpie
Step 2: Find the Chip


Find the ChipFind the Chip

I am using an old, deactivated debit card. I found the RFID chip in a previous card by cutting into it randomly. 
I DO NOT recommend this method if you don't know where the chip is, as you could obviously damage the chip and make it unusable.
I do not know if all cards are setup with the RFID in the same location, but if they are, my guidelines will give you a good idea where to start.

If not, I was able to see the impression of the chip on the back of the card when I looked at it from an angle in a well lit room (it appeared as a small square impression only a few millimeters across).

Make sure to mark out a guideline to cut along that goes from the bottom of the magnetic strip to the top of the imprinted card numbers. This will yield a decent size chunk of the card with the RFID in the center.
Step 3: Cut out the chip


Cut out the chip
 Cut out the chip  Cut out the chip


Be very careful when cutting out the chip.

Less is more!

The initial size may be fine for many people and is small enough to be placed in many cellphones or anything else you can think of. But if you're like me and have an env2 or similarly compact phone you need it a little bit smaller.

Going any further than the initial cutout comes with the risk of damaging the chip.
Consider yourself warned.

When cutting close to the chip you may break the seal around it and the sides may begin to separate.
You DO NOT want this to happen as you want the plastic for insulation around the chip.
Step 4: Place the chip in your phone

Place the chip in your phone   Place the chip in your phone

This last step is pretty self-explanatory.
However, there are two possible ways to go about it.

1. I've found that the easiest way of placing the chip inside the phone is by placing it inside the battery cover.
In the case of my env2 and other compact cellphones, there is very little wiggle room available to place anything extra in the battery compartment. For my phone, I would trim the card more than shown in order to create a lower profile inside the battery compartment.
For others the chip in the size I show here may be more than adequate.

2. This second option is for those are not utilizing their microSD card slots (if available).The plastic around the RFID can usually be trimmed enough so that it is able to fit into a microSD card slot.
I only offer this option as an alternative for those willing and able to do so. Just make sure you can remove the chip from the slot and that there is no way to cause a short while the chip is in the slot.
Step 5: Success

Success

Congratulations!

You now have a fully operational RFID-embedded cellphone.

Read More

How to Interface Arduino with Visual Basic


I have tried VB2 and VB6. It is an easy environment for Hardware Engineers or Hobbyists to program. It means easy to code unlike C++. Programs made with the new VB may not be compact or fast; but as it runs on a Virtual DotNet Machine and is bug-safe and may not hang/boot too. The DotNet was MS answer to Java of Sun. Even Java is a simple language and it seems to be lighter too. DotNet of late has become a bigger download, more than 10 times the size it started with.

MS can try Visual Basic Webapp on the Cloud using HTML5. Even remotely hosted DotNet is better, with the VB Apps as Web Applications using DotNet WebService. Then nothing to download, neither the update or the security fixes. Just provide something like jQuery for DotNet. Web VB would be a better thing for developers.
Its possible, i have collected many WebApps here, Dact Apps – Web Applications for an Engineer or Hobbyist
Arduino is a QuickStart Embedded system, very useful in learning both the hardware and software elements of a system. “http://flakelabs.com/”>Michael of Flakelabs is started using the .Net Micro Framework. This is something like an OS for a
Small HandHeld Device.
4.1 release, the .NET Micro Framework enables developers to create powerful embedded systems that are more securely connected through a variety of wired and wireless protocols. The 4.1 release is also the first release under the Apache 2.0 license.
From what i understand, the developed app can be burned into the device fully, no additional layer of OS or Firmware needed, It is all built in. In short the compiled binary can be either a stand-alone firmware(OS) or be a layer running over a Mobile OS.
Now putting Ardunio and VB together, we get an Hardware/Software Environment that is easy on students and hobbyists too.


Fermata written by Andrew Craigie

Firmata is a generic protocol for communicating with microcontrollers from software on a host computer. It is intended to work with any host computer software package. See more examples ….

Arduino – Simple temperature monitor also see Visual C++ and Arduino

“Then for those that liked Java, He gave the Processing … thenceforward, the Inspired People made many Large Sketches and the Globe Glowed like Warm White LED Lamp”

(Processing is an IDE. It can also be used in Android mode, for that you will need Android SDK Installed.)

See this Steven’s Temperature Display and this Serial Comm using Processing. This compiles Java exe and Jar Applets. It can create programs for Windows, Linux and Mac.
Read More

How to access Pay sites for FREE


When you look for answers in search engines, sometimes when you click on the most relevant answer to a question, you might get your answer from a site that in any other case would have asked you to register or is a pay site.
How did Google index this site and access pay sites? You can be sure that Google did not pay any registration fees to access this content on pay sites. Instead, the webmasters of that particular site let Google in so that they can get more visitors through Search engines such as Google.
When Google needs to index websites, it does through an automatic robot known as the Googlebot which crawls the internet, looking for information to add to the Google database and using Google’s PageRank algorithm, you are returned the most relevant results for your search query and are ranked accordingly based on a number of factors.
So, how to access pay sites?
Well, we are going to disguise our browser as the Googlebot. Every browser such as Mozilla Firefox, Internet Explorer or Opera have a unique signature which identifies them. This is known as the useragent of that browser. For example, if you wish to find out what browser you are using, you can go to DNS Stuff, which will tell you what browser you are using and other information which it extracts using the user agent of your browser.
Access Pay Sites using Mozilla Firefox 
If you are using Internet Explorer, I would highly recommend you download the latest Mozilla Firefox browser which is more secure and much faster.
In Firefox, all we need is a simple extension and import this file (right click and save). You get a list of user agent settings including Googlebot/2.1 and settings for many other spiders/bots.
Once you install the user agent for your browser, close and restart your browser. Go to Tools –> User Agent Switcher –>Options –> Options –> User Agents


Under User Agents, click add and add the following information as shown from below


You are all set now. All you need to do is turn of Javascript in your browser. Go to User Agent Switcher, choose Google Bot, and access Pay sites for FREE using the Mozilla Firefox. If you still did not download Firefox,
Access Pay Sites for free using Opera
Changing the user agent is easy, to do this in Opera you have to uses these settings:
User Agent: Googlebot/2.1 Compatible: Webmaster Help Center
Access Pay sites for free using Internet Explorer 
Internet Explorer users you will need to change the registry entries, to do this open notepad and copy this into it:
Windows Registry Editor Version 5.00 [HKEYLOCALMACHINESOFTWAREMicrosoftWindowsCurrentVer sionInternet Settings5.0User Agent] @=”Googlebot/2.1″ “Compatible”=”+http://www.googlebot.com/bot.html%25E2%2580%259D”
Then save it as ua.reg and double click on it.
To revert the changes back, you will need to do the same but this time copy this in:
Windows Registry Editor Version 5.00 [HKEYLOCALMACHINESOFTWAREMicrosoftWindowsCurrentVer sionInternet Settings5.0User Agent] @=”Mozilla/4.0 (compatible; MSIE 6.0; Windows NT 5.1)”
Save as oua.reg and double click.
To see if it has worked go here and your browser should now be Googlebot v2.1
Read More

How to prevent your pen drive from getting infected with Virus ?


Friends many of your PC/laptop's normally gets virus because of Pen Drives or USB devices (Even PC's who are not connected to network ). Some Virus like Ravmon Virus , Heap41a worm which are not detected by anti virus normally spreads mostly by the Pen Drives . In such a case what can you do to prevent your PC from getting infected with Virus that spreads through USB devices or Pen Drives ?

You can protect your PC by just following the simple steps below . It won't take much time.

* Connect your Pen Drive or USB drive to your computer .
* Now a dialogue window will popup asking you to choose among the options as shown in the figure.


* Don't choose any of them , Just simply click Cancel .
* Now go to Start--> Run and type cmd to open the Command Promt window .
* Now go to My Computer and Check the Drive letter of your USB drive or Pen Drive. ( E.g. If it is written Kingston (I , then I: will be the drive letter .)
* In the Command Window ( cmd ) , type the drive letter: and Hit Enter .
* Now type dir/w/o/a/p and Hit Enter.
* You will get a list of files . In the list , search if anyone of the following do exist .

1. Autorun.inf
2. New Folder.exe
3. Bha.vbs
4. Iexplore.vbs
5. Info.exe
6. New_Folder.exe
7. Ravmon.exe
8. RVHost.exe or any other files with .exe Extension .

* If you find any one of the files above , Run the command attrib -h -r -s -a *.* and Hit Enter.
* Now Delete each File using the following Command del filename ( E.g del autorun.inf ) .
* That's it . Now just scan your USB drive with the anti virus you have to ensure that you made your Pen Drive free of Virus .

Now Unplug your Pen Drive or USB device and Plug it again to your Laptop/PC . Before removing your Pen Drive from others Computer , Don't forget to search for .exe files using the Windows search and remove them .
Read More